
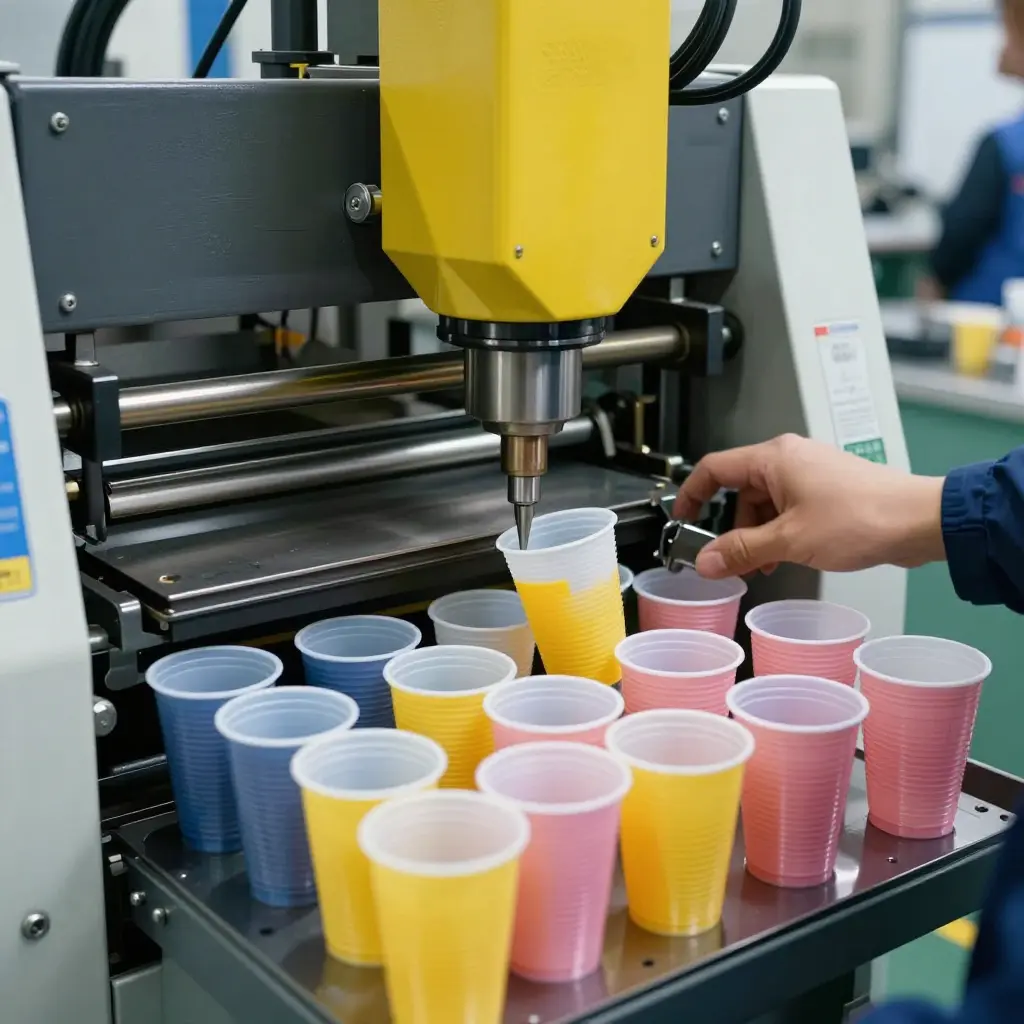
Thermoforming vs Injection Molding: The Core Decision for Thin-Wall PP Cup Production
Thin-wall polypropylene (PP) cups are the default package for food service, beverages, dairy, and takeaway. Quick-service restaurants, cinemas, stadiums, and delivery operators run through millions of them every day. PP is light, stands up to heat, and costs little per unit, which is why demand keeps rising. For manufacturers and investors commissioning new capacity, the choice of an industrial disposable plastic cups making machine is a capital decision, not a repeat purchase.
The technical fork is thermoforming vs injection molding. The two processes sit at different points on tooling investment, cycle speed, achievable wall thickness, and long-run unit cost. Buy capacity before you understand those differences and you risk a line that cannot make the cups your market actually buys.
Four questions decide the purchase, and this article works through them in order:
- Technology – how each process shapes, forms, and finishes a thin-wall cup
- Cost – tooling, capital outlay, and per-unit expense across production volumes
- Efficiency – cycle time, output rates, and energy consumption
- Product quality – wall consistency, rigidity, clarity, and seal performance
How Thermoforming Shapes Thin-Wall PP Cups
Most high-volume thin-wall PP cups are thermoformed. The process turns flat polypropylene sheet into finished cups through a short, repeatable cycle of heating, forming, and trimming, which keeps output high and tooling cheap.
Step 1 – Sheet Feeding: Inline Extrusion or Pre-Made Roll
Material arrives either as sheet extruded inline or as pre-made PP sheet on a roll.
- Inline extrusion: a single-screw extruder plasticates PP pellets into sheet directly ahead of the former, which cuts handling and gives the tightest thickness control.
- Pre-made sheet: rolled PP sheet is unwound and indexed into the machine, a setup that suits shorter runs or frequent grade changes.
Step 2 – Heating into the Forming Window
The sheet passes through a radiant (often ceramic or quartz) heater bank until it reaches PP’s forming window of roughly 140-160 C. At that point the polymer is soft and rubbery but not molten, so it stretches without tearing. The heat has to be even: a cold patch tears, a hot patch sags.
Step 3 – Vacuum/Pressure Forming into a Multi-Cavity Mold
The heated sheet is clamped over a multi-cavity mold, and vacuum from below combined with positive air pressure from above pulls and pushes material into every cup cavity. Plug-assist tooling pre-stretches the sheet for more even wall distribution. Throughput comes from the stroke: one forming pass fills every cavity at once.
Step 4 – Trimming and Stacking
A trim station punches or shears each cup free of the web, usually at the rim, and a stacking unit nests, counts, and prepares them for packing. The leftover skeletal web is reground and fed back to the extruder.
Wall Thickness, Cycle Times, and Cavity Count
| Parameter | Typical Range |
|---|---|
| Wall thickness | 0.3 – 0.8 mm (thin-wall < 1 mm) |
| Forming temperature | 140 – 160 C |
| Cycle time per mold cycle | 4 – 10 seconds |
| Cavities per mold | 12 – 64 |
| Line output | ~20,000 – 100,000+ cups/hour |
Cavity count sets output. One forming stroke makes as many cups as the mold has cavities, so a 48-cavity tool produces roughly three times as much per cycle as a 16-cavity tool at the same cycle time. How far you can push cavity count depends on how evenly the sheet heats and how precisely the trim station cuts.
Key process characteristics:
- Continuous, indexed line flow from sheet feed to stacked cups.
- Low tooling cost – lightweight aluminum forming molds instead of hardened steel.
- Multi-cavity productivity that scales output per stroke.
- Reliable thin walls down to about 0.3 mm.
- A narrow processing window, since PP’s low melt strength demands tight temperature control.
How High-Impact and Talc-Filled PP Behave
Not every PP grade forms the same way. High-impact PP (impact copolymer with a rubbery dispersed phase) is tougher and more ductile, tolerating stretching and resisting impact cracking, but it can sag more at forming temperature and is slightly harder to trim cleanly. Talc-filled PP (typically 10-30% talc) raises stiffness and thermal conductivity, so the sheet heats faster, sags less, and holds tighter dimensional tolerances; its lower elongation, however, makes it more prone to tearing at sharp radii and generates more abrasive trim dust. For demanding thin-wall cups, machine parameters are tuned to the specific grade.
If you are comparing forming lines, this process is the baseline against which everything else gets measured. Explore thermoforming cup-making equipment here.
Thermoforming vs Injection Molding for Thin-Wall PP Cups
Both processes turn PP resin into cups. The table below compares the numbers that usually decide the question: production scale, budget, and product specification.
| Comparison Metric | Thermoforming | Injection Molding |
|---|---|---|
| Wall thickness capability | 0.3-1.0 mm, ultra-thin achievable | 0.4-2.0 mm, thicker and more uniform |
| Cycle time per cavity | 3-8 seconds | 8-20 seconds |
| Tooling cost | Lower, roughly USD 8k-30k per mold | Higher, roughly USD 30k-150k+ per mold |
| Tooling lead time | 4-8 weeks | 10-20 weeks |
| Machine capital cost | Lower, roughly USD 80k-300k | Higher, roughly USD 250k-800k |
| Energy consumption per 1,000 cups | Lower, about 1.5-3 kWh | Higher, about 4-8 kWh |
| Scrap/reclaim rate | 5-15%, easily reground | 1-5%, more stable and consistent |
| Decoration/printing options | In-mold labeling limited; post-print common | In-mold labeling and in-mold decoration easier |
| Mold changeover time | 30-90 minutes | 2-6 hours |
| Typical output per hour | 30,000-100,000 cups | 10,000-50,000 cups |
Thermoforming’s advantages are cheaper tooling, faster changeovers, and thin-wall runs at volume. Injection molding wins on dimensional precision, scrap rate, and in-mold decoration. Which column matters more depends on your production scale and the cups you sell. For a wider look at how these decisions play into full turnkey lines, see our guide to industrial disposable plastic cup making machines.
Cost Economics: Thermoforming vs Injection Molding for Thin-Wall PP Cups
A total cost of ownership (TCO) comparison comes down to how each process splits costs between fixed and variable. Thermoforming keeps fixed costs low and leaves the cost per cup higher. Injection molding demands heavy upfront spending on tooling and machinery, then drives incremental cost per unit down once it runs at speed. For any disposable plastic cups making machine, annual volume decides which cost structure works in your favor.
The Main Cost Drivers
Seven cost drivers decide the equation:
- Tooling investment – thermoform molds cost a few thousand to tens of thousands of dollars; injection molds for thin-wall PP cups cost several times more and take longer to build and validate.
- Machine price – high-tonnage injection molding machines with hot runners and fast-cycling robotics cost materially more than comparably rated thermoforming lines.
- Resin cost per cup – both processes use similar PP weights, but injection molding holds more consistent, slightly thinner walls, which trims grams of material per cup.
- Energy cost – injection molding consumes more energy per cycle; thermoforming uses less energy but heats the entire sheet.
- Labor – thermoform lines typically need more manual handling and trimming; injection systems run with greater automation.
- Maintenance – injection molds and machines carry higher servicing and replacement-part costs over their life.
- Scrap loss – start-up scrap and trim waste are higher in thermoforming; injection produces less trim but carries costlier tooling-correction risk.
How Volume Shifts the Break-Even
Below roughly 1-2 million cups a year, thermoforming wins decisively. Tooling and machine costs are small enough to amortize quickly, and that fixed-cost advantage outweighs the higher variable cost per cup. Short runs, custom shapes, and high-mix product lines belong here.
As volume climbs, the economics invert. Injection molding’s high fixed costs spread over millions of units while its lower per-cup conversion cost compounds. Past a break-even threshold of roughly 4 million cups per year, injection molding delivers the lowest total cost per cup and the most stable unit economics.
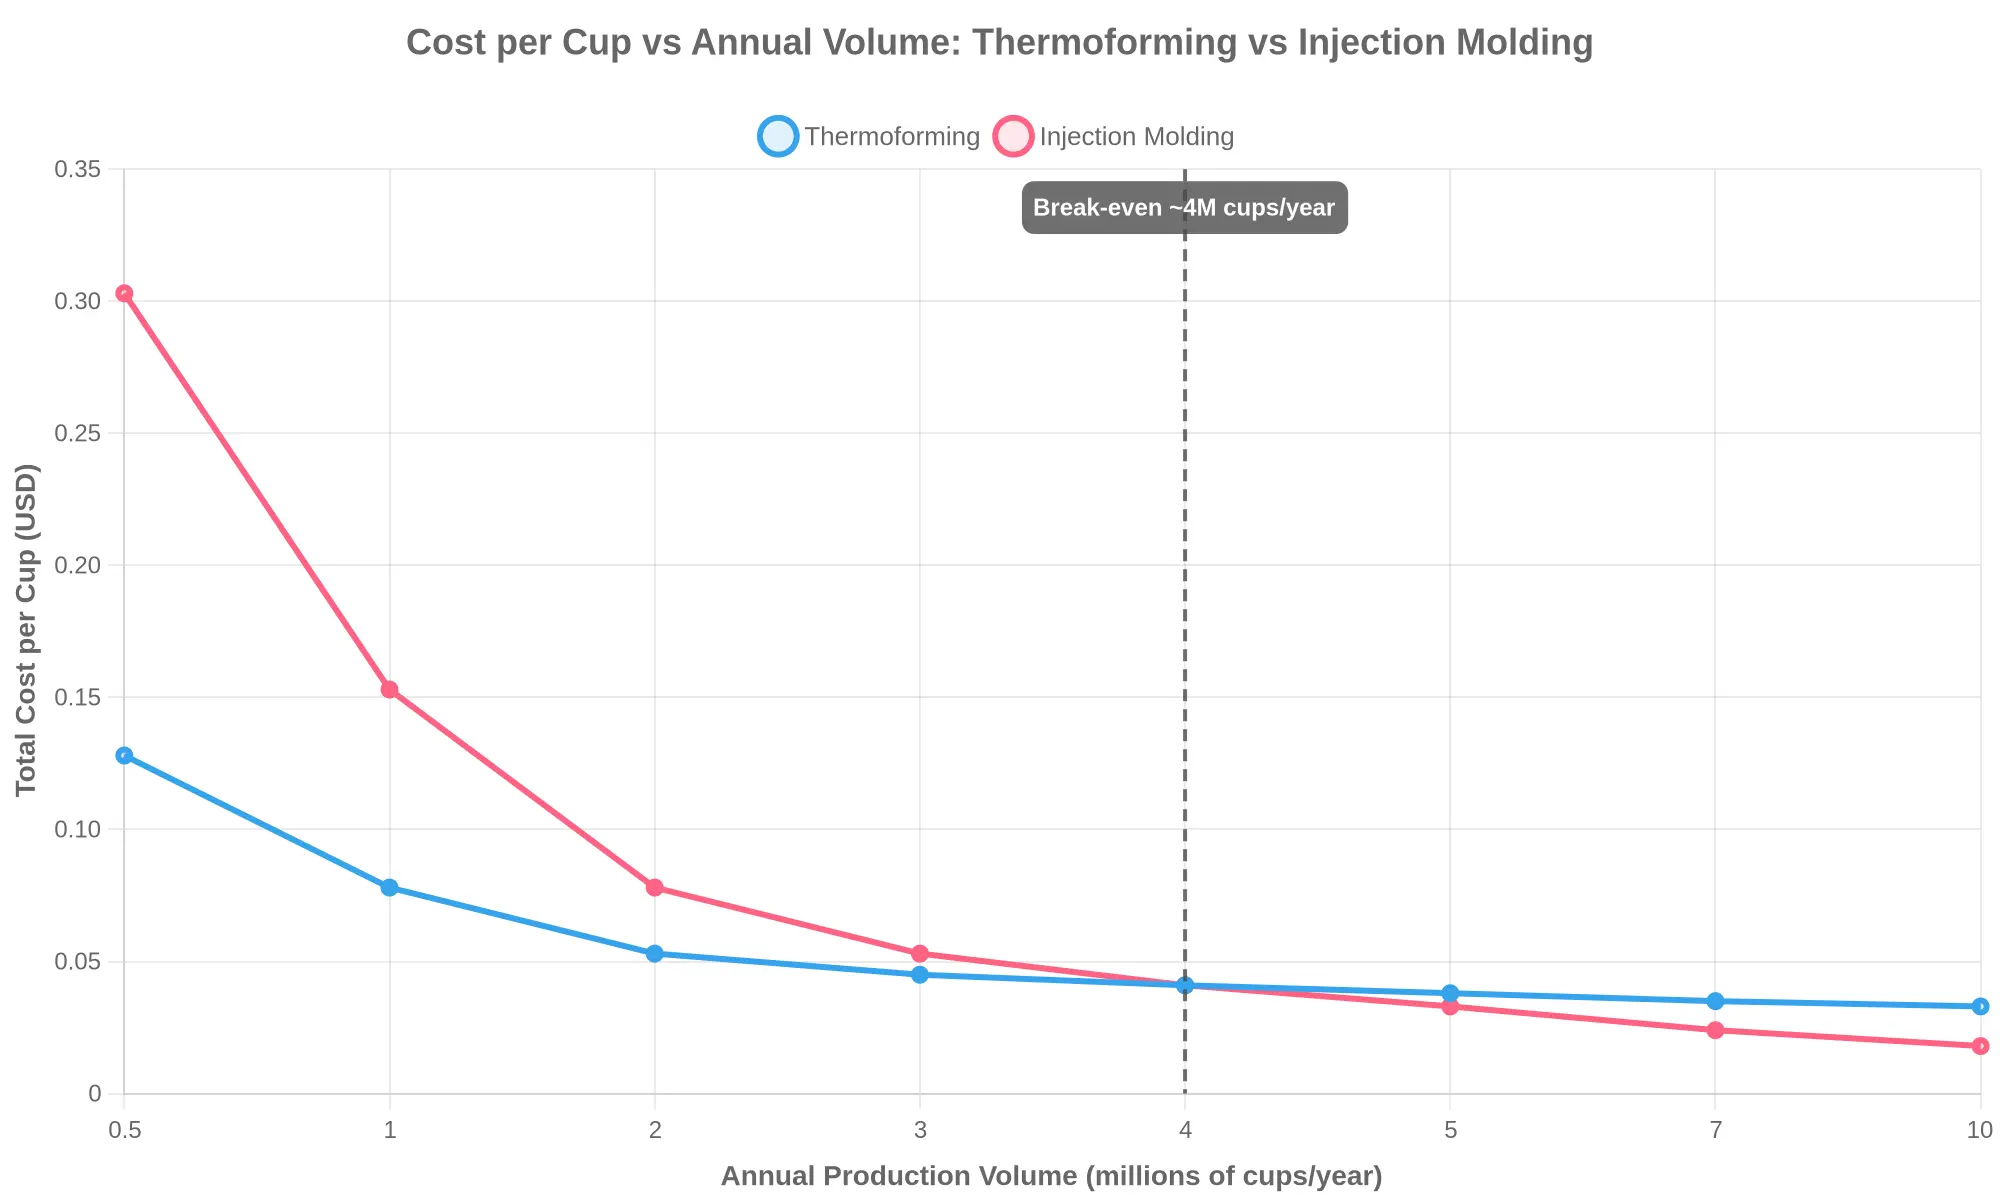
Thermoforming wins below the break-even point, where volumes are low and product mixes are wide. Injection molding becomes the lower unit-cost choice once annual volume passes a few million cups.
Below the threshold, thermoforming buys flexibility and low risk. Above it, injection molding buys scale and lower unit cost.
Production Economics: Thermoforming vs Injection Molding
This chart compares the two processes on four measurable cost drivers at a defined annual volume of 5,000,000 cups.
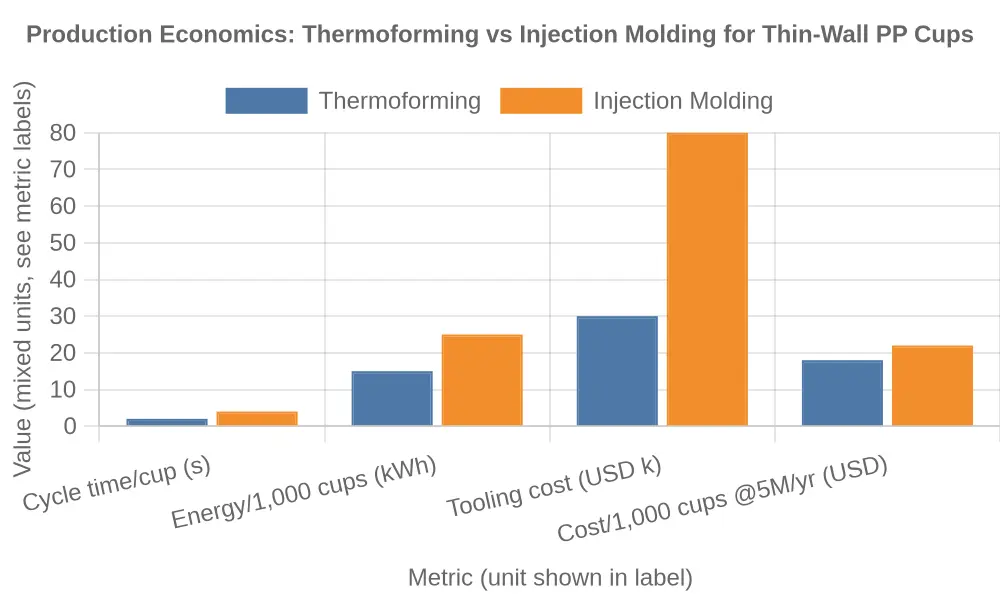
Thermoforming leads on every metric the chart measures, most sharply on tooling cost and cycle time. At steady high volume, injection molding narrows the gap to a few dollars per thousand cups. The industrial disposable plastic cups making machine comparison covers these trade-offs in more detail.
Process Flow: Two Routes to a Thin-Wall PP Cup
The two routes build a cup in fundamentally different ways. The schematic below sets them side by side, from raw material to finished, stacked product.
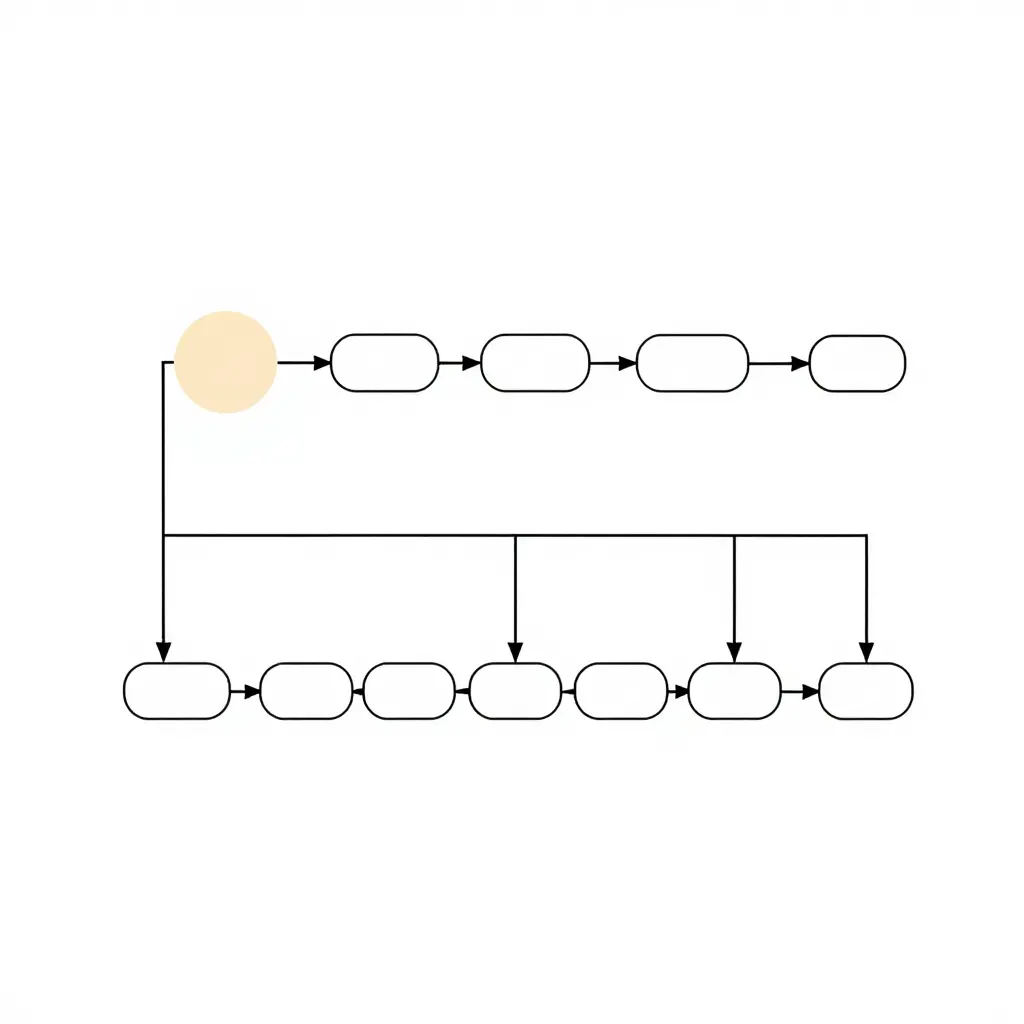
Figure: A side-by-side process flow contrasting the sequential stages of each cup-making method, from material feed through to final stacking.
Route A – Thermoforming. The process starts with PP sheet that is unwound and indexed through the machine. The sheet is heated until it becomes soft and pliable, then formed over a mold cavity under vacuum or pressure. A trimming station cuts the individual cups from the web, and the finished parts are stacked for packing.
Route B – Injection molding. Here the raw material is PP pellets instead of sheet. The pellets are melted in a heated barrel, then injected at high pressure into a closed mold. The part cools inside the mold until rigid, is ejected by the tooling, and finally stacked downstream.
The structural difference is simple: thermoforming shapes a pre-made flat sheet along a near-continuous line, while injection molding builds each cup from molten resin in discrete cycles. Nearly every downstream trade-off in speed, tooling cost, and wall-thickness control follows from that. If you want a deeper breakdown of how these machines are specified on the factory floor, explore this guide to the industrial disposable plastic cups making machine.
Buyer’s Decision Criteria for Selecting a Cup-Making Machine
Eight criteria are worth checking before you commit capital. Each one affects output, cost per cup, and how easily the line adapts later.
-
Target annual output. Define your required cycle rate (cups per hour) and annual volume, then confirm the machine’s rated capacity exceeds it by a 15-20 percent margin for maintenance and changeover downtime. Undersized equipment forces premature reinvestment; oversized equipment inflates capital cost and energy draw.
-
Desired wall thickness and cup format. Specify target wall thickness (thin-wall PP typically runs 0.3-0.7 mm) and the full range of cup diameters, depths, and rim designs you intend to produce. Wall thickness governs mold pressure, cooling time, and whether thermoforming or injection molding is the correct platform for an industrial disposable plastic cups making machine.
-
Available floor space and power supply. Map the machine footprint together with ancillary needs such as resin dryers, chillers, compressors, and stacking or packing lines. Verify incoming power voltage, phase, and total connected load against the machine’s nameplate demand before finalizing placement.
-
Tooling budget and changeover flexibility. Price the tooling set required for each cup format, and establish how many tools you need to run in rotation. Assess mold-change time, quick-release clamping, and whether the platform supports multiple cavities or stacked molds without new capital expenditure.
-
Resin grade compatibility. Confirm the machine handles your intended grades, whether virgin thin-wall PP homopolymer, impact copolymer, or regrind blends. Verify melt-flow-index tolerances and plasticizing capacity so the screw and barrel can process your chosen resin without degradation.
-
Decoration needs. Determine whether the market requires in-mold labeling, dry-offset printing, or wraparound sleeve application. Integrated IML capability adds cost but eliminates secondary handling, while offline printing keeps the machine simpler and less expensive.
-
Service and spare-parts support. Evaluate the supplier’s response time, regional technician availability, and documented spare-parts inventory. Ask for guaranteed lead times on critical components such as heaters, molds, and hydraulic units, since unplanned downtime directly erodes your cost-per-cup advantage.
-
Total cost of ownership modeling. Build a five-year model that combines purchase price, installation, energy consumption, labor, resin yield and scrap rate, maintenance, and tooling replacement. Compare cumulative cost per thousand cups across candidate machines rather than comparing sticker prices in isolation.
Efficiency, Throughput, and Scalability: Thermoforming vs. Injection Molding
Raw output is where the two processes diverge most sharply. Thermoforming feeds a continuous roll of PP sheet through a heated oven and a multi-station forming tool, so throughput scales with sheet width rather than with discrete shots. A modern industrial disposable plastic cups making machine running thin-wall PP cups typically reaches 40,000-70,000 cups per hour, with cycle times of 3-6 seconds, depending on cavity count and sheet width. Injection molding instead produces a fixed number of cups per shot, so a 16-cavity mold on a 5-second cycle yields roughly 11,500 cups per hour.
That gap produces two different scaling models. Thermoforming scales horizontally: widen the sheet, add forming stations, and output climbs almost linearly at low tooling cost per station. Injection molding scales by adding cavities. Going from 8 to 32 cavities roughly quadruples hourly output, but it needs a larger press, higher clamp tonnage, balanced hot-runner melt delivery, and tighter process control.
Downtime behaves differently too. Thermoforming stoppages usually trace to sheet-feed jams, heater drift, or trim-tool wear, and most clear in minutes. Injection molding absorbs longer changeovers when swapping molds, plus more frequent purging and maintenance on hot runners and ejector systems. A high-cavity mold change can consume hours, which hurts short-run SKUs.
Automation narrows the gap. Robotic take-out arms, inline stacking, and integrated packaging raise overall line efficiency on both platforms by removing manual handling, cutting scrap, and holding cycle-to-cycle timing steady. On fast injection lines these systems are effectively mandatory, since human hands cannot keep pace with the cycle.
Efficiency levers worth optimizing:
- Higher mold cavity count (molding) or more forming stations (thermoforming)
- Wider sheet width and faster index cycles for thermoforming
- Robotic take-out to eliminate manual part handling
- Inline stacking and automated packaging to stabilize cycle times and cut scrap
- Preventive maintenance on heaters, hot runners, and trim tools to shrink downtime
So: choose thermoforming for high-volume, single-shape disposable plastic cup manufacturing where speed and the lowest unit cost dominate. Choose injection molding when you need thicker walls, tighter dimensional tolerances, and premium reusable-quality cups. For most high-volume thin-wall PP cups, thermoforming combined with automation wins on throughput per dollar.
Thin-Wall PP Material Considerations
Thin-wall PP cups need materials engineered for high flow, stiffness, and fast cycle times. The grade and additive package you choose determines whether a cup runs cleanly through injection molding or thermoforming, and whether it holds its shape on the shelf.
Homopolymer vs. copolymer. Homopolymer PP delivers higher stiffness, greater heat resistance, and cleaner crystallization, which makes it the default for rigid, stackable cups. Copolymer grades (random or impact-modified) trade some stiffness for toughness, improving drop resistance and reducing brittleness at the ultra-thin walls typical of lightweight cups. For cold-fill or handling-abusive applications, a clarified random copolymer is often the better compromise.
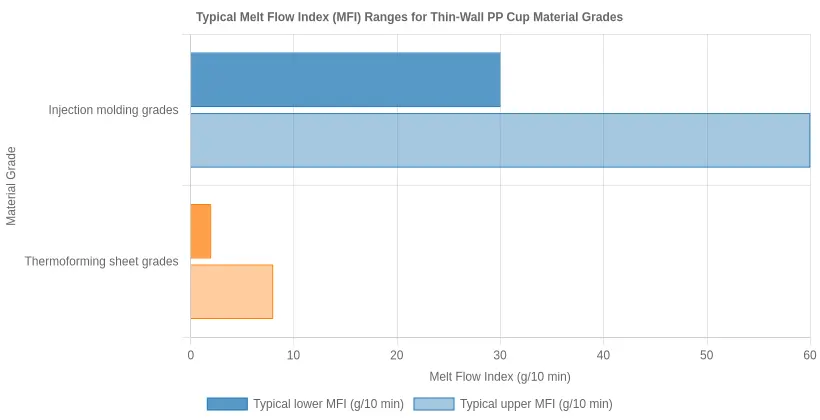
Melt flow index (MFI). Injection molding of thin-wall PP cups relies on high-MFI grades, typically 30 to 60 g/10 min, so the melt fills long, narrow cavities before it freezes off. Thermoforming starts from extruded sheet, so the sheet grade needs a much lower MFI, often 2 to 8 g/10 min, with tight batch-to-batch consistency for uniform wall thickness.
Nucleating agents. Nucleating agents accelerate crystallization, shortening cycle times while boosting stiffness and clarity. In injection molding, faster crystallization trims cooling time and improves demolding; in thermoforming, it raises sheet rigidity and reduces sag during the heating stage.
The role of regrind. Reintroducing clean, sorted regrind lowers resin cost, but it degrades MFI consistency and optical clarity. Keep regrind ratios controlled and avoid mixing homopolymer with copolymer scrap, which can shift flow behavior and cause warping or inconsistent walls.
Material selection factors
- MFI matched to the process: high (30-60) for injection molding, low and stable (2-8) for sheet.
- Homopolymer for stiffness and heat resistance; copolymer for impact toughness.
- Nucleating agents to speed crystallization and improve clarity.
- Controlled, single-polymer regrind ratios to protect flow and appearance.
- Additive package (antistatic, slip, UV) tuned to the specific end-use.
For a broader look at how these material choices translate into finished packaging, see this guide on plastic food containers.
Cup Wall Cross-Section: Thermoformed vs. Injection Molded PP
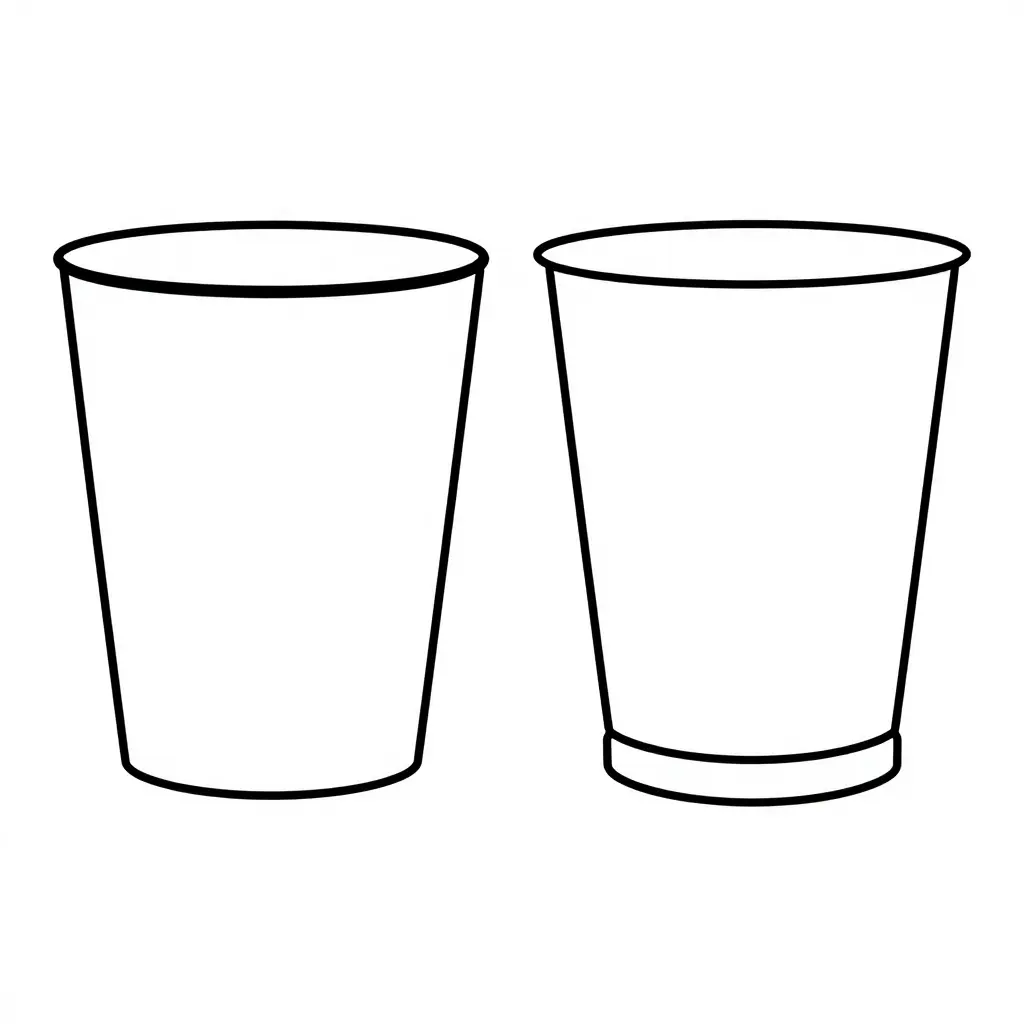
Figure: Wall-profile comparison of a thermoformed (left) and injection molded (right) thin-wall PP cup.
Thermoforming stretches material down from a flat sheet. The result is a near-uniform, very thin wall (often around 0.3-0.6 mm), a sharply rolled flange, and a base that thins as it stretches. Injection molding fills the cavity under pressure at a set thickness, so the wall is more uniform but noticeably thicker, the rim is sturdier, and the base carries extra material placed there for rigidity and stacking strength.
FAQ: Thermoforming vs Injection Molding for Thin-Wall PP Cups
Which process is cheaper for low production volumes?
Thermoforming is usually the cheaper route at low volume. Its molds are simpler and less expensive than injection tooling, so the initial investment is smaller. That matters most when order volumes are modest and you want to reach market quickly.
Which process produces stronger rims?
Injection molding produces stronger, more precise rims. Molten PP fills the mold under high pressure, creating uniform wall thickness and rigidity. Thermoformed rims are thinner and more flexible. For premium snap-fit lids, injection-molded rims generally outperform thermoformed ones.
Can one machine produce multiple cup sizes?
Both processes can run more than one cup size, but each size change needs different tooling. Thermoforming swaps interchangeable forming molds; injection molding needs a separate precision mold for every format. The industrial disposable plastic cups making machine can handle several sizes, though each changeover adds setup time.
What is the typical payback period for each process?
Thermoforming lines often pay back in twelve to eighteen months because of lower tooling cost and faster setup. Injection molding typically needs eighteen to thirty months, reflecting higher mold investment, but it delivers lower per-unit cost at very high volumes.
Can recycled PP be used?
Both processes accept recycled PP, including food-grade rPP. Injection molding tolerates higher regrind percentages with consistent melt quality. Thermoforming handles recycled PP well but requires tighter control of sheet quality and contamination to avoid weak spots in the finished cups.
Which method suits thin-wall PP cups best?
Thermoforming suits thin-wall PP cups best. It produces very thin walls economically, which is ideal for single-use drinking cups where low weight and high speed matter. Injection molding suits thicker, rigid, premium cups that need precise rims and lids.
Conclusion and Purchasing Recommendation
Choosing between thermoforming and injection molding for your cup line comes down to four variables: cost, efficiency, product quality, and scalability. Weigh them against your real order book.
When the cups are standard thin-wall single-use items, thermoforming is the stronger fit at high volume. Thin-wall injection molding earns its place when dimensional accuracy and rim consistency are the priority: multi-cavity tooling runs at fast cycle times, holds consistent wall thickness and dimensional accuracy, and keeps reject rates low. The catch is higher upfront tooling investment, so it only pays off when volumes stay large and steady.
For operations that prize flexibility, lower volumes, or lower tooling cost, thermoforming is the practical pick. Molds are cheaper, changeovers are quicker, and it is far easier to trial new cup sizes or niche designs without heavy capital outlay. It also lets regional producers scale up in stages as demand grows.
Final Recommendations
- High-volume, tolerance-critical thin-wall PP cups: go with thin-wall injection molding, and lock in long-run contracts to justify the tooling spend.
- Flexible output, frequent new SKUs, or tighter budgets: choose thermoforming to keep tooling and changeover costs down.
- Map your target volume, wall-thickness tolerance, and unit-cost ceiling before you compare quotes on any industrial disposable plastic cups making machine.
- Prioritize suppliers with proven thin-wall experience, reliable spare-parts support, and responsive service.
Before you invest, review a disposable plastic cup manufacturer guide to benchmark suppliers, and consult a plastic food containers guide if your line will also run containers.
Thin-wall PP cup demand should keep climbing as food delivery, takeaway beverages, and grab-and-go culture expand worldwide. Whichever process you choose, build capacity and quality control that can scale with that growth.