
What this guide answers
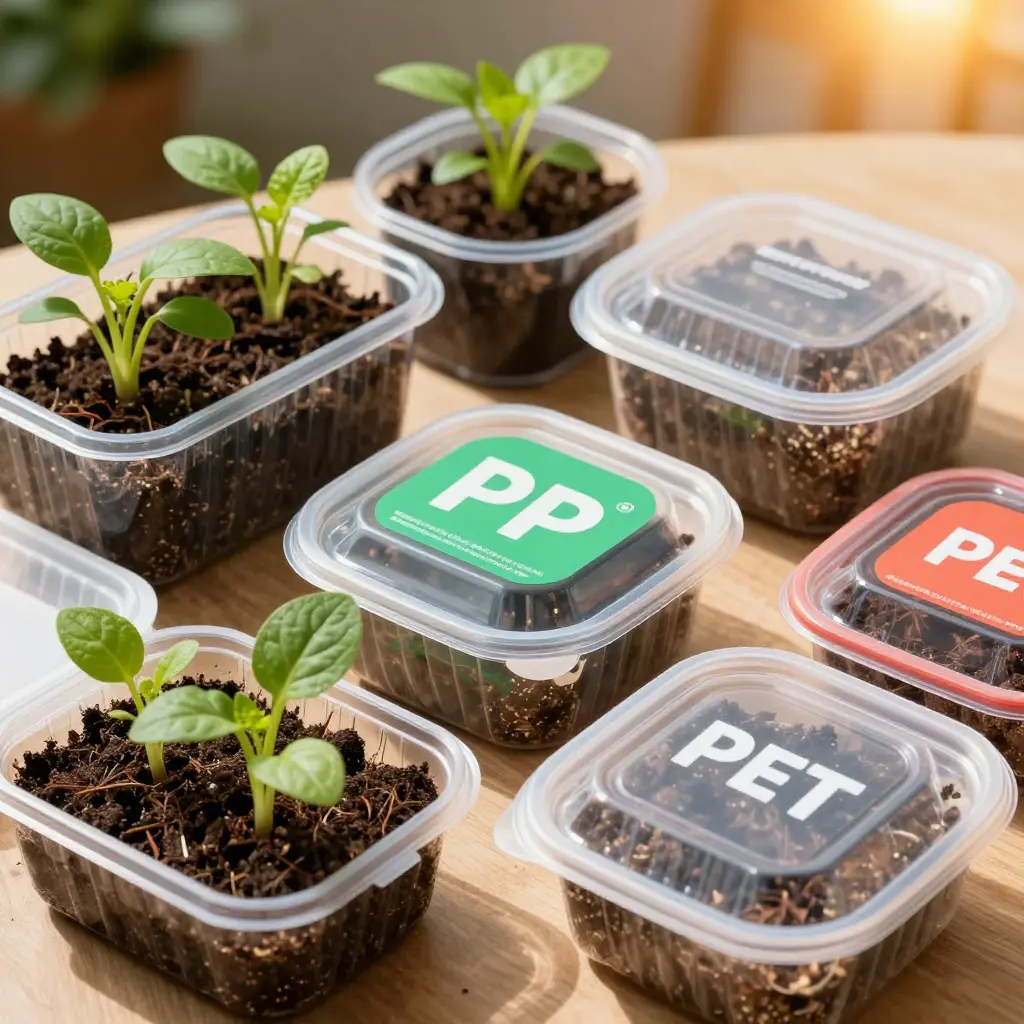
Takeout containers come back from service by the thousand. Some shops stack them, some hand them to staff for seed starting, and sooner or later someone asks procurement whether the PP tubs or the PET cups are the safer bet once soil and sunlight are in the picture. This article answers that narrower question: which of the two resins tolerates being filled with damp potting mix and parked on a sunny sill. It is written for bubble tea shops, restaurants, food trucks, caterers, and event and procurement teams who already own the containers.
You will get a verdict on resin type, the checks to run before a container gets a second life, and a packaging shortlist you can send to a supplier. Along the way: what each resin does when it is buried, scratched, or left out on a patio, why wall thickness and lid fit often decide the outcome before the resin label does, and where plant-fiber food containers fit as a lower-risk option for edible plantings.
PP vs PET: what each plastic actually is
Both resins are food-grade, both end up in the same takeout drawer, and they part company as soon as heat, light and washing enter the picture.
PP (resin code 5) is a semi-crystalline polymer. The ordered regions in it keep the material stiff well past the point where PET has already gone soft, which is why rigid PP tubs and lids survive hot fills, repeated washing and warm storage. PP is translucent to opaque, slightly flexible, and scuffs show up less than they do on clear plastic. Containers sold as microwave-safe are usually PP, though the rating comes from the manufacturer’s testing rather than from the resin code alone.
PET (resin code 1) is a clear, rigid polyester. The transparent molded cups used for iced coffee, bubble tea and smoothies are PET, chosen for clarity and built for a single trip. It looks close to glass and shows a drink clearly, but the surface scuffs, and the cup softens at temperatures a PP tub shrugs off.
Three differences matter at the purchasing stage:
- Stiffness: PET feels stiffer in the hand and cracks under impact; PP flexes and recovers.
- Transparency: PET is glass-clear; PP runs from frosted to fully opaque.
- Scuffing: scuffs on clear PET are impossible to miss, and on frosted PP they blend in. The plastic has not survived better – you simply cannot see the damage.
| Property | PP (code 5) | PET (code 1) |
|---|---|---|
| Structure | Semi-crystalline | Clear polyester |
| Comfortable heat range | Up to roughly 100-120 C | Up to roughly 60-70 C |
| Appearance | Frosted to opaque | Glass-clear |
| Feel | Tough, flexible | Rigid, brittle on impact |
| Washing | Tolerates repeated washing | Designed for single use |
Why heat history matters
A container that has already been through a hot fill or a hot drink has spent part of its thermal margin. The polymer has been stressed, and the cup often comes back slightly distorted, clouded, or thinner at the base. A second heat load – greenhouse sun, a hot delivery van, a stack of tubs against a wall – pushes a weakened wall further. That is why a used hot-drink PET cup makes a poor planter, while a PP tub usually still has straight walls and its original shape.
If you are weighing plastic against fiber for the same job, compare plant-based food containers side by side before you lock in a supplier.
Heat and mechanical tolerance: PP vs PET side by side
The useful question for a planter is not which plastic is stronger in the abstract. It is which one keeps its shape and its strength through heat, sunlight and repeated washing. The chart below compares polypropylene (PP) and polyethylene terephthalate (PET) on melting and heat deflection temperature, top continuous service temperature, rigidity, and impact resistance after repeated wash cycles.
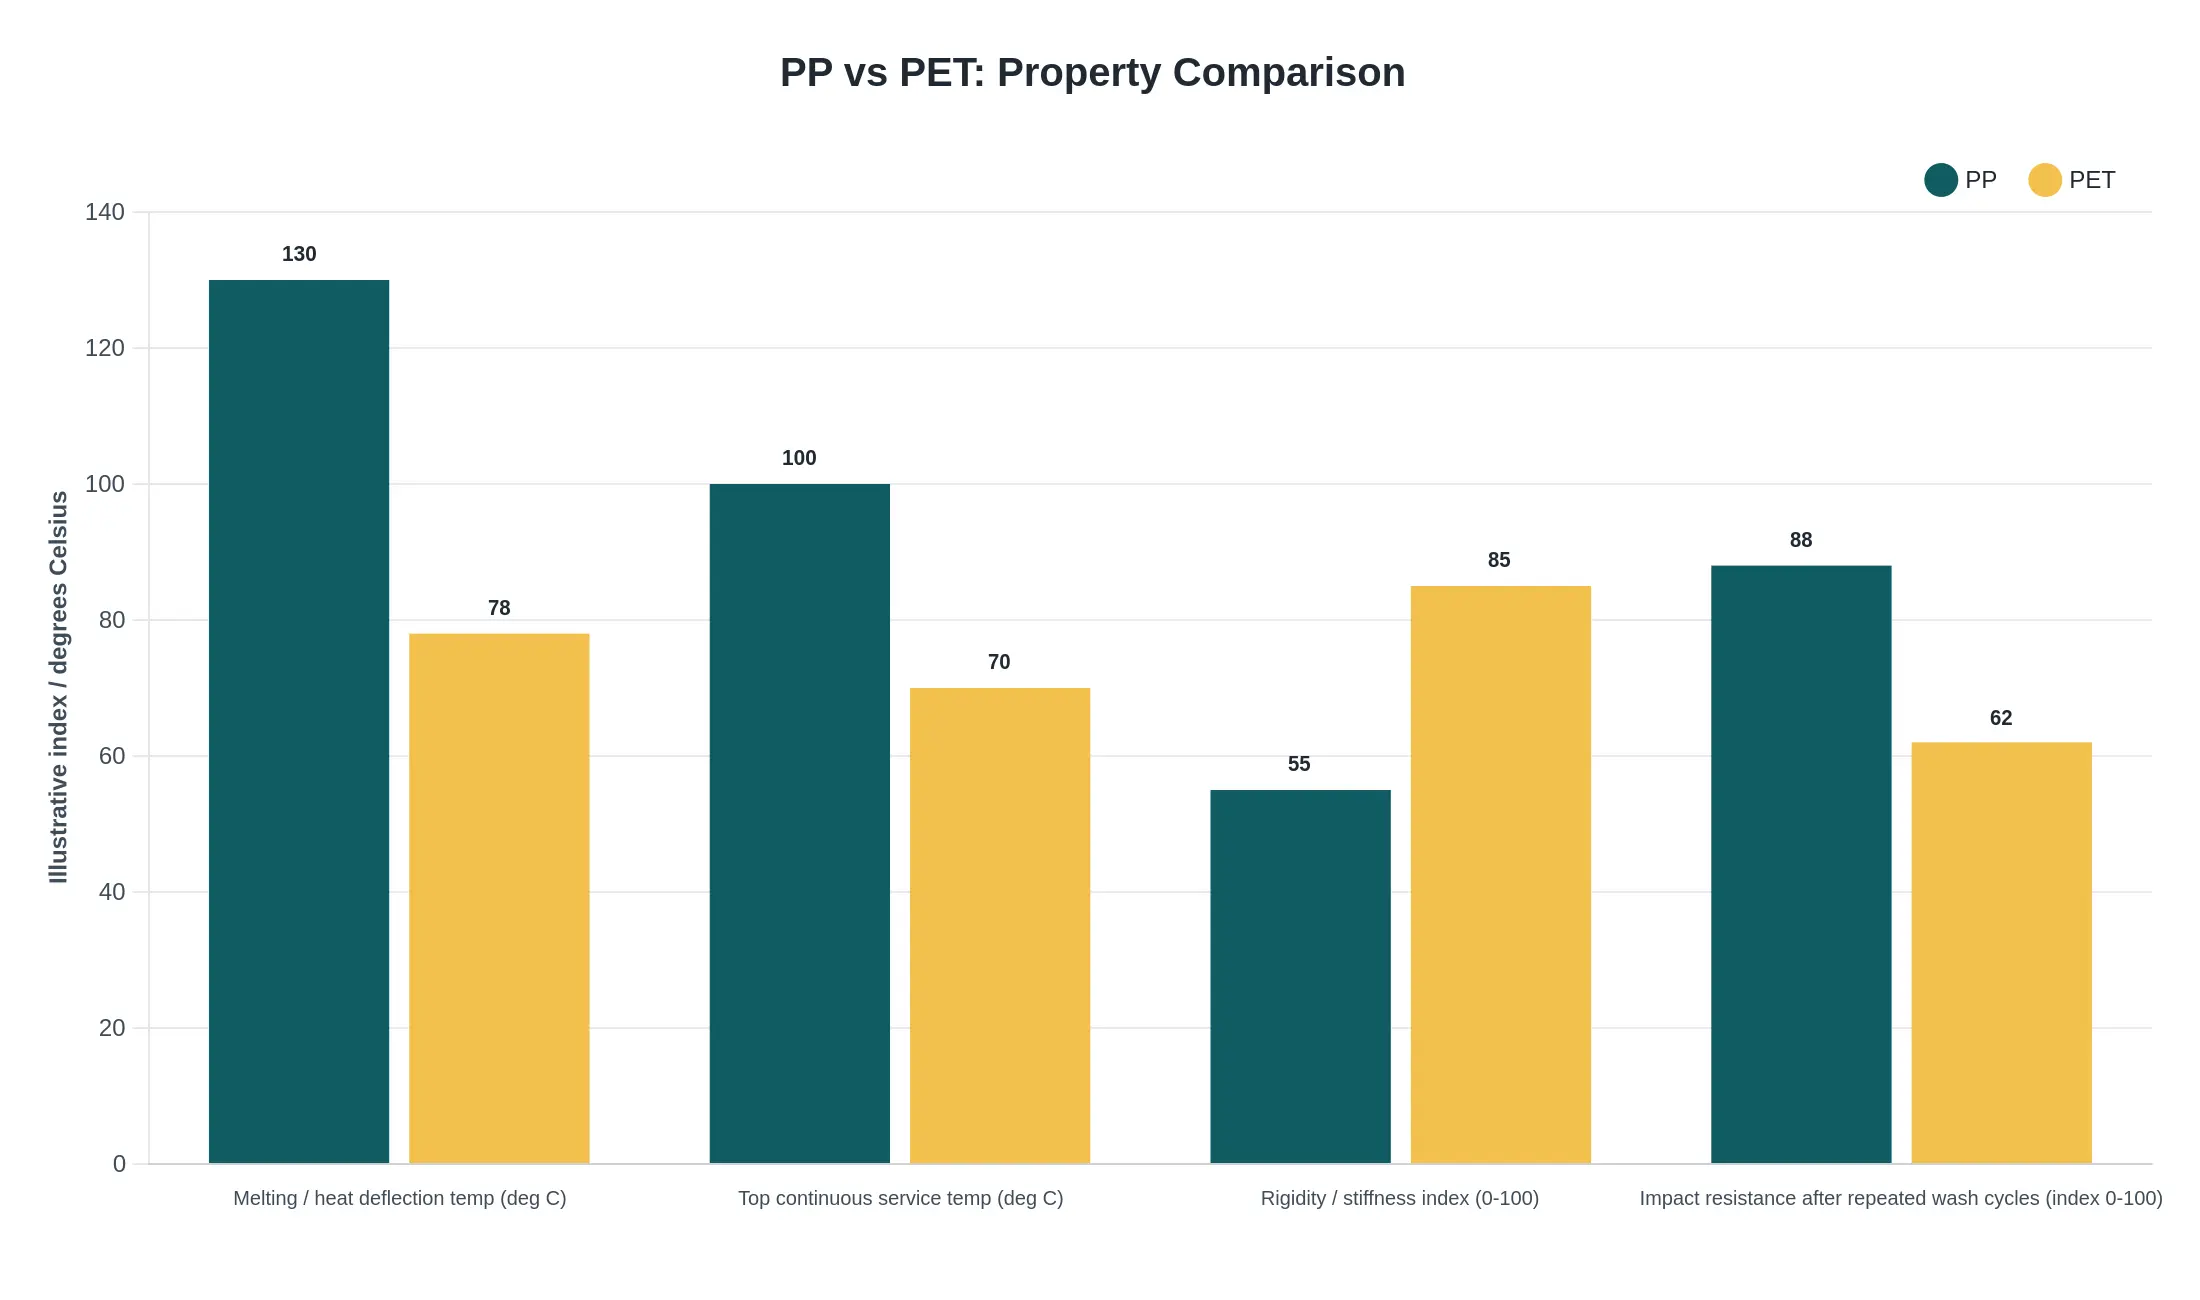
Figure: Illustrative comparison of PP and PET takeout containers across four heat and mechanical attributes. Values are indexed or rounded representative figures drawn from typical published material data, not the results of our own laboratory testing. Actual performance will vary with wall thickness, resin grade, colourants, UV stabilisers and the conditions of use.
One number on that chart needs a caveat, because it is the one people misread. PET actually melts higher than PP – around 250 C against roughly 165 C – and that figure gets quoted as proof that PET is the heat-resistant material. It is not, for this job. Melting point describes when a crystal lattice collapses, and a planter never gets near it. What matters is where a material stops being stiff, and PET crosses that line near 70 C, while PP holds its shape to about 100 C. A PET cup on a sunny sill warps at temperatures that leave a PP tub unaffected, even though the PET would need a much hotter day to melt at all.
PP also wins the handling test. Knock it and it flexes and comes back; knock PET and it cracks, and the crack runs. PET’s advantage is rigidity, which is why it feels crisp and holds a sharp shape straight out of the box, and that same rigidity is why it fails suddenly instead of bending. For a container sitting in warm sun for weeks, the temperature at which it goes soft matters far more than the temperature at which it melts.
How sunlight exposure changes plastic takeout containers
Put a plastic tub on a sunny sill and the clock starts. Ultraviolet energy breaks the long polymer chains that give plastic its strength, a process called photodegradation, and every chain break leaves the material a little less forgiving. The first signs are cosmetic: a dull, chalky bloom where degraded polymer has risen to the surface and oxidised, colours fading or shifting toward yellow, hairline micro-cracks that trap dirt and moisture. Then embrittlement sets in. A tub that once flexed when you squeezed it starts to split along the rim or crack at the base, usually right where soil pressure and water weight are already working.
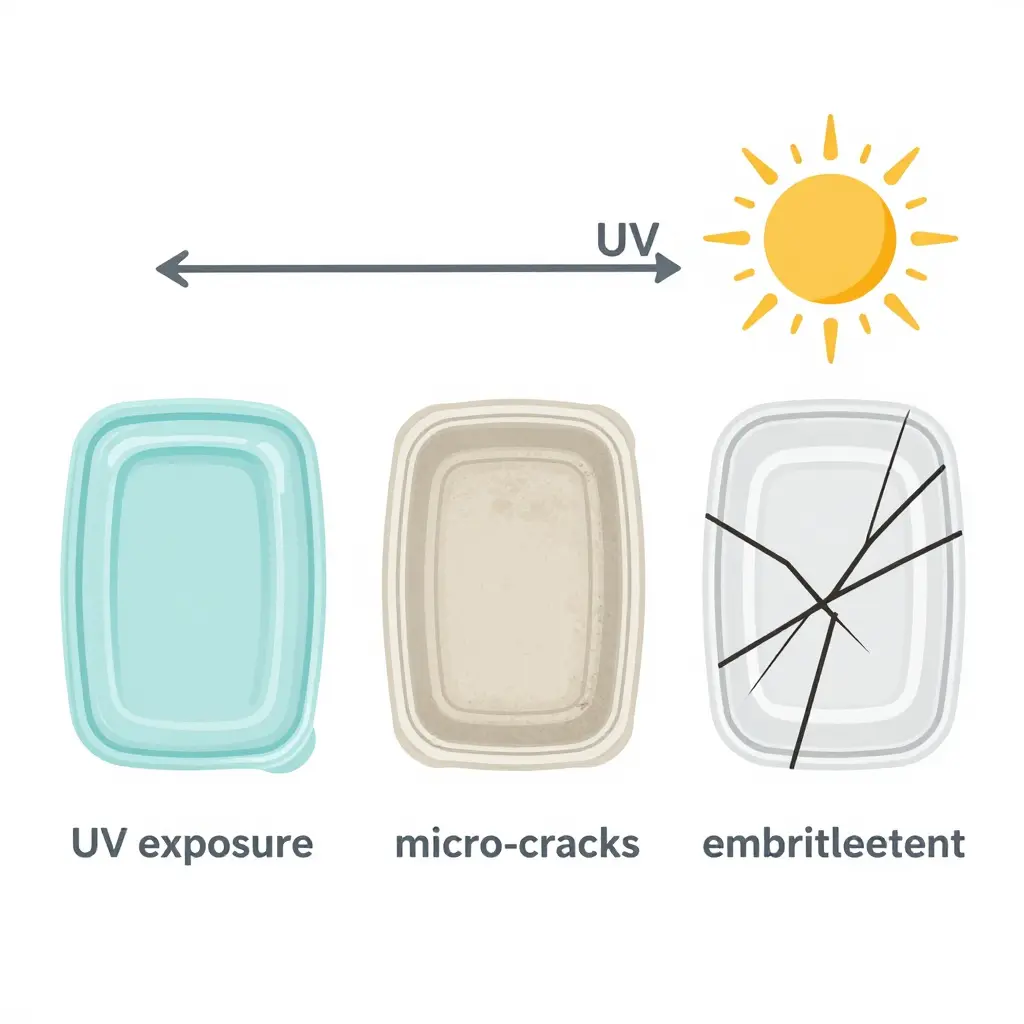
Plastics do not all weather at the same speed. Clear PET blocks short-wave UV but passes much of the longer-wave UVA, so damage accumulates through the wall rather than sitting on the surface; on a bright sill, a thin clear cup can embrittle inside one growing season. Pigmented polypropylene lasts longer. Carbon black and titanium dioxide absorb or scatter UV before it reaches the polymer, and a thicker wall puts more sacrificial material between the sun and the load-bearing structure. Dark or thick PP containers therefore hold their shape far longer than thin transparent ones. Heat accelerates all of it: glazing turns a windowsill into a solar oven, and warmth speeds up both UV degradation and the wet-dry cycling that widens existing cracks.
- Indoors on a windowsill: glass blocks most UVB and passes a good share of UVA, and trapped heat behind the pane keeps the surface warmer than the room. A clear PET container may last a few months before the rim cracks, while a thick pigmented PP tub can go several seasons.
- Outdoors: full-spectrum sunlight, day-night temperature swings and rain compress the timeline, so expect chalking, fading and stress cracks sooner, especially on rims and corners that flex every time the container is moved.
- What helps: opaque or dark thick-walled PP for anything long-term, drainage holes kept away from high-stress corners, and a look at rims and bases every few months for the chalky sheen that means replacement.
A container’s useful life in the sun comes down to pigment, wall thickness and how much heat the glazing traps, so pick opaque, thicker PP for windowsill planting and treat any clear PET tub as a single-season option.
Teams choosing across a whole packaging line rather than one windowsill can use the table below as the consolidated version of everything so far, plus the questions that come up at the sink and at the bin: soil contact, transparency, recyclability, and a retirement rule for each resin.
| Attribute | PP (code 5) | PET (code 1) | Practical implication for reuse as a planter |
|---|---|---|---|
| Resin code | Recycling code 5; polypropylene, common for hot food tubs and lids | Recycling code 1; polyethylene terephthalate, common for cold cups and bottles | Check the stamped number on the base before choosing a planting container |
| Typical takeout application | Hot food containers, soup bowls, lids, microwave-safe clamshells | Cold drinks, bubble tea cups, salad domes, clear dessert containers | PP tubs suit warm windowsills; PET cups suit cool, shaded herb displays |
| Heat tolerance | Handles hot food fills and brief microwave reheating without warping | Suited to cold or warm fills; deforms when exposed to hot liquids | Keep PET planters away from hot surfaces, radiators and summer greenhouses |
| UV/sunlight tolerance | Moderate; coloured PP yellows and embrittles after long outdoor sun exposure | Lower; clear PET hazes, yellows and becomes brittle under sustained sunlight | Shade both types; opaque PP outlasts clear PET on sunny balconies |
| Behaviour in direct soil contact | Chemically stable in soil; resists moisture, salts and fertiliser breakdown | Stable short term; can craze and crack where soil stays wet | PP holds up longer in wet media; inspect PET walls each season |
| Transparency | Usually translucent to opaque; natural PP shows contents only vaguely | Highly transparent; shows roots, soil level and water easily | Choose clear PET for root-watching; choose opaque PP to limit algae |
| Scratch and crack resistance | Flexible and tough; dents rather than shatters when knocked, and gouges stay hard to see | Hard, glassy surface; thin walls crack when flexed, and every scuff shows | Handle PET planters gently and avoid stacking them while damp |
| Recyclability stream | Code 5 stream; kerbside programmes accept tubs in fewer areas than they accept bottles | Code 1 stream; bottles are accepted almost everywhere, cups and clamshells far less often | Rinse containers before recycling and follow your local council’s list rather than the code alone |
| Recommended reuse role | Best for long-season herbs in opaque tubs on hot, bright balconies | Best for short-cycle sprouts and seedlings where visibility matters | Match container type to crop lifespan and the light level at that spot |
| Reuse limit guidance | Retire when the surface feels chalky, scratched, or starts to smell | Retire at first haze, hairline crack, or cloudy patches near the rim | Replace reused containers each growing season rather than relying on them long |
Table: this table summarises the practical trade-offs discussed in the surrounding sections, from sunlight tolerance through to reuse-safety checks.
Run this check before a container earns a second life as a planter or a grow tray. It takes about a minute per container.
- Surface crazing or hairline cracks: fine spiderweb lines and splits on the base and sidewalls, especially where the walls flex.
- Cloudiness or chalky film after sun exposure: hold the container up to the light; a hazy, whitish surface that no longer reads clear is a change in the material, not a stain.
- Warping or softening near heat: check whether a flat base still sits flat, and whether the walls bow inward at warm room temperature.
- Persistent odour: smell the container after washing and air-drying; an aroma that survives a normal wash is a retirement signal.
- Staining that will not rinse clean: colour that stays in the plastic after a standard rinse and gentle scrub.
- Flaking or lifting printed decoration: ink or labels lifting at the edges or coming away on a fingertip.
- Oily sauce film: a slick, greasy patch on the inner surface that stays slick after washing means the surface is holding residue.
- Loss of shape at the rim: the rim no longer sits level, or lid and base only seat together with force.
Any single hit is reason enough to retire the container. PP takes repeated washing and warm soil far better than PET, which hazes and cracks sooner in sunlight, so keep PET for display and short service, and move repeat grow cycles to plant-fiber food containers if you would rather not track plastic condition at all.
The schematic below shows the setup the rest of this section assumes: rim, planting line, soil, a shallow gravel layer, and drainage holes in the base.
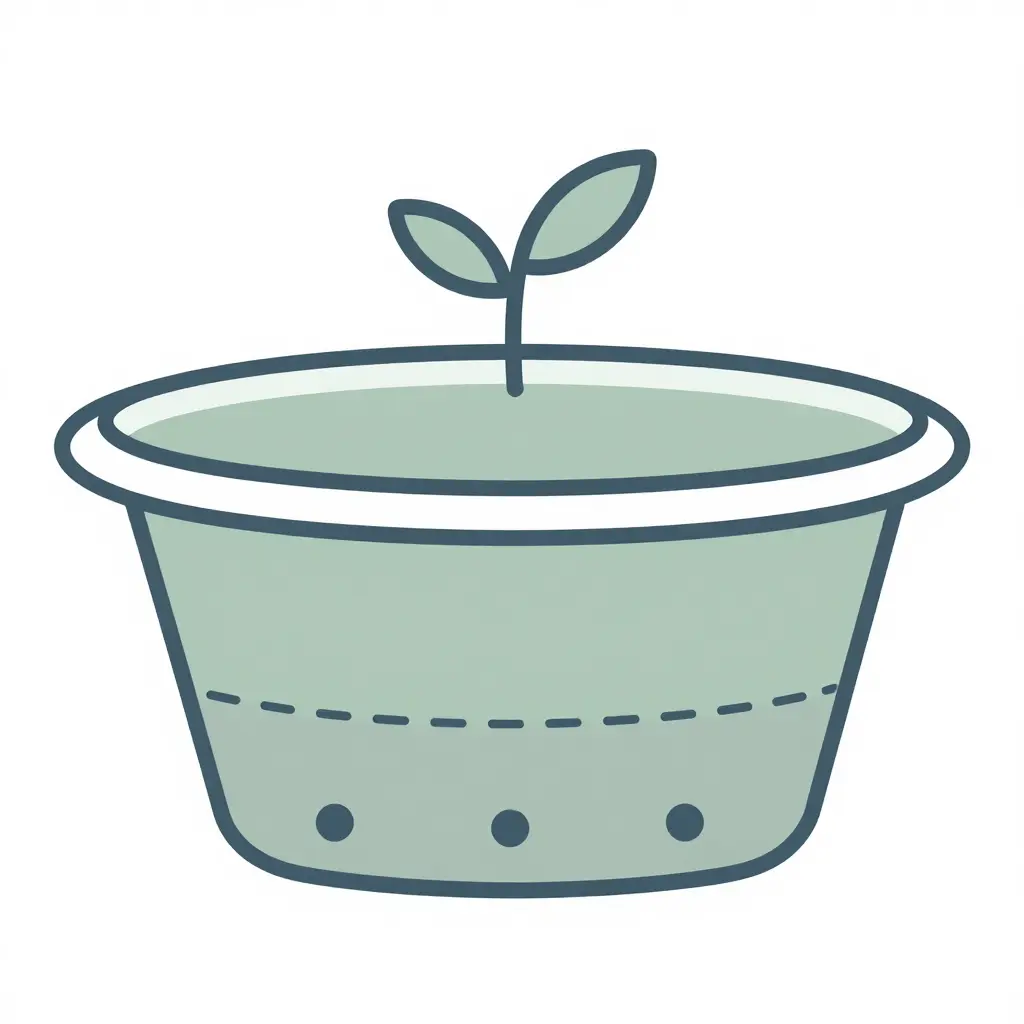
Caption: Cross-section schematic: container rim, planting line, soil layer, gravel layer, and three base drainage holes.
Two things about that drawing are worth stating plainly. The holes are the part you cannot skip: without them, water pools at the bottom and roots suffocate. The dashed line shows how far below the rim the soil should sit, so watering does not run straight over the edge. Keep the gravel shallow as well. A gravel layer stops potting mix from washing out through the holes; it does not add drainage, and a deep layer only lifts the saturated zone closer to the roots. A scrap of mesh over the holes does the same job. If you want thicker walls and a base that tolerates being drilled and reused, compare sturdy food containers before you start drilling.
Soil contact and reuse safety: what repurposed takeout containers face in a planter
A container built for food service meets different conditions the moment it lands in soil. Near the soil line, moisture rarely dries out: wicking, condensation and daily watering keep that band damp for weeks, and that is where microbial load builds. Sauce, syrup and dairy residue make it worse, because they feed the same growth and collect in the rim and seam areas where water already pools. A quick rinse does not reach under a rolled rim, so biofilm keeps developing in a container that looks clean. None of this is dramatic, and a proper wash before the first fill handles most of it.
The second question is migration. Dyes and printed inks on food-safe plastic containers are formulated for short-term contact with food that is usually fairly dry, not for months of wet soil, UV and abrasive grit. A food-grade rating describes the use it was approved for; it does not transfer to a soil-and-sunlight role, and it says nothing about repeated saturated cycles. Dry goods and wet soil are also different jobs: dry contents do not drive hydrolysis or surface leaching, and permanently damp soil does. Food-service containers were never designed as horticultural vessels, so drainage, wall thickness and print placement become your responsibility. On materials the verdict is consistent: PP performs better than PET in wet soil over repeated cycles because it absorbs almost no water and stays ductile, while PET is more prone to stress cracking and hydrolytic ageing. If you would rather not manage plastic at all, plant-fiber food containers start from a different material.
Before any container goes into service as a planter, operators should verify:
- Residue-free interior: wash rims, corners and seams, and reject any container that still smells of sauce, dairy or syrup.
- Drainage you made yourself: takeout bases are sealed by design, so drill or punch the holes and then confirm water actually exits.
- Resin code and print location: confirm PP or PET on the base, and keep printed panels above the soil line rather than buried in wet substrate.
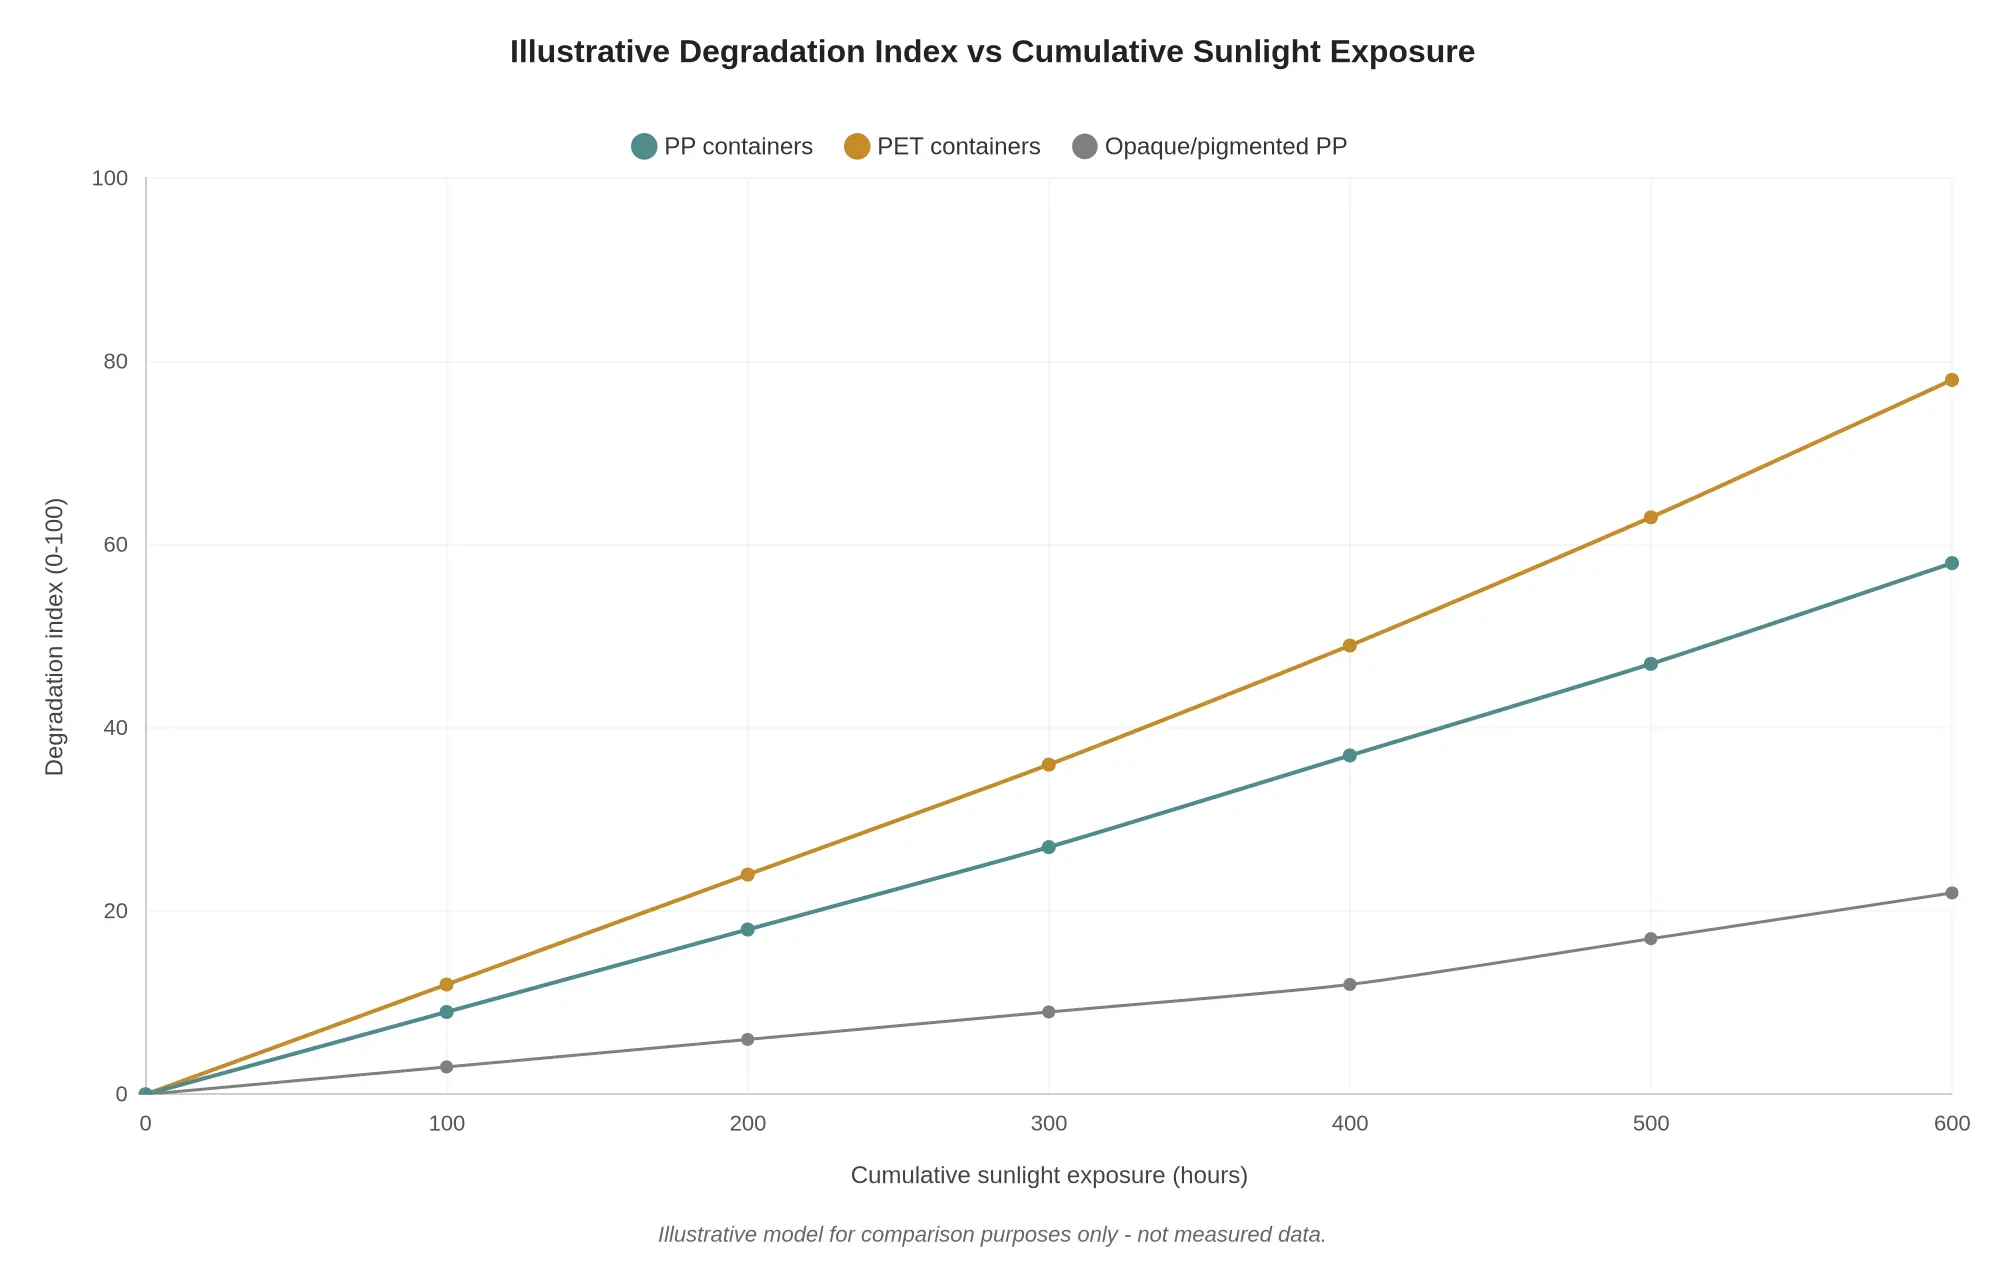
Chart caption: Illustrative model for comparison purposes only, not measured data.
Read that curve as a direction of travel rather than a measurement. PET climbs fastest under the same sun, PP holds its ground longer, and opaque or pigmented PP barely moves because the pigment takes the UV hit before it reaches the polymer. If your patio planters sit in full afternoon sun all season, that gap is the part worth remembering: it is the difference between a container that has chalked and cracked by August and one still holding damp soil in October. Wall thickness, pigment loading, latitude and how hard you scrub will all shift the lines.
Sunlit patios and event setups that want to skip the plastic question can serve the same duties in plant-based sugarcane food containers.
The six steps below are a maintenance routine for a team, not a certification and not a promise that a given container is suitable for food crops.
- 1. Read the resin code on the base. Find the triangle stamp first; code 5 (PP) tolerates soil contact and sunlight far better than code 1.
- 2. Wash and fully dry. Scrub with mild soap, rinse, then air-dry until no moisture remains in the corners.
- 3. Inspect in good light. Hold each reusable takeout container under a bright lamp and flex it gently; hairline splits show up as pale lines.
- 4. Drill or melt drainage holes. Four to six in the base so excess water never pools against the roots; the sketch above shows three, and a wide tub is better off with more.
- 5. Add a shallow gravel layer. Two centimetres of gravel keeps potting mix out of the holes. It does not replace drainage.
- 6. Set a retirement date for each batch. Label every batch with a start date and a retire date, and send cloudy or brittle plastic out on schedule.
Teams moving off plastic can run the same planting setups in sugarcane food containers, which compost where commercial facilities accept them.
Safer packaging alternatives: purpose-built materials beat reused takeout plastic
Starting seedlings in a takeout tub is a reasonable instinct and a small win. The problem is engineering. PP and PET were designed to hold food for an hour or two, not to sit in damp soil under a sunny window for eight weeks. Packaging made from paper and plant fibre is built for that wet, stacked, handled life, and it gives your team something consistent to stock, stack and explain. Unit cost is usually where the comparison gets interesting, so ask a supplier for a landed-cost quote instead of assuming fibre is out of reach.
Match the material to the job, not the leftovers drawer
Rigid structure matters the moment a container meets wet soil. Roll-rimmed paper bowls hold their walls straight under damp potting mix, so seedlings sit level instead of being squeezed sideways the way they are in a flexible clamshell that bulges under the weight.
Compostable fibre is the other half of the story. A moulded sugarcane food container is pressed from bagasse, which is opaque, wicks moisture away from roots instead of holding it against them, and breaks down in commercial composting at the end of a cycle instead of leaving a scratched plastic tub behind. Nothing flakes into the soil you are trying to grow food in. Check the lining and the disposal route your municipality actually offers before you count on that.
Stackable transport saves the most time on multi-site work. Kraft paper boxes stack squarely with rigid corners, so trays of seedlings travel from kitchen to event site without tipping or crushing each other, and the boxes flatten for storage afterwards.
Leak resistance decides whether your first watering ruins a shelf. A paper cup with a sealed side seam holds water through the period before drainage settles, which makes it workable for cuttings and small herb pots on a windowsill.
Bulk handling rounds things out. Sturdy paper buckets scoop potting mix and carry a harvest-weight load in one trip, then double as transport for filled pots rather than being thrown away at the end of the day.
| Job to be done | Material that fits | Why it works |
|---|---|---|
| Soil contact for 6-8 weeks | Sugarcane fibre | Breathes and composts; no plastic fragments in the soil |
| Sun-facing window shelf | Kraft paper board | Opaque walls stop light reaching anything fragile underneath |
| Moving seedlings between sites | Kraft paper box | Square stacking, rigid corners |
| Watering and drainage checks | Coated paper cup | Leak-resistant seam, stable base |
The short verdict: for anything that touches soil, sugarcane fibre; for anything that sits in direct sunlight, opaque kraft paper.
FAQ: PP vs PET takeout containers for growing food
Is PET safe for soil contact?
Food-grade PET is not a toxicity problem; it is a durability problem. It is thinner than a PP tub, scuffs easily and cracks under pressure, and those cracks let soil moisture and bacteria sit against the wall. For damp soil, use food-grade PP containers, which hold up far better when packed with wet mix.
Can I microwave a PP container before reuse?
Reheat food in it only if the container or its lid is labelled microwave-safe; do not run an empty container in the microwave to “condition” it. Plain PP handles reheat temperatures, so 60 seconds of reheating is usually fine. Skip it if the container held oily food, has a stained interior, or came with a thin lid that warps. Clean it first, then reheat.
How long does sunlight exposure take to make a container brittle?
Expect one to three months outdoors, and faster in direct summer sun. Ultraviolet light breaks down the polymer chains, and thin takeout plastic goes chalky and cracks first. PET turns brittle noticeably sooner than PP. A container in all-day summer sun can fail in under six weeks. Shade it, rotate it, or replace it on a schedule.
Do takeout containers need drainage holes?
Yes, always. Without holes, water pools at the bottom and roots rot. Punch four to six in the base with a hot nail or a drill, then stand the container on a tray or lid. Drainage matters more than which resin you chose, so never skip this step.
Which is better between PP vs PET for growing herbs and seedlings?
PP, on every count that shows up in a planter: thicker walls, better heat tolerance, and enough toughness to survive being drilled. PET is workable for one short season and then degrades quickly in sunlight. For herbs and seedlings you plan to keep, choose PP.
Looking for sturdier alternatives for your food service operation? Browse our kraft paper takeaway boxes for packaging that pairs well with reuse-friendly container programs.
The bottom line: match the material to the job
Polypropylene handles heat and rough handling considerably better than PET, which makes it the sturdier choice wherever containers get stacked, moved and reused. PET gives you the crisp, see-through clarity customers notice, and it degrades faster in sustained sunlight, so its looks go before its structure does. Neither resin was engineered for months of direct soil contact; that is outside the job description of a takeout container.
For procurement teams, the operational answer is short. Buy purpose-built food packaging from a dedicated paper packaging range for anything that touches food, and reserve takeout containers for short-cycle plant starts that get rotated out quickly. Put an annual review of packaging specifications on the calendar so the team keeps up as resins, suppliers and local rules change.
None of this has to be decided under time pressure. A supplier who will answer questions about resin grade, lining and composting in writing takes most of the risk out of the choice.