
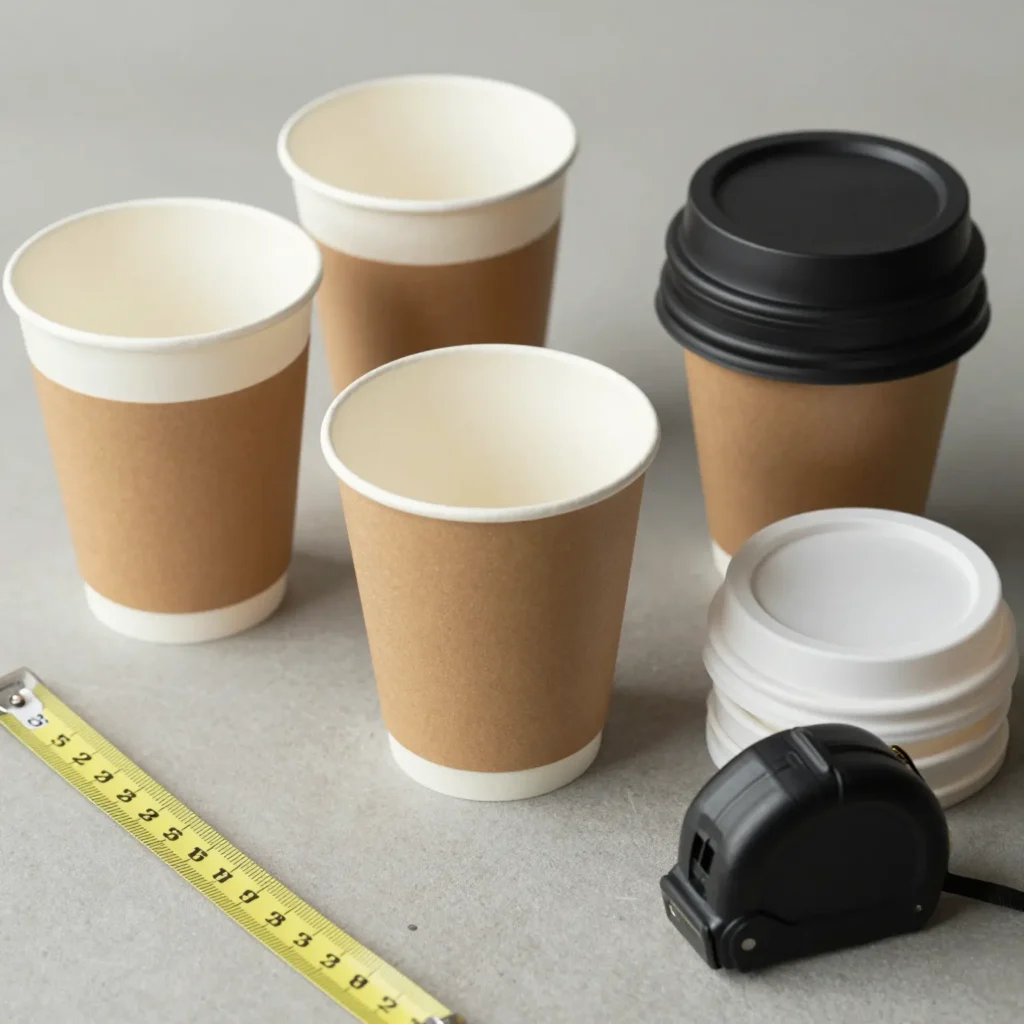
Why Rim Diameter Governs Every Wholesale Paper Cup Reorder
When you reorder wholesale paper cups, one dimension decides whether the shipment works with the lids already in your storeroom: rim diameter. Case counts can change between orders, print colours can shift, and even the base diameter can move a little without breaking anything. The rim cannot. It is the outside diameter measured across the rolled top edge, and it fixes the geometry a lid skirt has to grip, snap over or seal against.
A millimetre or two is enough to fail, and the failure shows up in one of two places: on the receiving dock, or at the counter. Lids sit loose and lift off while a hot drink is handed across. They crack when staff force them down. Each of those moments costs a spill, a remade drink or a complaint, and it keeps happening because the cause is a specification error, not a training problem.
The money ends up in stranded inventory. Lids bought against the previous cup do not fit the new one, and cups that match no lid on hand cannot be used or resold, so both get written off. At pallet volumes, one unchecked change in rim diameter ties up working capital in stock with no outlet and can push back a seasonal menu launch.
What follows covers three things: the dimensions to record, the checks to run on an incoming shipment with ordinary tools, and the way to hold those numbers steady across reorders. Buyers who want to review dimensions alongside compatible matching paper lids can compare published specifications before the next purchase order goes out.
Measuring takes a few minutes. A wrong reorder costs a pallet.
Rim Diameter and the Related Measurements Buyers Must Record
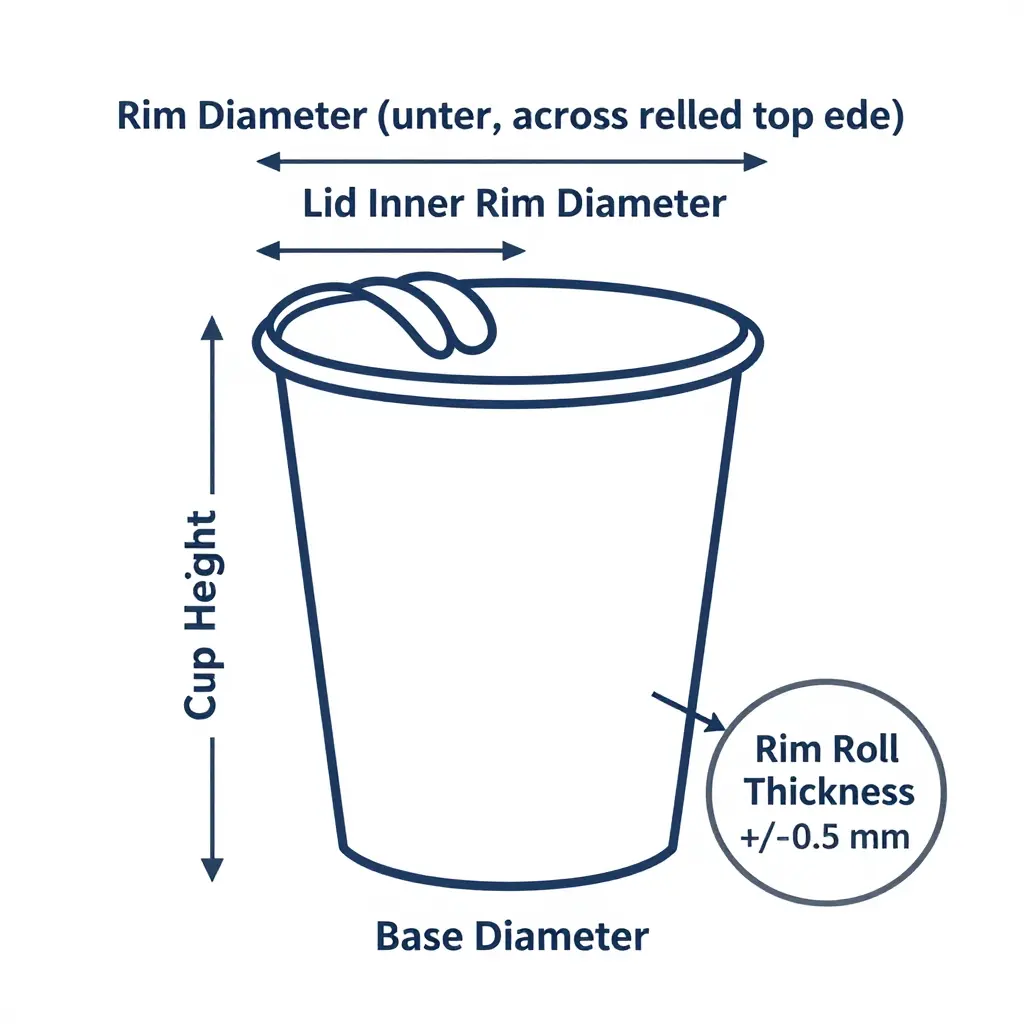
Rim diameter is the outer diameter of a paper cup measured across the rolled top edge: the widest point of the formed rim, read as a straight line through the cup’s centre from one outside edge of the roll to the opposite one. Use a calibrated vernier or digital caliper, keep the jaws square to the cup axis, and apply light contact only. Compress the roll and you get a diameter no lid can match. Confirm the cup is round before you record anything, because an out-of-round rim reads differently at 90° intervals.
Rim Diameter Is Not the Only Fit Dimension
Rim diameter decides whether a lid seats. It does not decide fit on its own. Record the dimensions below as a set, because a lid that meets the rim diameter can still leak, sit loose or refuse to snap down when the other dimensions move.
| Specification | Definition | How to Measure | Typical Production Tolerance |
|---|---|---|---|
| Rim diameter | Outer diameter across the rolled top edge | Caliper across the widest outer points, two readings at 90° | ±0.5 mm |
| Lid inner rim diameter | Inside diameter of the lid’s skirt or groove that grips the roll | Caliper inside the lid groove | ±0.3 mm |
| Rim roll thickness | Wall thickness of the rolled top edge | Caliper across the roll itself | ±0.10 mm |
| Cup top diameter tolerance | Permitted variation of rim diameter within a run | Compare batch readings against the drawing | As stated on the spec sheet |
| Cup height | Overall height from base to top of the roll | Height gauge, base flat on a level surface | ±1.0 mm |
| Base diameter | Outer diameter of the cup’s bottom | Caliper across the base, two readings at 90° | ±0.5 mm |
Unit Conventions
Quote specifications in millimetres as the primary unit and inches as a secondary reference, converting at 1 in = 25.4 mm and rounding to two decimal places. Never mix units within one specification sheet, and state each tolerance in the unit used for its nominal value. When a supplier quotes inches only, ask for the millimetre equivalent in writing so you can check it against your caliper readings without a conversion error.
Why Tolerance Ranges Matter in High-Volume Runs
Cup board varies in thickness from sheet to sheet, so no two rims come out identical. A tolerance range marks the window inside which lids still seal. Buy cups whose rim tolerance is compatible with the lid’s groove tolerance and keep at least 0.2 mm of working allowance between the two. On runs of thousands the deviations compound: a rim at the top of its band paired with a lid at the bottom of its groove can leave a whole carton loose. Check the tolerances on the spec sheet at every reorder instead of trusting how the last shipment behaved.
How Manufacturers Grade Cup and Lid Compatibility
To grade cup and lid compatibility, manufacturers pair the cup’s rim diameter and roll thickness against the lid’s inner rim diameter and skirt depth, then test each matched pair on the production line. Grades usually fall into three classes: a full snap with an audible seat and no lateral movement, an acceptable fit with slight play but no leakage, and incompatible. Approved pairs are recorded as a matched set number, and that set number, not the nominal diameter alone, is what you should quote when ordering. Order paper lids from the same matched set as the cups, and ask for the pairing chart with the quotation.
Recording Checklist
- Log rim diameter as two readings at 90° plus the average.
- Record lid inner rim diameter from the same batch as the lids in stock.
- Note rim roll thickness, cup height and base diameter in millimetres, with tolerances.
- Attach the matched set number to every purchase order.
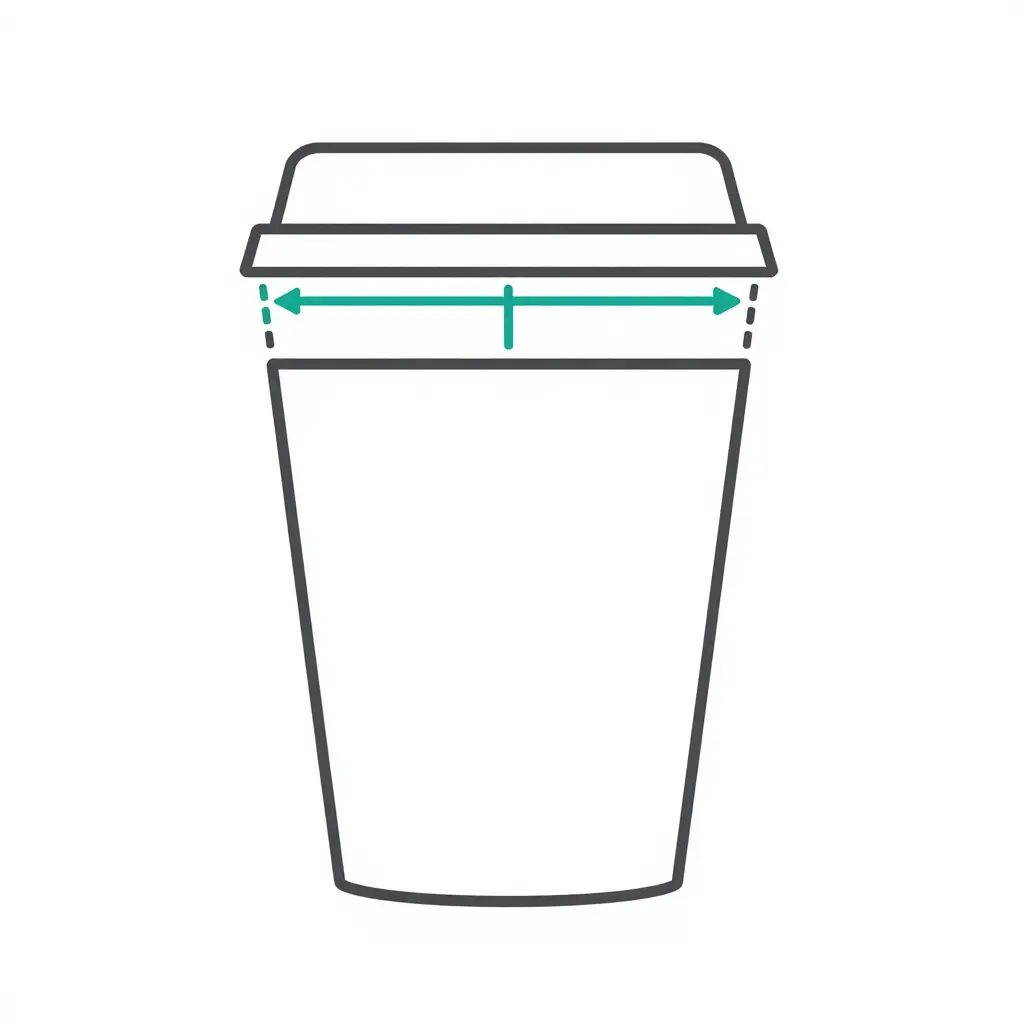
Reading the diagram: the upper arrow is the lid’s inner rim diameter; the lower arrow is the cup’s outer rim diameter, taken across the rolled top edge. Measure the cup first, then check that the lid’s inner diameter falls in the same band. If you are reordering lids separately, compare the available paper lid options against that number before committing to volume.
Confirming Rim Diameter Before Reordering: A Six-Step Measurement Sequence
Before you release a reorder, work through the sequence below to verify that the cup’s rim diameter still matches the lids sitting in your storeroom.
- Set up a flat, rigid measuring surface. A granite bench top, steel workbench or heavy glass plate keeps the cup square and the rolled rim level while you measure.
- Measure the rolled rim with a digital vernier caliper. Put the jaws across the widest point of the roll, not the body taper, and close them with light pressure; squeezing the paper wall inflates the reading. A rim gauge or go/no-go ring is faster if you are checking dozens of samples.
- Repeat the measurement across a second axis. Rotate the cup 90 degrees, measure again, and average the two readings so ovality from the forming process cancels out.
- Cross-check the average against your documentation. Set the specification sheet and the carton label side by side and confirm the printed SKU, the stated rim diameter in millimetres and the lid code listed for that cup size. Keep your supplier’s catalogue on the bench if you need a reference for how paper lid specifications are listed by size.
- Sample the shipment. Pull at least ten cups from three or more cartons, measure each one, and note the highest and lowest values. The spread shows whether the batch sits inside the tolerance band or is drifting.
- Log the result in the purchasing file. Enter the average diameter, the min-max range, the measurement date, the supplier batch or lot number and your initials on the item record or spec card attached to that SKU.
A verified baseline in the purchasing file, next to the lid code and batch number, means the next buyer orders against a measured figure rather than an assumption.
Use this lookup to shortlist cup-and-lid pairings by rim diameter before requesting samples, then check the shortlisted codes against current paper lid specifications.
| Nominal cup capacity | Typical rim diameter (mm) | Matching lid inner rim range (mm) | Rim roll type | Confirm with supplier |
|---|---|---|---|---|
| 4 oz hot (120 ml) | 62 | 61 – 63 | Single rolled | Lid code is for hot service only; check vent hole style |
| 6 oz hot (180 ml) | 74 | 73 – 75 | Single rolled | Confirm rim curl height matches lid skirt depth |
| 8 oz hot (240 ml) | 80 | 79 – 81 | Single rolled | Ask whether 80 mm and 90 mm lids are stocked separately |
| 12 oz hot (360 ml) | 90 | 89 – 91 | Single rolled (double-wall builds differ) | Verify lid is rated for hot drink temperatures |
| 16 oz hot (480 ml) | 90 | 89 – 91 | Single rolled (double-wall builds differ) | Same 90 mm rim as cold cups, but the lid type differs; check it |
| 16 oz cold (480 ml) | 90 | 89 – 91 | Single rolled | Confirm flat or dome lid and straw-slot diameter |
| 24 oz cold (700 ml) | 90 | 89 – 91 | Single rolled | 93 mm versions are also sold; measure a sample before you commit |
| 32 oz cold (950 ml) | 107 | 106 – 108 | Single rolled | Confirm PET or paper lid availability at this wider rim |
Figures vary by mould, board thickness and production tolerance, so confirm each dimension against your supplier’s current specification sheet before placing a bulk reorder.
The Most Frequent Causes of Rim Diameter Mismatch
A rim mismatch rarely comes from one bad batch. It usually turns up between orders, when a cup that worked with last quarter’s lids suddenly sits loose or will not seat at all. Since the cause is almost always upstream of the purchase order, “what changed in the specification” is a more useful question than “who is at fault”. These five changes account for most of the cases buyers of wholesale paper cups bring to us.
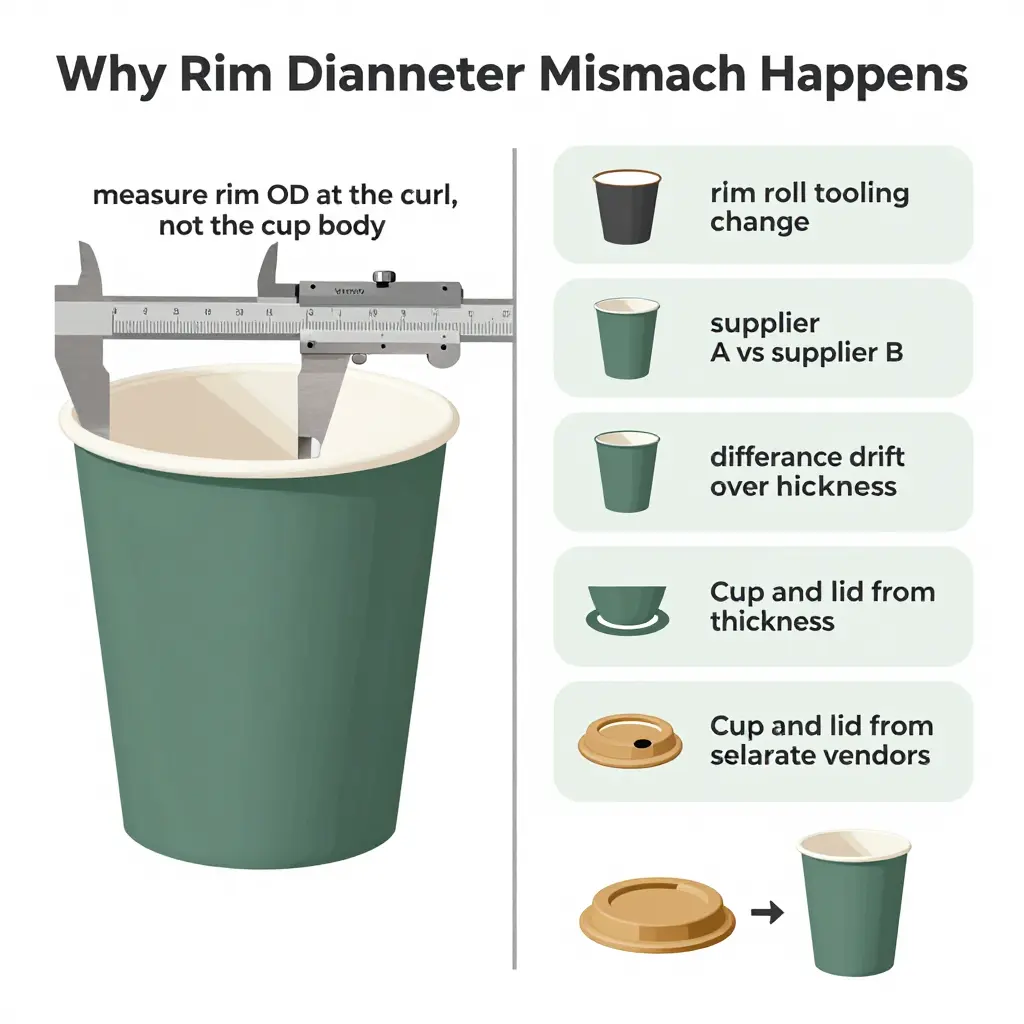
1. Changes in Rim Roll Tooling
The rim is formed by rolling the top edge of the sidewall into a curl, and the finished outer diameter depends on the profile of the rolling die or forming collar. When a converter replaces, regrinds or re-profiles that tooling, even for routine maintenance, the curl can shift by a fraction of a millimetre. Nothing on the carton label records that shift, but the lid interface feels it immediately.
2. Different Suppliers Using the Same Cup Capacity Label
A “12 oz” or “16 oz” designation describes fill volume, not geometry. Two converters can both meet a nominal capacity while building cups with different top diameters, taper angles and curl profiles, because the label says nothing about the rim. Buyers who switch suppliers on the strength of the capacity label alone often inherit a rim diameter mismatch that only shows up on the filling line.
3. Tolerance Drift Across Large Production Runs
No converting line holds an exact dimension; each runs inside a stated band. Early in a very large run, cups may sit at the low end of that band and later cups at the high end as heat, pressure and web tension settle. Every individual cup still passes inspection, yet a lid sized to the tighter end of the range fits the first pallets better than the last.
4. Substitution of a Different Cup Wall Thickness
Single-wall, double-wall and ripple-wall constructions each finish with a different rolled edge, because the curl has to absorb more material. Substitute a double-wall cup for a single-wall cup of the same capacity, usually to add insulation, and the outer rim diameter and curl thickness change with it. Lids made for the single-wall version will not seat reliably on the substitute.
5. Cup-to-Lid Mismatches from Separate Vendors
Lids and cups bought from different vendors are a common source of trouble, because each side is engineered against its own internal reference cup. Seat depth, skirt height and the snap groove all interact with the rim, and no standard guarantees interchangeability. Compare the lid’s quoted rim range with the cup’s measured rim, and confirm fit details on a paper lid specification page before committing to volume.
Quick Reference: What to Check Before Reordering
| Cause | What actually changes | What to verify |
|---|---|---|
| Rim roll tooling | Curl profile and outer diameter | Request a rim drawing, not just capacity |
| Supplier change | Top diameter and taper | Measure rim OD with a caliper on 10 cups |
| Tolerance drift | Position within tolerance band | Sample cups across pallets and lots |
| Wall thickness change | Curl thickness and outer diameter | Re-test lids on the new construction |
| Separate vendors | Snap groove and skirt geometry | Confirm lid rim range in writing |
Takeaway: a rim diameter mismatch is a specification problem, resolved by measuring and documenting rim dimensions on both the cup and the lid. It is not a defect claim.
Rim Diameter vs. Cup Capacity: Why Your Eyes Are Lying to You
Before you reorder lids, put the actual numbers side by side. The chart plots typical rim diameters in millimetres against the cup capacities buyers order most often.
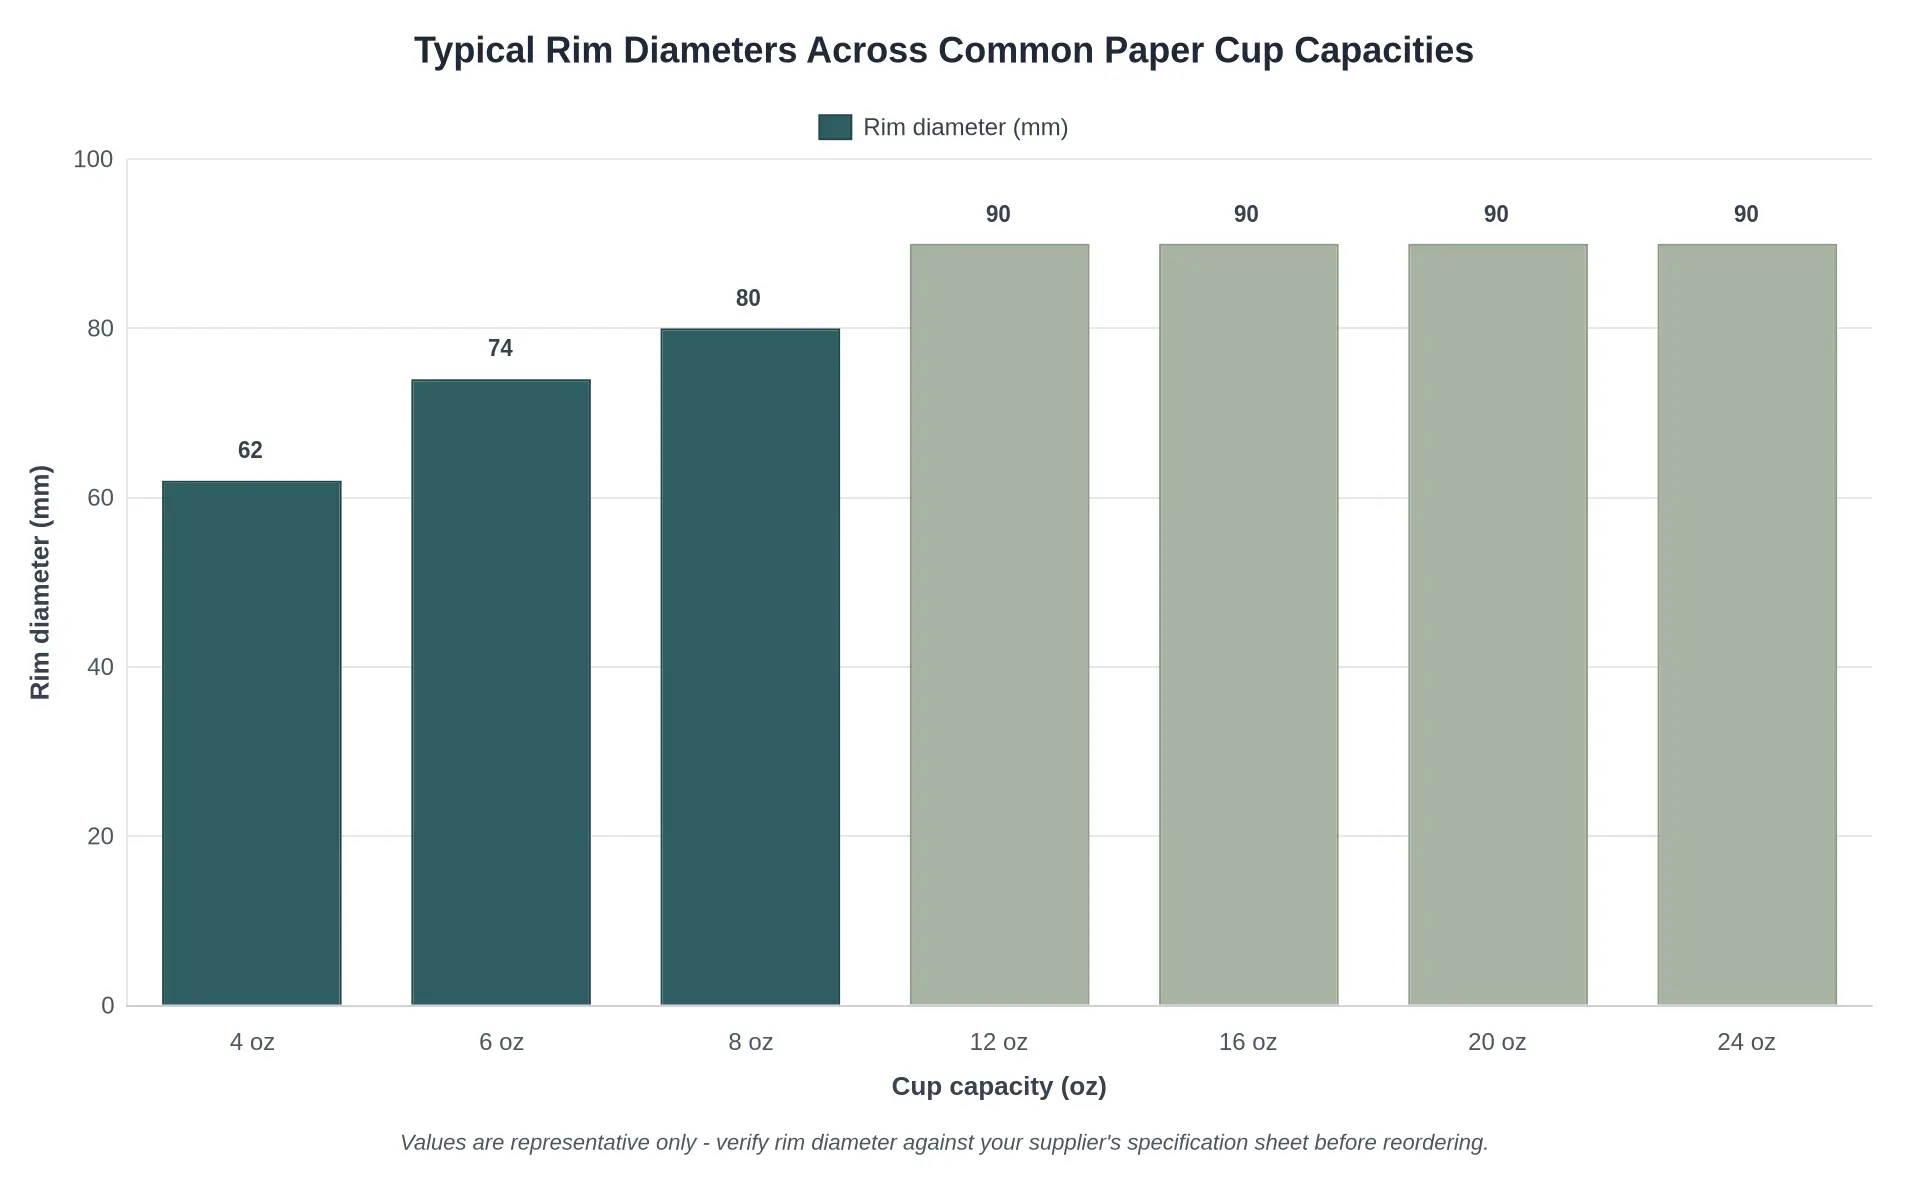
Figure 1: Typical rim diameters by cup capacity. Values are representative and must be verified against supplier specifications.
What the Bars Actually Tell You
The right-hand side of the chart is where the surprises are. The 12 oz, 16 oz, 20 oz and 24 oz cups all land at roughly 90 mm, even though the 24 oz holds twice what the 12 oz does. That one fact explains a lot of lid mix-ups:
- Two cups can look completely different on the shelf and still take the identical lid.
- The step from 8 oz (80 mm) to 12 oz (90 mm) is 10 mm, enough for a lid to feel almost right while it leaks.
- The widest gap between neighbouring sizes runs from 4 oz to 6 oz: 62 mm against 74 mm, a 12 mm difference. That is where buyers most often assume one small cup will take another small cup’s lid. It will not.
The Same Data, in Table Form
| Cup capacity | Typical rim diameter | Common lid caliber |
|---|---|---|
| 4 oz | 62 mm | 62 mm |
| 6 oz | 74 mm | 74 mm |
| 8 oz | 80 mm | 80 mm |
| 12 oz | 90 mm | 90 mm |
| 16 oz | 90 mm | 90 mm |
| 20 oz | 90 mm | 90 mm |
| 24 oz | 90 mm | 90 mm |
The Practical Takeaway
Capacities cluster; diameters cluster differently from what the shelf suggests. Because 12 oz through 24 oz share one rim, a lid bought for your large cups may also fit your medium ones, which is one way to cut SKU count. The same fact makes the mistake easy: a 90 mm lid will never seat on an 80 mm cup, and a 93 mm lid will fight a 90 mm rim. Measure the cup you are actually reordering against, not the capacity printed on the carton.
If you are building a cup and lid set from scratch, start with a full paper cup range and confirm each SKU’s stated rim diameter before committing to volume. Capacity tells you how much coffee goes in; diameter decides whether the lid stays on.
Three Fit Tests That Confirm Cup and Lid Compatibility Before a Full Reorder
A matching rim diameter on paper is a claim, not a result. Run three physical tests on the actual shipment before you commit to a full reorder. Each takes minutes, needs no lab equipment, and ends in a pass or fail you can write into a purchase record.
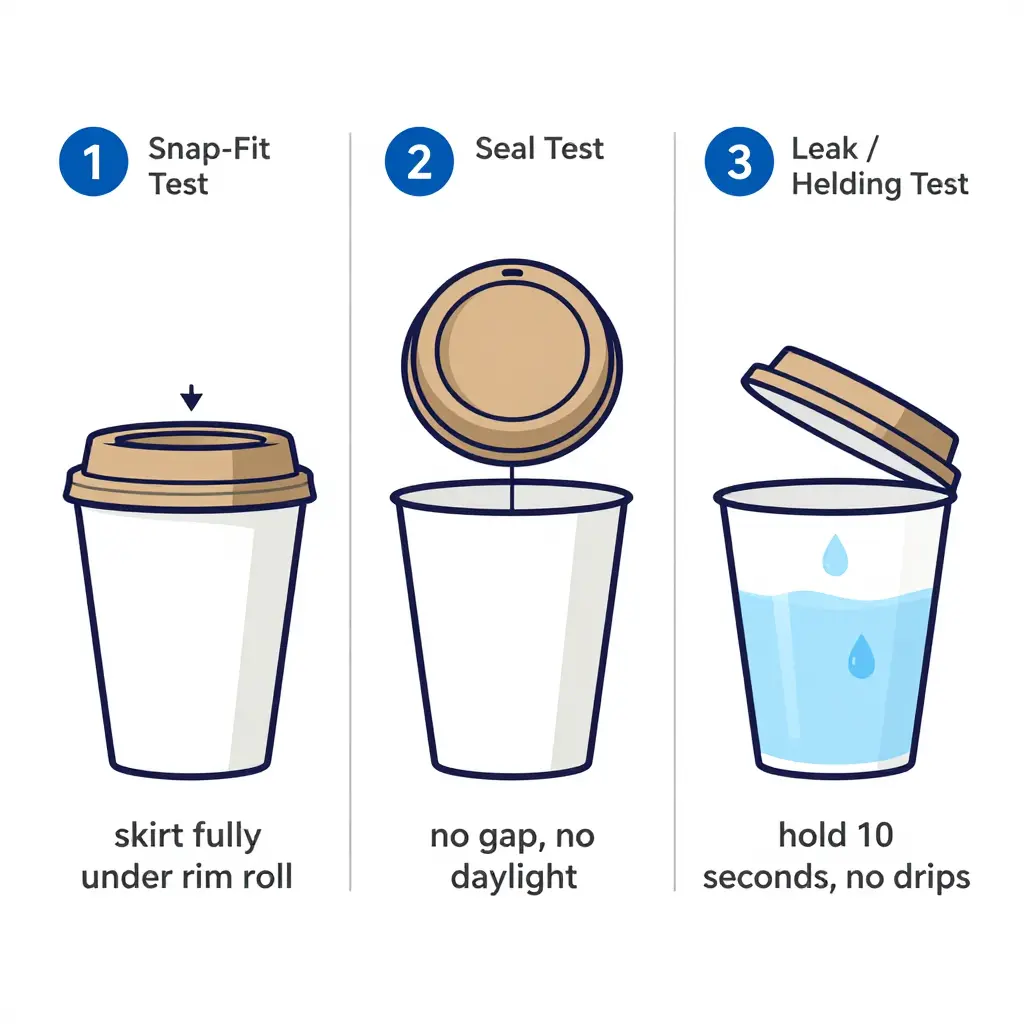
Test 1: The Snap-Fit Test
Press a lid onto a cup with both thumbs, working around the circumference, then press down firmly at the centre.
- Pass criterion: the lid skirt seats completely under the rim roll, no section of skirt sits on top of or beside the roll, and the lid holds against a firm upward pull.
- Fail signal: a partial click, a skirt that pops off under light upward pressure, or a lid that needs force at one point and none at another.
The test checks engagement, not just diameter. A paper lid can measure the correct rim diameter and still fail if the skirt depth is wrong.
Test 2: The Seal Test
Seat the lid, then sight around the join at eye level, tilting the cup slowly through a full turn.
- Pass criterion: the lid edge meets the rim roll continuously around the full circumference, with no gap, no daylight through the join, and no rocking when you press one side.
- Fail signal: a bright line of daylight anywhere, a lid that rocks on the rim, or a gap that opens and closes as the cup turns.
Test 3: The Leak or Holding Test
Fill to 80 percent with water at serving temperature. Seat the lid, hold the cup at a 45-degree tilt for 10 seconds, then set it upright and shake it gently twice.
- Pass criterion: nothing escapes at the join during the tilt or the shake, and the rim area is dry to the touch when the cup is upright again.
- Fail signal: any drip, seep or damp ring on the rim roll.
Use warm water when the cups will carry hot drinks. Heat softens the rim roll and exposes fits that pass cold.
How Many Units to Sample
Pull at least 30 units per lot before you sign off, from no fewer than three cartons, ten per carton and including the top and bottom of each stack. For lots above 20 cartons, add five units for every additional ten cartons. Snap-fit the first five units from each carton, seal-check all 30, and fill ten for the leak test.
If more than one unit in 30 fails any test, quarantine the lot and ask for a replacement sample. Do not average the results; a single failure points to a tolerance problem in the run.
Recording the Results
Log every test on a single sheet so the decision can be traced later, and compare the measured rim diameter against the lid specification already on file.
| Field | What to Record |
|---|---|
| PO / lot number | Reference number from the supplier paperwork |
| Cup rim diameter | Measured value in mm, three cups per carton |
| Lid spec diameter | Value stated on the existing lid spec |
| Snap-fit result | Pass or fail per unit, count of failures |
| Seal result | Pass or fail per unit, note gap location |
| Leak result | Pass or fail per filled unit, note drip point |
| Decision | Release, hold, or reject the lot |
Keep the sheet with the sample cups. When the next reorder arrives you have a baseline rather than a memory. Buyers building a repeatable spec file should review the available paper lid options and confirm skirt depth alongside rim diameter before ordering.
An hour with a caliper and a sheet of paper is cheaper than a pallet of lids that fit nothing.
Reading the Cross-Section: How a Lid Actually Seats on a Rim
Before you compare numbers on a spec sheet, it is worth being precise about what “seated” means. A paper lid holds a cup in two places at once: the outer skirt wraps down around the outside of the rolled rim, and the inner plug ring presses against the inside of the same bead. When both contacts are snug, the lid is mechanically locked, resisting lift-off and sealing the seam. That double grip, not the lid’s flat top, is what keeps coffee out of the cup holder.
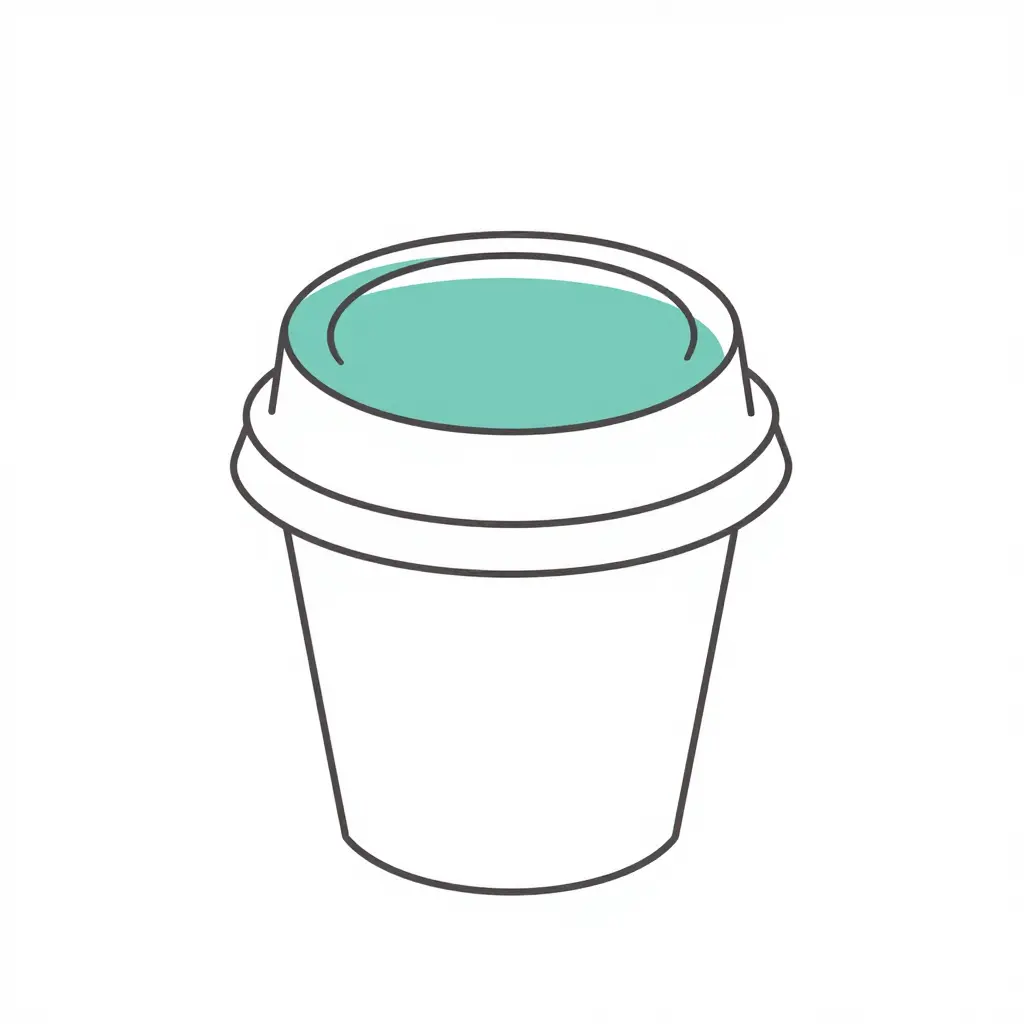
What a Mismatch Looks Like
The same joint with the wrong lid keeps the geometry and loses the diameters: the skirt hangs clear of the bead with a visible gap, and the plug ring never touches the inner wall. The lid still goes over the cup, which is exactly why mismatches pass receiving inspections, but it is resting, not seated. Expect pop-offs when the cup flexes, leaks at the seam, and lids that ride up in a carrier.
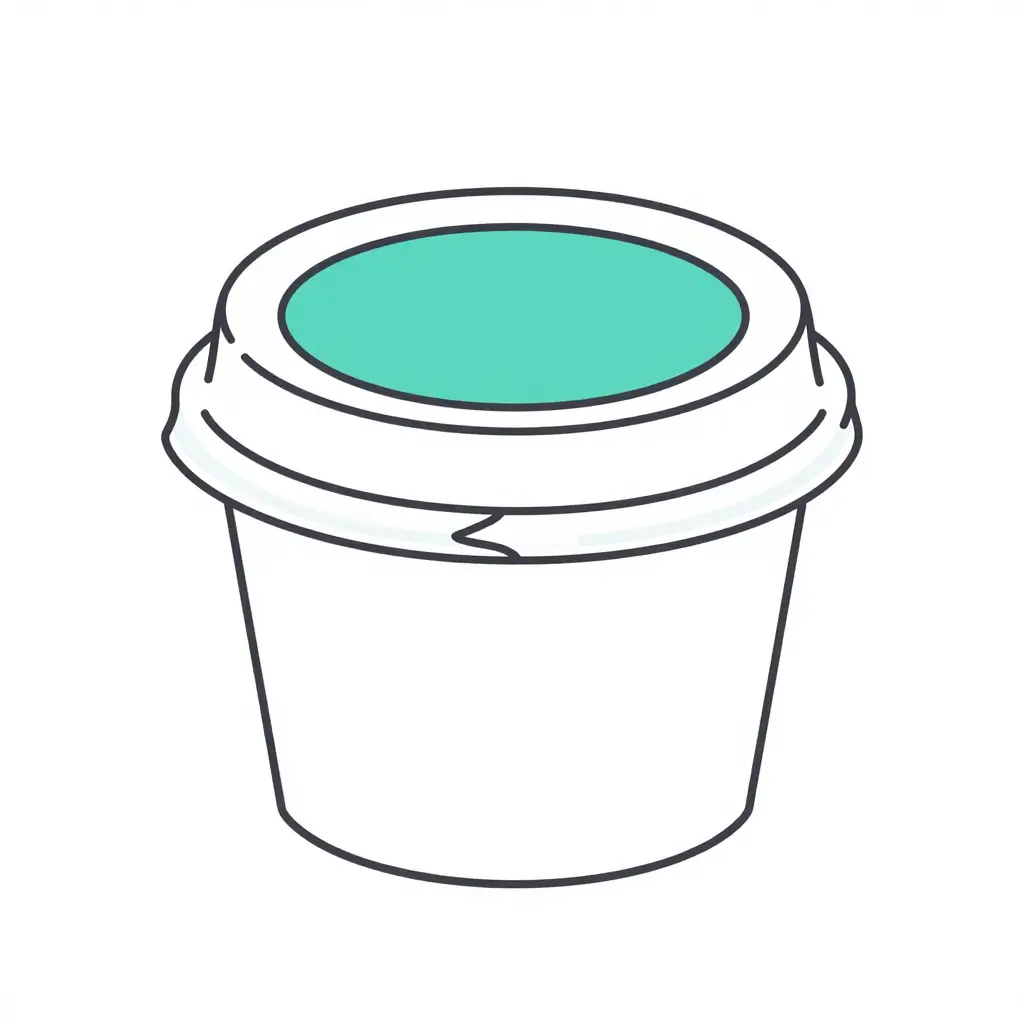
Two drawings, one rule: contact on both sides of the rolled rim, or it is not a fit. If you are auditing current stock, confirm the lid range your supplier actually engineers for the cups you buy. Browse the paper lid options matched to standard rim diameters before you set a reorder quantity.
Locking Rim Diameter Into the Reorder Process
Once a cup has been measured and matched to a lid, the work is keeping that knowledge alive through the next purchase order. Open a written specification record for every finished product you stock: rim diameter in millimetres, matching lid code, nominal capacity, supplier and the lot it came from. Treat that record as the single source of truth and cross-check it against the published cup specifications whenever a new size enters the range, so nobody ends up re-measuring a cup at the counter with a queue forming.
Those numbers belong on the paperwork as well. A purchase order that says only “12 oz cup” quietly invites substitution, so name the rim diameter and the lid code on every line item, and ask for a pre-shipment sample set from each lot with caliper readings recorded rather than eyeballed. Request five to ten pieces measured across the rim, and check anything that wraps or caps the cup too: a paper sleeve is a matching accessory that has to be size-checked against the same body diameter.
Require written confirmation of any tooling or specification change before you reorder. A new mould is the most common reason a lid that always seated suddenly will not. Keep one retained sample from every approved lot, labelled with the date, lot number and measured rim diameter, and store it with the rest of your packaging categories stock. For a buyer on a rolling reorder cycle, that shelf of labelled cups is the fastest way to prove a fault, in minutes rather than days.
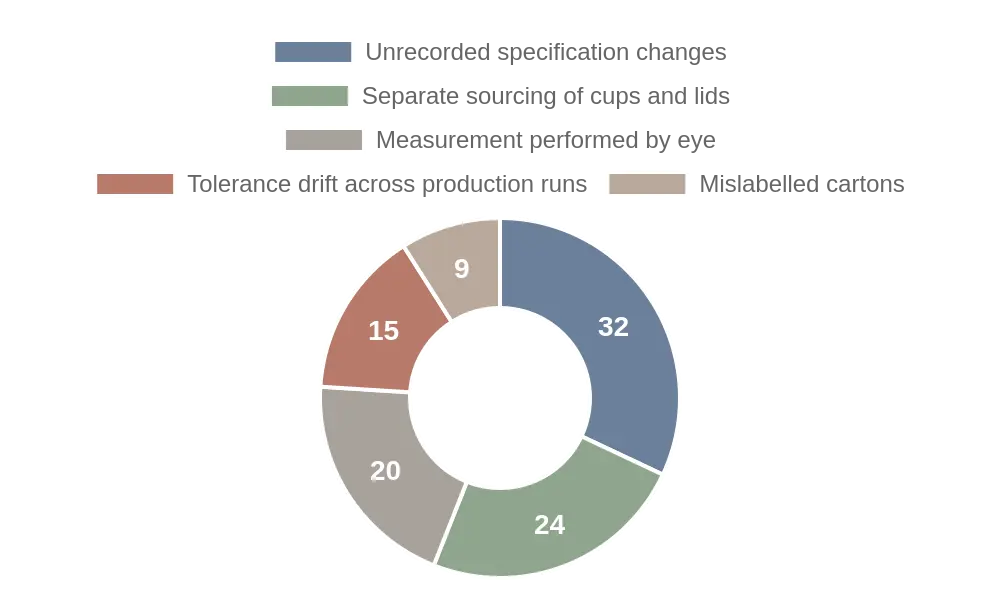
Proportions are illustrative of internal audit patterns.
The audit behind this chart groups causes differently from the five listed above, so the labels do not line up one for one. The ranking is still the argument: unrecorded specification changes (32%) and separate sourcing of cups and lids (24%) account for more than half of the mismatches in those audits, which is why a written rim specification and a paired cup-and-lid supply chain matter. Measuring by eye (20%) and tolerance drift between runs (15%) add another third, and mislabelled cartons (9%) close the list. If you are rebuilding a spec sheet, start by confirming the rim diameter on your paper cup lids so the numbers you record match what actually ships.
FAQ: Cup and Lid Sizing Questions Buyers Ask Most
These five questions come up most often when a buyer is matching a new cup order to lids already in stock.
How is rim diameter measured on a paper cup?
Across the rolled top edge, from the outermost point on one side to the outermost point on the opposite side, read with a digital caliper at the widest span. Take the reading on the external surface of the roll, not the inner opening, because the paper lid grips the outside of the roll. Record the value in millimetres to one decimal place, and take three readings 120 degrees apart to confirm the rim is round rather than distorted in shipping.
Do two cups with the same capacity always share the same rim diameter?
No. Capacity describes internal volume; rim diameter is a separate structural dimension set by the cup’s taper angle and height. A 12 oz cup most often carries a 90 mm rim, but 89 mm and other top diameters are sold, and each needs its own lid. Specify by rim diameter when reordering, and treat “12 oz” as a family name rather than a fit specification.
Can paper lids be used with cups from a different supplier?
Cross-supplier use is reliable only when the rim diameter, roll height and roll thickness all sit inside the lid’s designed tolerance. A paper lid seals on the outside of the rolled rim, so a cup with the same diameter but a heavier or taller roll can sit proud and fail to seat. Confirm compatibility with a 30-cup fit test, including a hot-fill check at serving temperature, before approving a mixed-source combination.
How much rim diameter variance is acceptable before fit fails?
Keep the difference between the lid’s nominal inner diameter and the cup’s measured rim inside about ±0.5 mm. A mismatch of 0.5 mm or less usually still seats and seals; at 1.0 mm and beyond, the lid either sits loose and lifts under pressure or has to be forced on and cracks at the skirt. Roll thickness and roll height carry their own tolerances, around ±0.10 mm and ±0.15 mm, so check all three dimensions rather than diameter alone.
What information should be on the purchase order to prevent a mismatch?
Cup capacity in oz and ml, rim diameter in mm with the acceptable tolerance, roll height and roll thickness, board caliper, and the exact lid SKU the cups must fit. Add a reference to the approved sample or fit-test report, plus quantity, pack configuration and carton labelling. Where the same order includes serving accessories, add compatible paper cup holders as a separate line item so carrier sizing is confirmed against the finished cup rather than assumed.
Turning All of This Into One Reorder Standard
The standard is short enough to write on a card. Measure the rim diameter of the cup you are running. Record it in the item master, on the purchase order and on the receiving label, so the number lives somewhere other than one buyer’s memory. Match it to the stated inner rim diameter of the lid. Verify the pairing on a physical sample from the incoming batch, not just on the spec sheet. Then reorder against that written specification and quote it in every request for quotation and every confirmation.
The discipline protects margin in three quiet ways. It prevents stranded lid stock, because you never commit to a lid that fits nothing on your shelf. It prevents split-shipment orders, because one accurate spec removes the back-and-forth that delays dispatch. And it prevents counter-level failures, the leaks and popped lids that cost a free drink, a refund and a customer’s confidence. We supply this product family, along with cup, bowl and bucket supply, and we will answer a rim question whenever one comes up.