
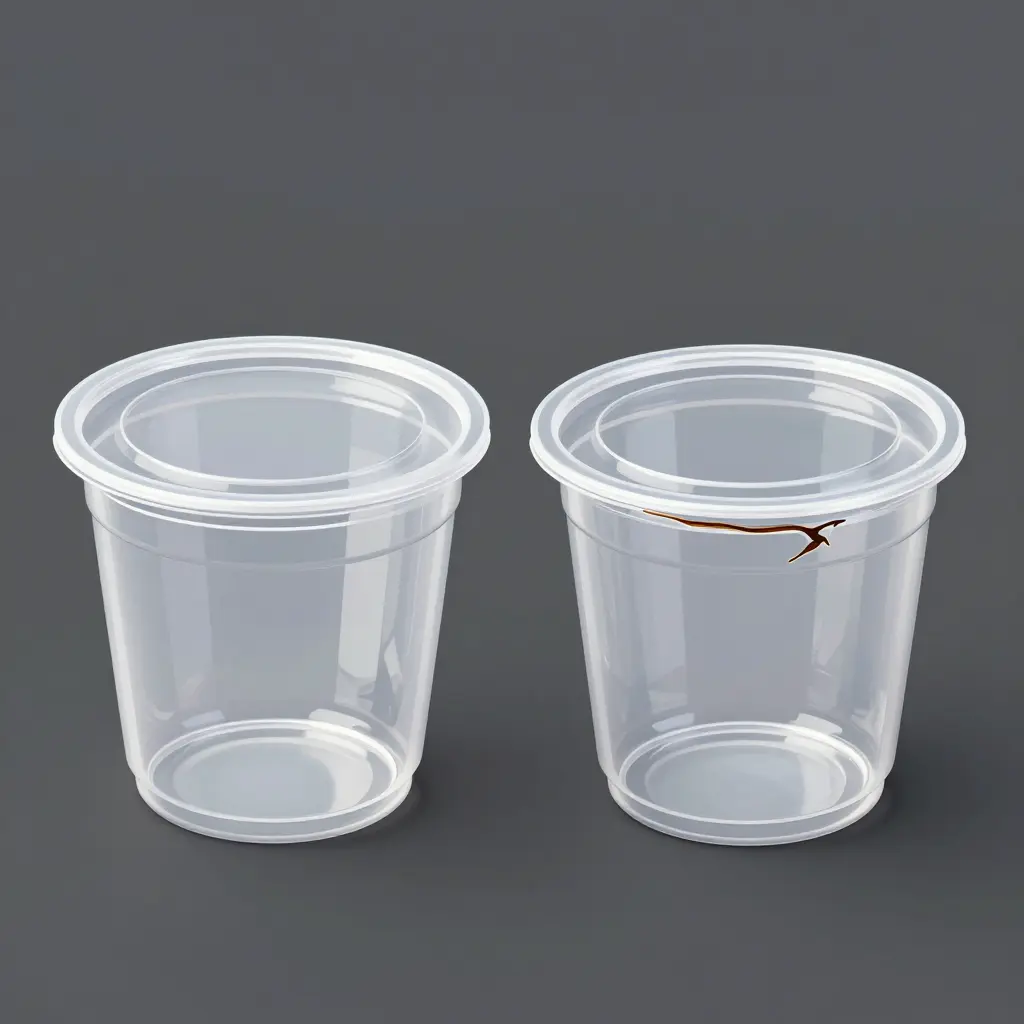
Clear Plastic Condiment Cups Leaking at the Lid Seam: Rim Flatness vs Lid Snap Depth
When a clear plastic condiment cup releases sauce past the lid seam, the problem is containment, not appearance. Product is lost, someone has to clean it up, and food-contact surfaces and delivery bags end up contaminated. The customer reads the mess as careless handling even when the kitchen did everything right. At high volume, a small per-unit loss rate turns into a meaningful cost and a steady flow of complaints.
Two variables decide whether that seam holds: how flat the cup rim is, and how deep the lid snap engages. Both have to be satisfied at once. Flatness determines whether a continuous contact band exists around the full circumference. Snap depth determines whether the lid skirt actually reaches the cup’s sealing bead and locks below it. A perfectly round cup still leaks if the snap barely engages, and a correctly seated lid still leaks over a rim that is out of plane.
Troubleshooting tends to stop at whichever variable is easier to see. A plant blames the lid for being undersized or the cup for being defective, changes that part, and never measures the other. Because the two interact, the substitution often clears a batch, which makes it look like a fix while the process drift that caused the leak continues.
Rim flatness is best treated as a mold, cooling, and stacking characteristic, measured in millimeters of deviation. Lid snap depth is a dimensional engagement condition set by lid geometry, cup bead profile, and seating force. When cups and lids come from different suppliers, the first control point is documented closure compatibility rather than catalog compatibility, as with any matching lid system.
Inside the Seal: How a Condiment Cup Lid Actually Seals
Leak complaints on portion cups are usually investigated at the wrong end of the package. Someone checks the sauce, the fill level, the stack, or the pallet. The place to start is the joint between cup and lid, because that is where containment is decided.
Defining the lid seam
The lid seam is the full mechanical interface between the cup’s top rim and every mating surface of the lid: rim land, inner skirt, snap bead, and the undercut below it. It is a three-part geometry working as one system, not a single line of contact. A clear plastic condiment cup leaking at the seam has a geometry problem, not a plastic problem.
The rim as a sealing land
A well-formed cup finishes its top rim into a flat, closed annulus, narrow and continuous. That annulus is the sealing land, and it is the only part of the cup the lid is designed to press against. A thermoformed rim should present a planar surface all the way around. Cooling stress can warp it, denesting can nick it, and the trim tool can leave a flash string. Any of these breaks planarity locally, and a thin liquid only needs a local break.
The lid’s inner plug and skirt
The lid seals from the inside out. A central plug, or inner skirt, drops into the cup opening and centers the lid while the outer wall wraps the rim from outside. The rim land ends up trapped between them, a plug-and-flange arrangement. The useful split for troubleshooting is that the plug sets alignment and radial pressure while the flange sets axial pressure. A lid that looks seated can still be short-engaged if the plug never reached its designed depth.
Snap bead, undercut, and interference fit
The click operators listen for comes from the bead on the lid passing over the undercut molded into the cup wall and dropping behind it. The fit is an interference fit: the bead’s inner diameter is slightly smaller than the cup bead it has to clear, so the skirt deflects outward on the way down and springs back once it is past. That stored elastic energy produces the contact pressure at the seam, and it is also what makes the lid feel secure in the hand.
Radial vs. axial contact
Contact happens on two perpendicular axes. Radial contact is horizontal: skirt and bead pressing in against the cup wall. Axial contact is vertical: the lid’s flat trough pressing down on the rim land. Radial interference resists pop-off. Axial compression resists liquid migration. Different features produce them, and they fail for different reasons. Treating them as one property is the most common diagnostic error in packaging QC.
Why pop-off resistance is not leak resistance
A lid can grip hard and still weep. A deeply engaged bead will survive drops, shaking, and stacking, and a low-viscosity dressing will still travel along the rim wherever axial pressure falls to zero. A seal needs continuous circumferential pressure through all 360 degrees, with no low-pressure arc. Where pressure reaches zero, the gap that opens is not just a hole; it becomes a capillary path, and thin liquids climb it by surface tension no matter how firmly the lid is clamped. That is why a cup can pass a shake test and fail a tilt test.
Two independent failure modes
- Loss of rim flatness. The sealing land is no longer planar. Waviness, ovality, or a crushed rim point leaves axial contact in some arcs and none in others, which opens a capillary route even when engagement is deep.
- Insufficient lid snap depth. The bead never clears the undercut, so engagement is too shallow to build the designed contact pressure. The lid sits high, radial interference is weak, and the seam is preloaded in the wrong direction.
On the line the two look the same: wet cups. They are corrected in opposite places. One is a cup tooling and handling issue, the other a lid dimension or a pairing issue.
Four physical conditions for a leak-free seam
- Planar sealing land: the rim is flat and continuous, free of warp, nicks, and trim flash.
- Full snap depth: the bead has passed the undercut so the designed interference is fully developed.
- Continuous circumferential pressure: axial and radial contact are unbroken through all 360 degrees, with no low-pressure arc.
- Balanced material compliance: the lid holds enough stored elastic energy to maintain pressure through settling, chilling, and handling without stress cracking.
Measuring Before Re-Specifying
When a leak is reported, measure before re-specifying. Run a straightedge or dial indicator across several cups from the same sleeve, then check snap depth and bead engagement on the lids that were actually used. If the program also matches closures to other rigid formats, review compatible lid formats and closure styles against the cup drawings. Containment comes out of geometry, and geometry can be measured.
Leak Rate vs. Lid Snap Engagement Depth: The Chart That Explains Your Seam Failures
How to Read This Chart
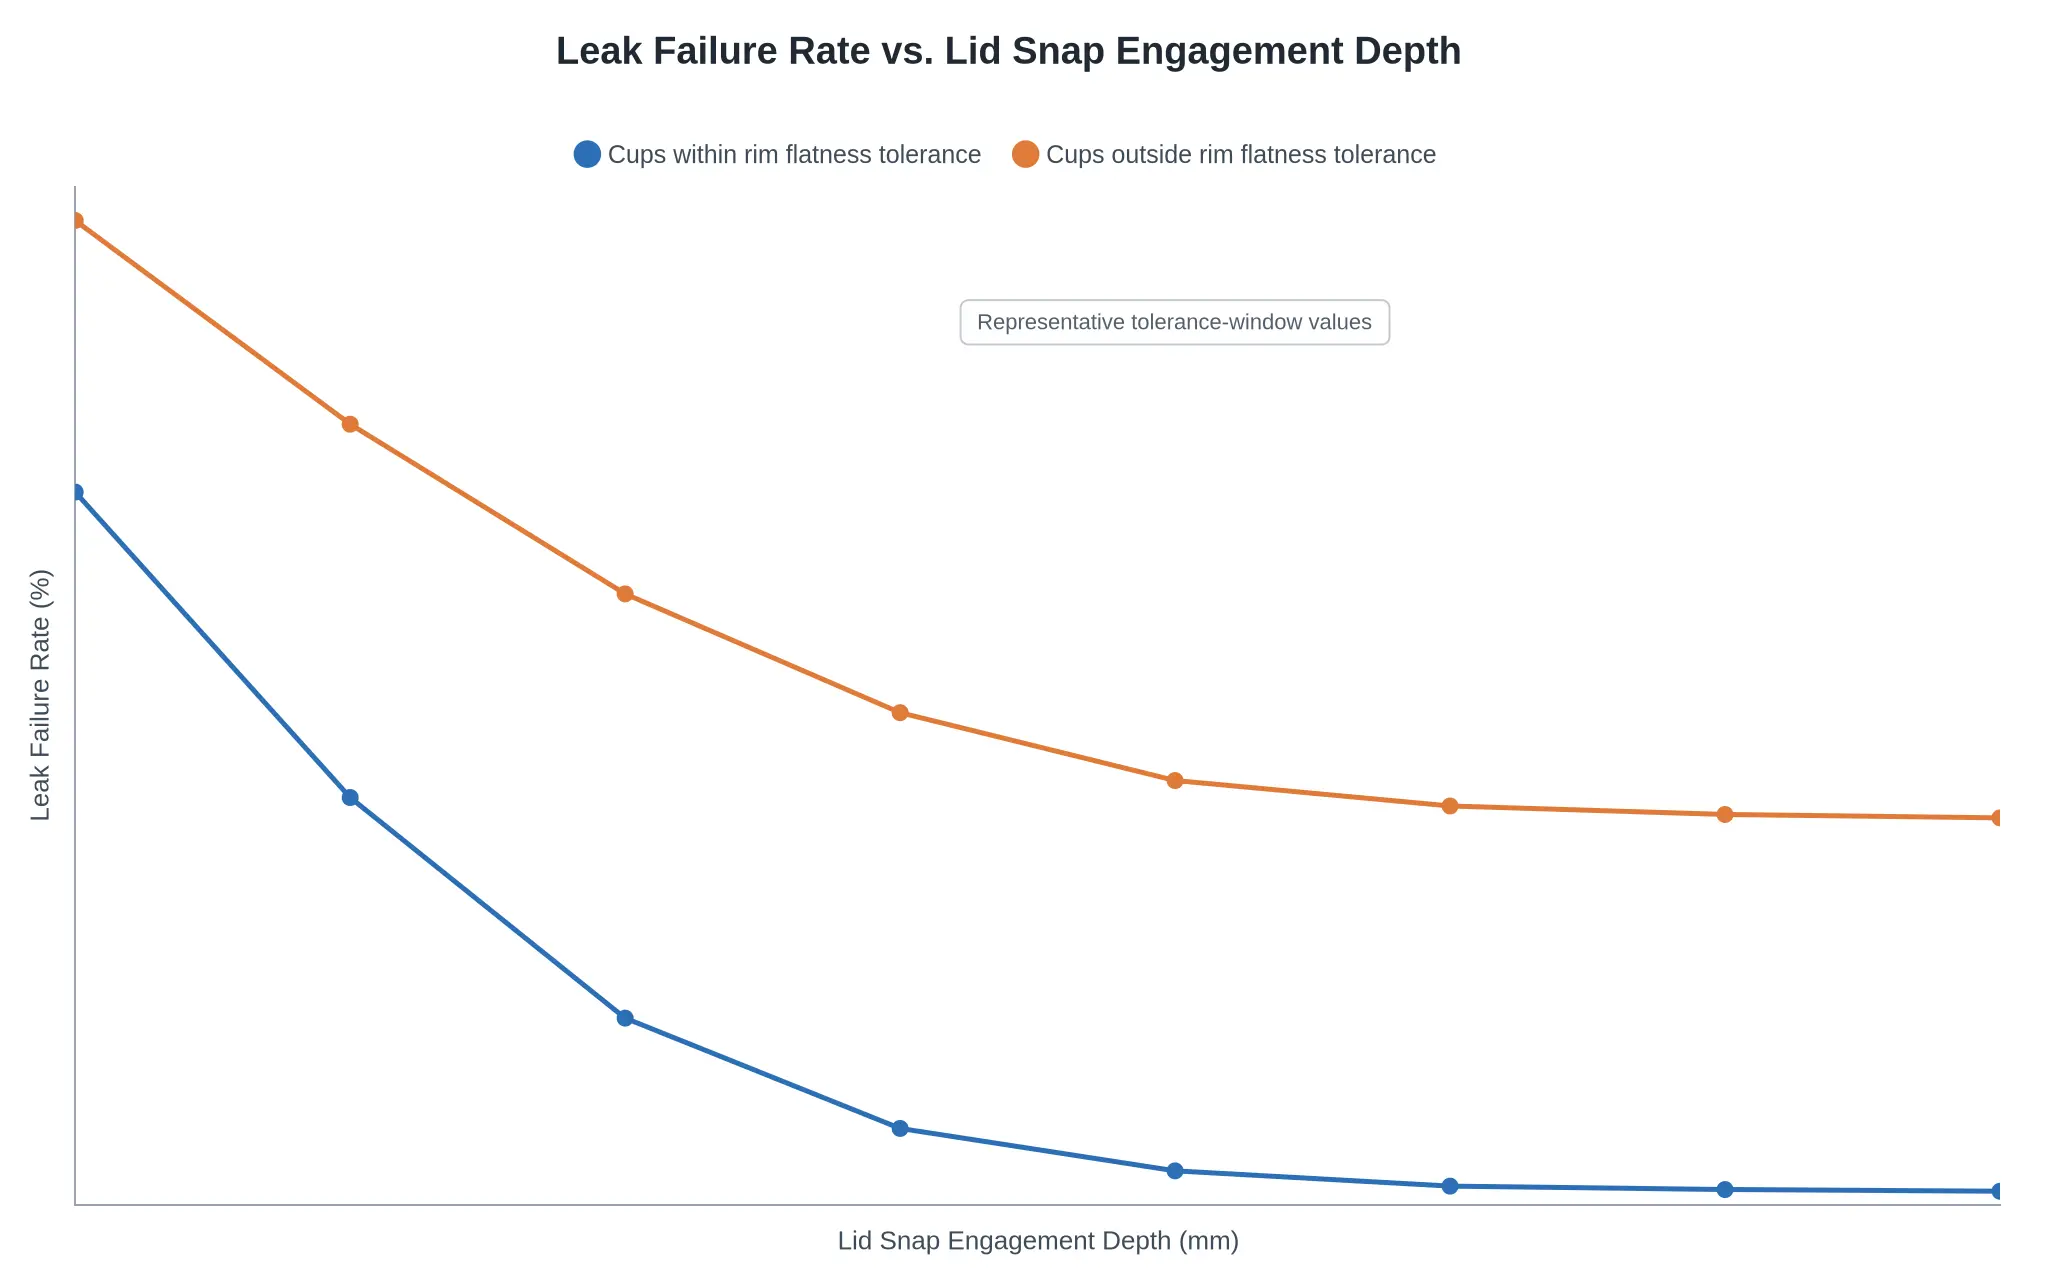
The horizontal axis is lid snap engagement depth in millimeters: how far the lid skirt travels down the cup rim before the retention bead locks under the rim lip. The vertical axis is leak failure rate in percent, measured as the share of filled cups showing sauce migration at the seam after a 30-minute static hold.
The chart plots two series, and the distance between them is the useful part.
- Cups within rim flatness tolerance (blue). The curve falls steeply. Going from 0.2 mm to 0.8 mm of engagement takes the failure rate from about 42% to under 5%, and past roughly 1.0 mm it flattens at 1-2%. That is where a well-tooled cup and lid pair should sit.
- Cups outside rim flatness tolerance (orange). It starts higher, falls more slowly, and levels off near 23%. Engagement beyond about 1.0 mm buys almost nothing; from 1.0 mm to 1.6 mm the curve is nearly horizontal.
That plateau is the point of the chart. Once flatness is out of spec, snap depth stops being a lever. The seal loses contact along a wavy rim land, so extra engagement only presses the lid harder against a surface that was never planar to begin with.
Representative Tolerance-Window Values
The numbers above are representative tolerance-window values, not data from a specific brand or production lot. They are constructed to show a mechanism that quality and procurement teams see repeatedly on the line.
| Engagement depth (mm) | In-tolerance leakers (%) | Out-of-tolerance leakers (%) |
|---|---|---|
| 0.2 | 42 | 58 |
| 0.4 | 24 | 46 |
| 0.6 | 11 | 36 |
| 0.8 | 4.5 | 29 |
| 1.0 | 2.0 | 25 |
| 1.2 | 1.1 | 23.5 |
| 1.4 | 0.9 | 23 |
| 1.6 | 0.8 | 22.8 |
Read the last four rows together. Doubling engagement from 0.8 mm to 1.6 mm takes an in-tolerance cup from 4.5% to 0.8%, a gain of 3.7 points. The same change on an out-of-tolerance cup moves 29% to 22.8%: 6.2 points, most of it won before 1.0 mm, and paid for with insertion force, lid distortion, and operator fatigue.
What This Means on the Floor
- Fix flatness before chasing engagement. A failure rate stuck in the low twenties regardless of lidding-station settings puts you on the orange curve. Back the press off and audit the rim land with a dial indicator or a straightedge and feeler gauge.
- Target a window, not a maximum. The in-tolerance curve shows diminishing returns past 1.0 mm. Pick a band that reliably clears the retention bead without crushing the rim.
- Log the two measurements separately. When leaks spike, one number drifts and the other holds, which points at tooling, resin, or cooling rather than lidding pressure.
- Keep lid and cup in the same tolerance family. A lid designed for nominal rim thickness cannot compensate for a rim that wanders outside its flatness window. If lids are being standardized across several cup formats, review compatible paper lids and closure formats to see how engagement geometry is specified per format.
What the Curves Say to Do
Snap engagement is a powerful variable inside a tolerance-compliant system. Both curves in the chart start steep and then diverge permanently, one settling near 1% and the other refusing to drop below about 23%. Lid pressure does not rewrite geometry. Solve flatness first, then tune engagement onto the blue line.
Rim Flatness: The Root Cause That No Lid Pressure Can Fix
When a clear cup weeps at the seam, the reflex is to “press harder” or “buy a lid with a deeper snap.” Sometimes that works. Often the failure is not in the lid at all but in the geometry of the cup’s own sealing land.
What Rim Flatness Means in Practice
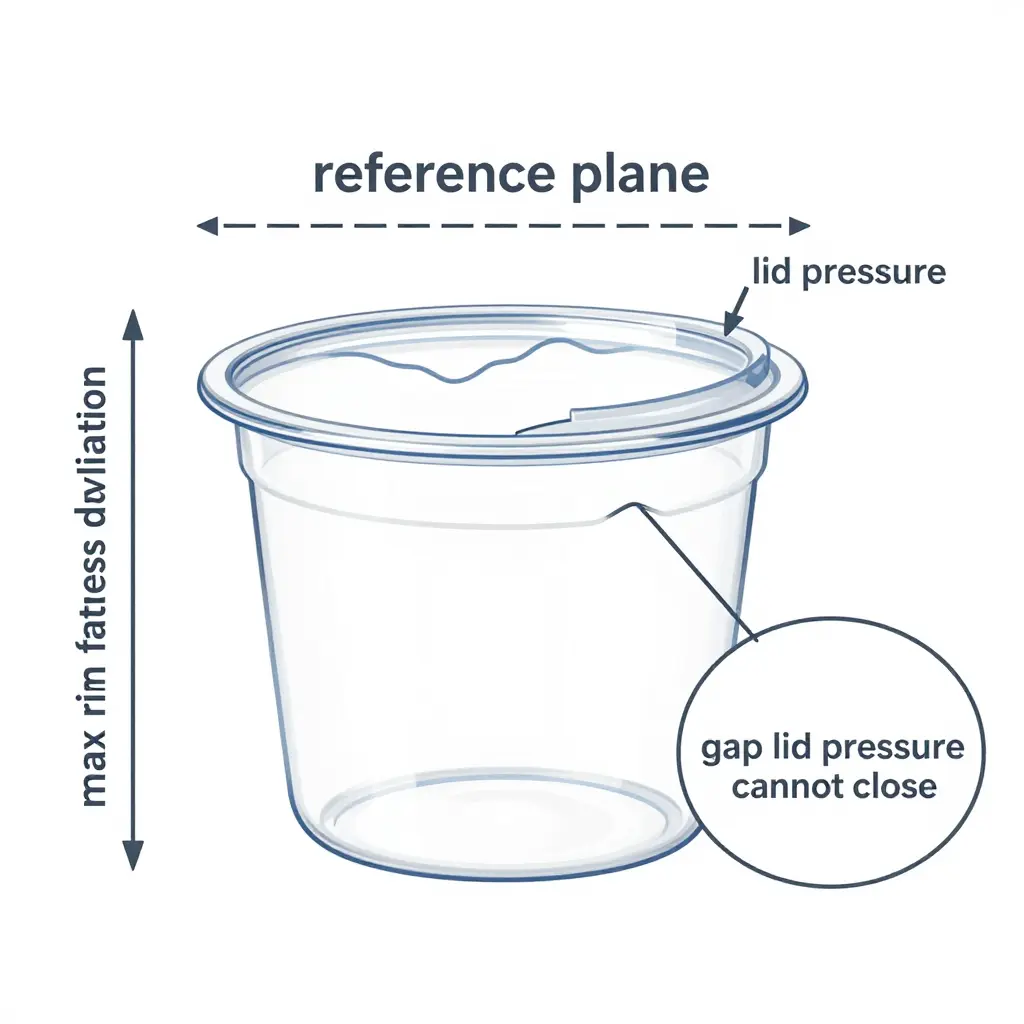
Rim flatness is the deviation of the sealing land, the top annular surface the lid skirt grips and compresses, from a single reference plane. Put a rigid flat plate across the mouth of the cup. A flat rim touches it everywhere along the circumference; a rim that is not flat touches only at the high points.
That single fact explains the leak. The lid is a semi-rigid shell. Snapped down, it lands on the highest point of the rim first and then bridges the low spots instead of conforming to them. Snap depth can be fully engaged, the lid can feel tight, and an operator can press with both thumbs; pressure still travels through the high points and never reaches the low ones. What remains under a low spot is an open channel between product and outside air. In a 1 oz portion cup, a channel a few hundredths of a millimeter deep and a centimeter long is enough for a thin sauce to creep, wick, and eventually drip into the bag.
Snap depth governs retention force. Flatness governs whether a seal exists at all, which is why the two have to be diagnosed as a pair.
Where Poor Rim Flatness Comes From
Rim flatness is rarely a design error. It is usually a process or handling artifact, and it tends to show up as lot-to-lot variation rather than a constant defect.
- Mold tooling wear and mismatch. The rim is formed between the cavity’s land and the stripper or lip ring. Worn, polished-out, or misaligned tooling produces a rim that is out of plane by the same amount on every shot, a consistent deviation that is easy to confirm by checking several cups from one production run.
- Uneven cooling and shrinkage in thin-wall PP or PET. Thin walls cool fast and unevenly. If one side of the cavity runs hotter, or the cooling channels are asymmetric, the rim shrinks differentially and pulls out of plane. PP is more forgiving than PET, which is stiffer and more prone to locking in molded-in stress.
- Ejection distortion. A stripper plate that pushes unevenly, or ejector timing that is too early while the rim is still soft, bends the land permanently.
- Stack load and nesting deformation in transport. Cups ship in tall nested sleeves, carrying their own weight in a hot trailer. Rims take that load through a thin cross-section and creep. Cartons crushed at the bottom of a pallet are a classic source of rim-flatness complaints.
- Hot-fill or high-temperature storage creep. Filling with a hot sauce, or storing pallets in a summer warehouse or near a kitchen line, relaxes oriented polymer and lets the rim sag. Creep is cumulative: a cup that measured flat at the filler can be measurably off after a week at 45 °C.
- Rim-curl inconsistency. The rolled edge has to be uniform in diameter, height, and roundness. A curl that is tight on one arc and loose on another changes the effective sealing-land geometry and the interference fit with the lid skirt.
How to Measure Rim Flatness
Measuring rim flatness needs a flat reference and a way to trace the rim, not a laboratory. Sample at least six to ten cups per lot and condition them at room temperature, because a warm rim reads differently from a cooled one.
- Clean and stabilize. Wipe the rim free of sauce, oil, and mold release, then let the cup sit at 20-23 °C for at least 30 minutes.
- Establish the reference plane. Place the cup upright and unsqueezed on a granite surface plate or a flat glass sheet. Alternatively, invert the cup and support it on a certified flat plate so the rim faces up.
- Set the gauge. Mount a dial indicator, or a digital indicator with 0.01 mm resolution, on a rigid stand so the stylus contacts the center of the sealing land rather than the outer curl edge or the inner wall.
- Zero on the highest point. Rotate the cup slowly by hand or on a turntable, identify the maximum reading, and zero the indicator there.
- Trace the full circumference. Rotate a full 360° at a steady rate and watch for a continuous trace rather than isolated spikes.
- Record the maximum deviation and its location. Log the total indicator reading in millimeters, note the angular or clock position of the low point, and photograph the trace if an optical comparator or vision system is in use.
- Repeat across samples. Compare the deviation range and the position of the low spot between cups. A low spot in the same clock position on every cup points to tooling; a random distribution points to handling, stacking, or thermal history.
- Confirm with a functional test. Fill with the actual product, lid, invert, and hold for 30 minutes over a white surface. Flatness readings only matter if they correlate with visible leakage.
Typical Tolerance Targets and How to Set Them
There is no universal rim-flatness number. The right target comes out of what is inside the cup: the hydrostatic head pushing product against the seal, and how easily that product flows through a capillary gap, which depends on viscosity and surface tension. A water-thin sauce climbs and wicks through gaps that would hold a thick paste indefinitely. Higher fill levels raise head pressure and put the liquid closer to the land.
| Content type (approximate viscosity) | Typical fill level | Suggested max rim flatness | Notes |
|---|---|---|---|
| Soy sauce, vinegar, hot sauce (1-100 cP) | 85-90% | 0.15 mm (0.006 in) | Tightest target; wicking is the dominant failure mode |
| Ketchup, ranch, BBQ, dressings (1,000-10,000 cP) | 75-85% | 0.25 mm (0.010 in) | Standard QSR sauce target |
| Mayonnaise, paste, thick dips (50,000 cP+) | 70-80% | 0.35 mm (0.014 in) | Self-sealing behavior buys tolerance |
| Rim curl height variation (all contents) | – | 0.20 mm max | Governs lid skirt engagement |
| Roundness / concentricity of land | – | 0.25 mm max | Prevents localized pinch points |
Treat the flatness targets as starting points, and tighten them if the product ships through hot climates, pallets stack high, or the lid style has a shallow snap. The viscosity figures are approximate, and a shear-thinning sauce reads differently on a viscometer than it behaves in a cup. When a flatness threshold and lid geometry are specified together, review the sealing land and lid fit of the whole cup family rather than one SKU, for example the lid and cup formats in the paper cup range.
Chronic “lid leak” complaints often come down to a flatness specification that was never written down. Measure the rim, put the number into incoming inspection, and the argument about snap depth gets much shorter.
If a cup leaks while the lid is fully snapped and visibly seated, stop adding pressure and start measuring the land. A rim that deviates from a single reference plane leaves a gap that no amount of thumb force or extra tape will close.
Diagnostic Matrix: Rim Flatness vs. Lid Snap Depth
Before swapping lids or blaming the resin, measure the cup. Find the row for the rim flatness you measured and the column for how the lid actually snapped down, then work from that one cell: the symptom you should be seeing, the most probable cause, and the correction to make on the line.
Table 1. Diagnostic matrix for clear plastic condiment cups: matching rim flatness condition (rows) to lid snap depth condition (columns) to isolate lid-seam leak causes and fixes.
| Rim flatness \ lid snap depth | Full engagement | Partial engagement | Insufficient engagement |
|---|---|---|---|
| In tolerance | Symptom: dry seam, no leak. Cause: seal intact, no fault. Action: hold current spec; record as baseline. | Symptom: slow weep at one spot. Cause: lid cocked by stacking load or hand pressure. Action: re-seat lid squarely; audit capping motion. | Symptom: fast leak, visible gap. Cause: mismatched cup/lid SKU or wrong lid diameter. Action: verify part pairing; switch to correct lid. |
| Marginal (micro-waviness) | Symptom: usually tight, seeps under squeeze. Cause: high snap force masking slight warp. Action: tighten QC sampling; add squeeze test to batch checks. | Symptom: leak after 10-15 min, drops at seam. Cause: low snap force cannot flatten the wave. Action: increase engagement depth; review resin stiffness. | Symptom: continuous seep, lid rides up. Cause: two adverse tolerances stacking. Action: quarantine lot; re-qualify lid spec. |
| Out of tolerance / warped | Symptom: leak at one point opposite snap start. Cause: ovality or warp blocks uniform contact. Action: hold lot; check cooling, nesting and stack warp. | Symptom: broad seeping film around seam. Cause: warp plus shallow engagement. Action: scrap lot; revert to verified supplier. | Symptom: gross leak, lid pops off. Cause: closure physically non-functional. Action: stop line; run full dimensional audit. |
Confirming the Diagnosis
Print the cell you suspect and prove it before changing the spec. Take 25 cups from the suspect lot, fill them with water or sauce at service temperature, seat the lids the way staff actually seat them, invert each cup, add a light top weight, and squeeze the body. Wipe the seam with a dry white tissue and look for a wet line or color transfer. Then check rim flatness with a feeler gauge on a flat plate and snap depth with a caliper across the seated skirt. If the numbers land in a different row or column than your visual guess, trust the numbers. Programs that also review closure formats across the wider range can compare paper lid options alongside plastic lids so the same snap-depth logic carries over.
Rim flatness problems look like a lid fault, and snap depth problems look like a cup fault. The matrix exists to stop you from replacing the wrong part.
Reading the Cross-Section: Where the Seal Actually Forms
Leak complaints get blamed on a “bad lid,” but the cross-section below shows why that verdict is usually incomplete. Two variables decide whether a cup stays sealed: the geometry of the rim and how far the lid bead travels down over it.
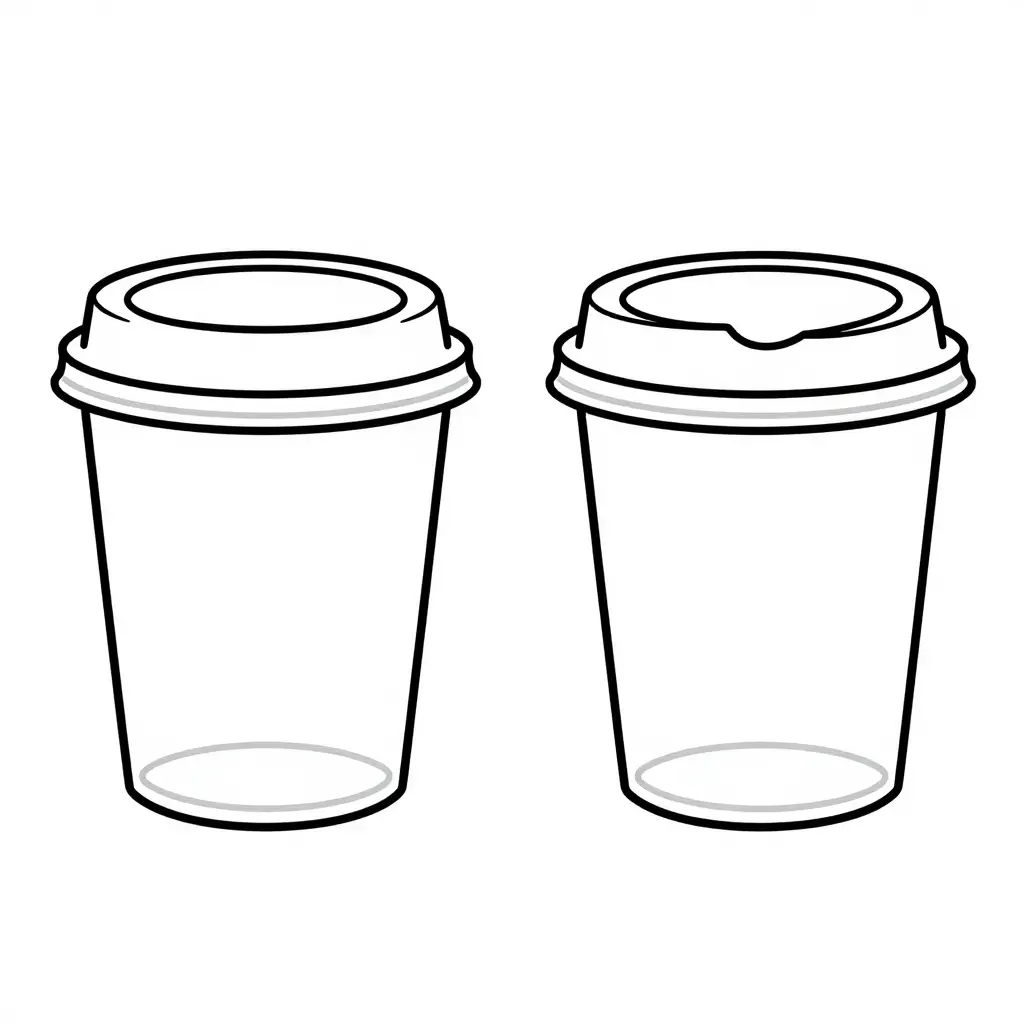
Rim flatness determines whether contact stays continuous across the sealing land. Lid snap depth determines whether the bead reaches full engagement. Neither substitutes for the other.
Left panel: full engagement. The skirt bead has passed completely under the rim bead, and the lid’s inner sealing land sits flush against a flat, undistorted rim face. Contact runs continuously around the circumference, so there is no path for sauce to migrate.
Right panel: shallow engagement. The bead has only partly climbed over the rim, so the lid sits high. A capillary gap opens at the seam, and that narrow void is enough for an oil-based dressing to wick outward under normal handling vibration or a light squeeze.
What the two failure modes look like on the line
| Symptom observed | Likely root cause | Corrective direction |
|---|---|---|
| Lid spins or rocks after pressing | Insufficient snap depth | Verify cup/lid tooling match and press force |
| Lid seats but weeps at one arc | Rim flatness deviation (warp, ovality) | Check rim dimension and cooling/warp control |
| Leaks only on filled, stacked cups | Rim deflection under load | Review rim thickness and stack height limits |
| Leaks on every cup in the case | Lid resin or bead dimension drift | Quarantine lot, verify incoming lid dimensions |
Across a mixed packaging program, it also helps to compare the cup and lid system against matching lid options that specify engagement depth as a controlled dimension rather than a nominal tolerance.
Fix the seam by measuring both halves of the joint. A perfectly molded lid cannot seal a rim that is not flat, and a flat rim cannot hold a lid that never snaps down.
Lid Snap Depth: The Root Cause Hiding Under the Lid Seam
When a stack of clear plastic condiment cups starts weeping dressing onto the prep table, most investigations stop at rim flatness. A warped rim is easy to see against a straightedge and easy to blame on the molding supplier. There is a second geometric variable that fails just as often and hides far better: lid snap depth.
Lid Snap Depth, Defined
Snap depth is the axial distance the skirt engages past the cup’s rim bead, measured along the centerline from first contact with the bead to the final seated position. It is not skirt length, and it is not lid diameter. A 2 oz polypropylene portion cup typically targets roughly 0.6 mm to 1.0 mm of engagement. The window widens with cup diameter, which is why the 16-20 oz specification further on calls for a deeper range. The lid’s internal undercut groove has to land on the bead inside that window every cycle.
The Five-Variable Tolerance Stack
Snap depth is never controlled by one dimension. It is the sum of five independent variables, each of which can sit inside its own drawing limit while the stack pushes the seam out of its sealing window.
- Cup rim diameter at the bead, which drifts upward as the cavity ring wears.
- Lid skirt inner diameter at the undercut, which drifts upward with core wear or downward with excess mold pressure.
- Bead undercut geometry, including bead height, undercut depth, and the blend radius that sets how the skirt ramps over the bead.
- Resin shrinkage differential between lid and cup. Different wall thicknesses, draw ratios, and sometimes different polymers mean the two parts shrink on different curves after ejection and again over the first 24 to 48 hours.
- Tool wear on both components, which slowly rounds the bead, opens the rim, and polishes away the sharp engagement edge that once produced a crisp click.
Shallow Engagement: When Contact Pressure Collapses
When the stack sums short, snap depth falls below target and the interference fit between skirt and bead goes nearly neutral. Radial interference drives contact pressure at the land, so low interference means low pressure, and low pressure means the land no longer resists liquid migration. Sauce creeps under it by capillary action, and hydrostatic head from cups stacked three or four deep in a delivery bag does the rest. The signature is a thin ring of product around the outside of the rim, no visible crack, and lids that lift off with almost no resistance.
Over-Deep Engagement: A New Leak Path
Push the stack the other way and the failure changes. An over-deep snap drives the skirt past the bead and expands the rim beyond its elastic limit. The thin rim section stress-whitens, the chalky line visible on a clear cup under good light, and a hairline crack often follows along the bead root. The leak is then not at the sealing land at all but a fracture through the rim wall. Over-deep lids also grip hard enough that staff pry them off with a thumbnail, which damages the rim further and sets up the next fill to fail.
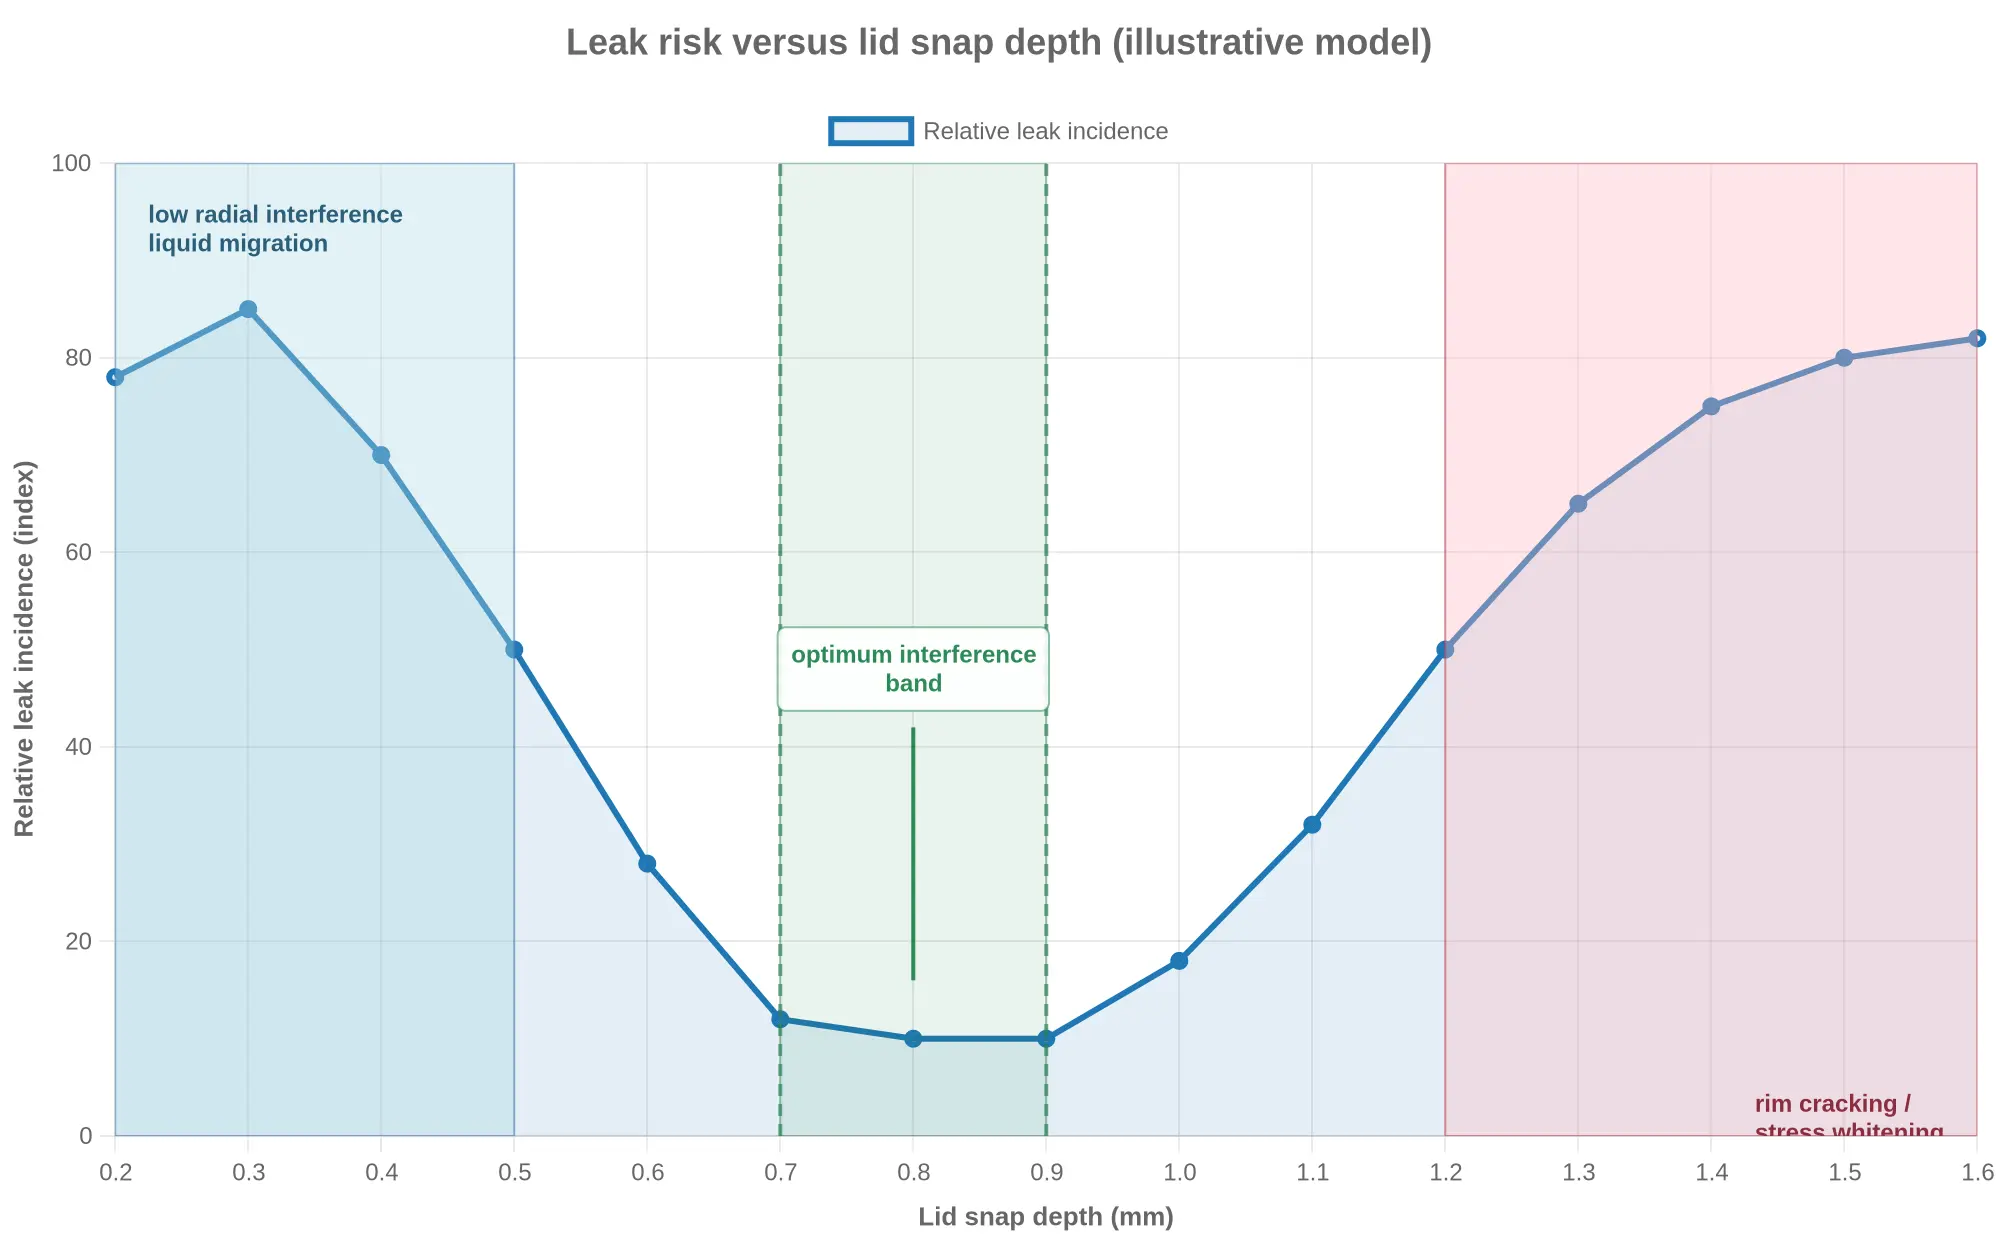
Leak risk is not monotonic. It is lowest in a narrow band and rises on both sides, which is why “a tighter lid is a safer lid” is bad procurement logic.
Measuring Snap Depth on Real Parts
A snap-depth dispute can only be settled by measuring a joined pair. Sectioning is the reference method: pot a sealed pair in resin or freeze it, cut through the diameter on a low-speed saw, polish the cut face, and read bead-to-land engagement on an optical comparator or toolmaker’s microscope. A depth or drop gauge works for production checks by referencing the rim top and the lid’s top plane, though it infers engagement rather than showing it.
| Method | Destructive? | Resolution | Best Use |
|---|---|---|---|
| Sectioning and optical comparator | Yes | Highest | Root-cause disputes, first-article approval |
| Optical cross-section / CT scan | No | High | Sampling, supplier audits, expensive parts |
| Depth or drop gauge | No | Medium | Line-side incoming inspection |
| Press-to-seat force and click retention | No | Low (proxy) | Fast screening of lid lots |
The tradeoff is plain. Sectioning tells the truth about one part and cannot run on every incoming pallet. Non-destructive gauging builds a distribution across hundreds of lids but never shows the actual joint. Most QC programs pair a tightened gauge check with periodic sectioning of the same lot.
Setting a Control Target
Write snap depth into the specification as a joint requirement, not a single-part one. Track cavity dimensions on both tools so wear shows up before the rim cracks, verify shrinkage at every resin lot change, and re-qualify the pair whenever either supplier switches material. For operations that also buy fiber-based formats, the same discipline applies to closure fit across paper-based takeaway packaging, where humidity adds a variable no shop-floor gauge will capture.
What a Leak Audit Turns Up
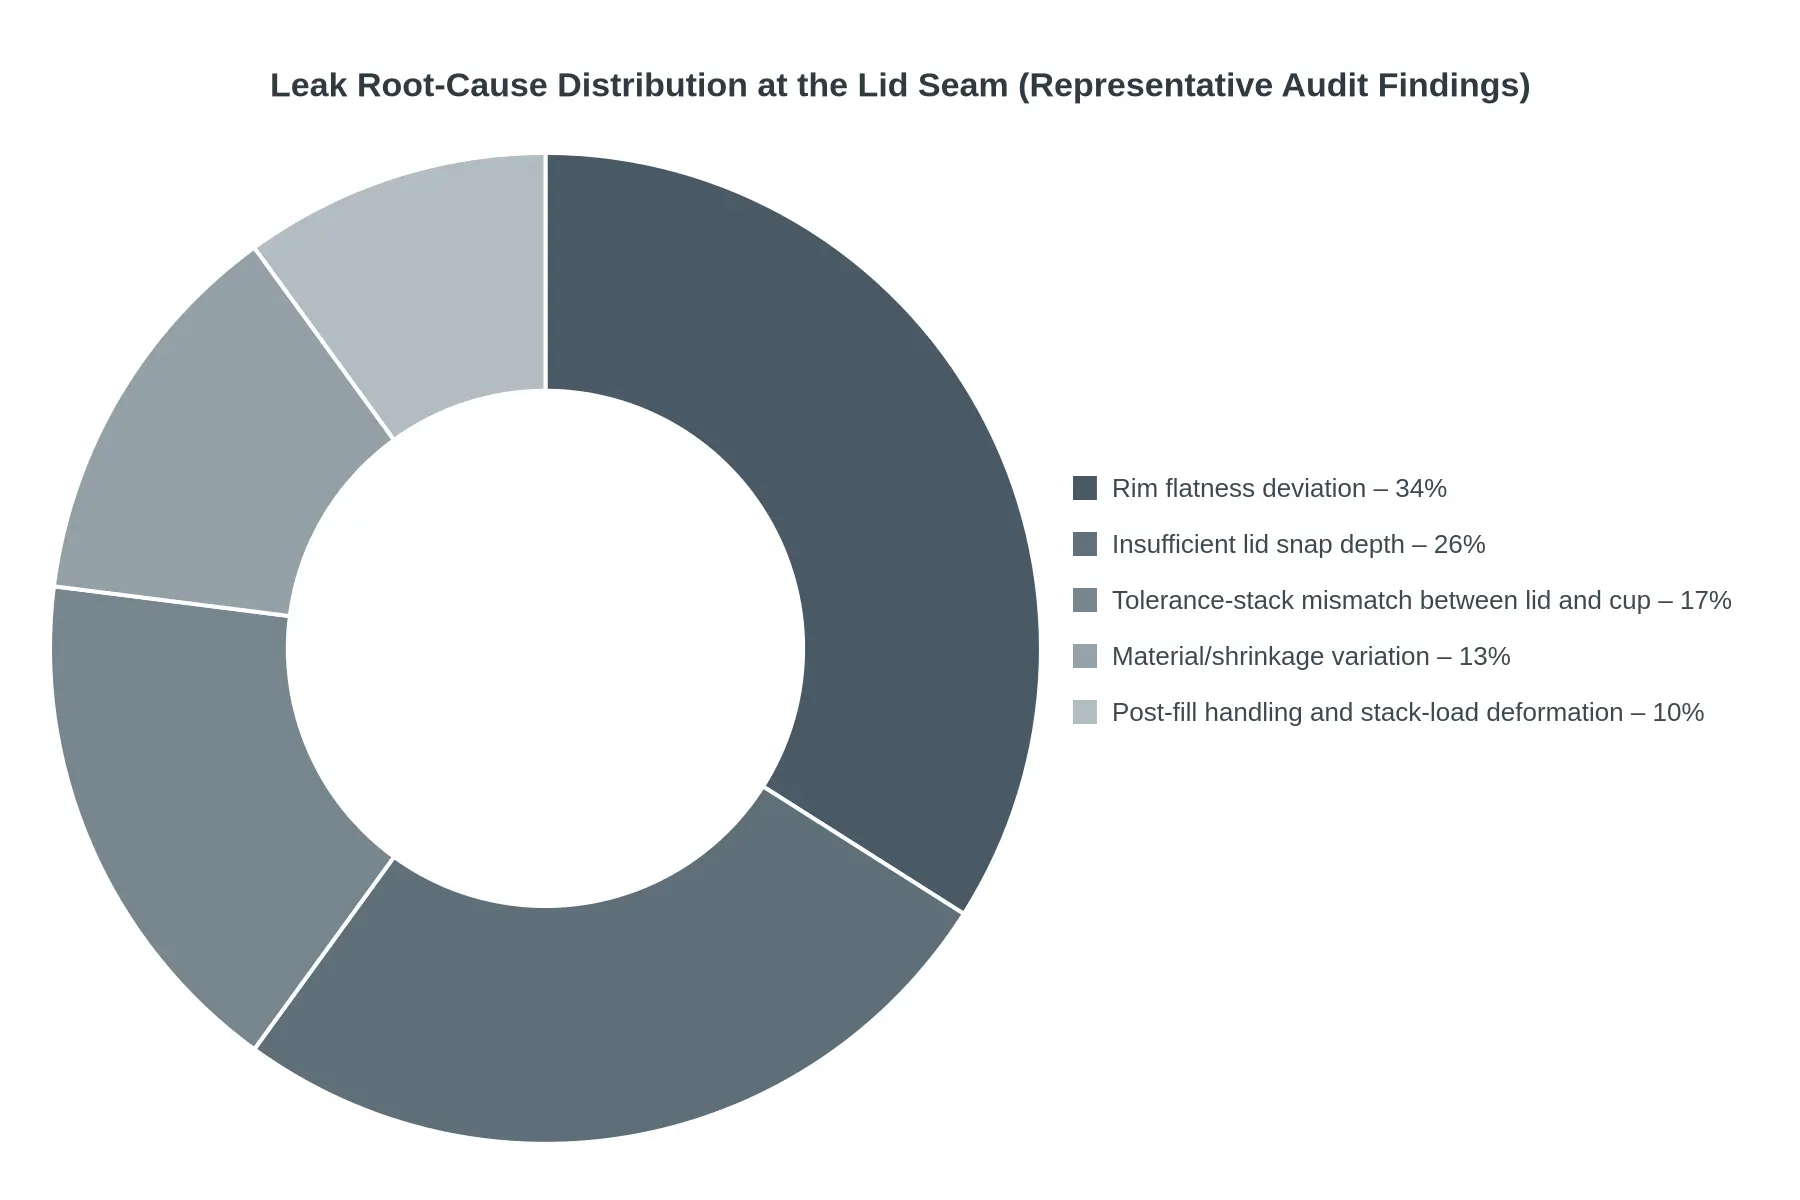
When clear plastic condiment cups leak, the conversation usually starts with “bad lid” or “cheap cup.” A structured root-cause audit tells a more useful story. The doughnut chart below is a composite of audit findings: teardown data, dimensional checks, and packing-line observation across portion cups used for sauces, dressings, and dips. Treat the figures as representative audit findings rather than universal industry statistics, because a leak profile shifts with mold design, resin lot, fill temperature, and distribution handling. The ranking tends to hold even when the percentages move.
Reading the Chart: Two Variables Account for the Majority
The structure of the chart matters more than the exact percentages. Rim flatness deviation at 34% and insufficient snap depth at 26% together account for roughly 60% of failures, a clear majority. Everything else is secondary by comparison.
- Rim flatness deviation, 34%. The sealing land is not truly planar. A rim that waves by even a few thousandths of an inch creates a gap that pressing cannot close, because the lid conforms only to what it touches.
- Insufficient snap depth, 26%. The lid’s bead engages the rim but does not seat past the interference point. The lid feels closed, passes a casual tug test, and still releases under side load.
- Tolerance-stack mismatch, 17%. Cup and lid are each in spec, yet the combined rim diameter, curl thickness, and lid channel width land at opposite ends of their windows. This is a sourcing problem, not a molding problem.
- Material and shrinkage variation, 13%. Resin lot changes, regrind percentage shifts, and inconsistent cooling move rim geometry after the tool has been qualified.
- Post-fill handling and stack-load deformation, 10%. Trays stacked too high, hot product softening the rim in transit, or rough handling that levers the lid loose.
Why Rim Flatness and Snap Depth Compound Each Other
These two failure modes multiply rather than add. A slightly wavy rim paired with a shallow snap leaks far more reliably than either condition alone, because the shallow bead leaves no reserve travel to absorb the wave. That is why single-variable fixes disappoint: a “tighter” lid on a cup with a flatness problem turns a slow seep into a fast one.
A Practical Diagnostic Sequence
- Check flatness first. Establish a baseline on the cup rim with a straightedge and feeler gauge or a dedicated fixture. If flatness drifts lot to lot, that is the first containment action.
- Then verify snap engagement. Seat a lid by hand and measure how far the bead travels past the rim. An audible but shallow snap means the tool needs adjustment, not a new resin.
- Then audit the tolerance stack. Request cup and lid dimensional reports side by side and compare them against mated assemblies rather than individual part prints.
- Only then look at handling. Confirm stack heights, case compression, and fill temperatures before blaming the operator.
| Symptom | Most Likely Root Cause |
|---|---|
| Seepage on one side of the cup only | Rim flatness deviation |
| Lid releases under light side load | Insufficient snap depth |
| Leaks appear with a new lid lot, same cup | Tolerance-stack mismatch |
| Leaks appear with a new resin lot | Material / shrinkage variation |
| Leaks only after palletizing or transport | Stack-load deformation |
If the investigation keeps returning to the same interface, it may be worth validating the whole containment format instead of chasing microns: reviewing alternative cup formats can show whether a different closure geometry suits the fill line and holding conditions better. Either way, start with the rim and the snap. Those two carry most of the risk.
Root-Cause Isolation Procedure: Separating Rim Flatness from Lid Snap Depth
A leak at the lid seam says nothing about which component failed. This sequence moves from symptom to root cause in roughly one shift without guessing.
-
Isolate the suspect lot. Pull every cup carton and lid carton carrying the suspect lot code off the line and tag it “hold for QC.” Record the cup lot and the lid lot separately on the tag. If complaints cluster around one lid carton mated to several cup lots, the lids become the primary suspect; the reverse pattern points to the cups.
-
Sort a defined sample. Draw 30 cups and 30 lids from the suspect lot, plus 30 matched pairs from a known-good reference lot, and condition all of them at 20-25 °C for at least 30 minutes. Standardizing sample size and temperature keeps the leak test repeatable instead of anecdotal.
-
Check rim flatness on the cup alone. Invert each cup on a flat glass plate or surface table and check for rock; measure the largest gap under the rim with a feeler gauge (a typical rejection threshold is 0.25 mm). A cup that rocks or exceeds spec has a warped rim that no lid can seal, which makes it a cup root cause.
-
Check lid snap depth on a joined pair. Seat the lid by hand and measure skirt engagement with a caliper or depth gauge, confirming an audible, fully seated snap at four points around the circumference. Shallow or inconsistent snap depth means the lid never reaches the rim, which points to lid tooling, resin shrinkage, or stack deformation.
-
Run the indicator fluid test. Fill each assembled pair to its rated line with a low-viscosity indicator fluid (dyed water, roughly 1 cP) at 20-25 °C, hold for 10 minutes, and read results in both upright and inverted orientation. Fluid that wicks out within the hold time confirms a true seam leak; a clean pass in both orientations clears that pair.
-
Compare against a known-good reference lot. Test the reference pairs in the same session, orientation, and hold time. If reference pairs pass while suspect pairs fail, the difference is component-driven rather than a filling, handling, or temperature issue.
-
Cross-pair to see which lot the leak follows. Build all four combinations and repeat the fluid test on each.
Combination What a leak here tells you Suspect cup + suspect lid Baseline confirmation of the failure Suspect cup + reference lid Leak follows the cup, so rim flatness is suspect Reference cup + suspect lid Leak follows the lid, so snap depth is suspect Reference cup + reference lid Control pair; a leak here means test error -
Confirm the root cause and release the correct lot. If the leak follows the cup across both lid types, rim flatness is the root cause. If it follows the lid across both cup types, lid snap depth is. If only the suspect-plus-suspect pair fails, the problem is a tolerance stack, so inspect both components and verify the pair against compatible cup-and-lid sets before releasing either lot.
Correct rim flatness first. The cup rim is the sealing datum, so a warped or out-of-spec rim guarantees a leak no matter how well the lid is molded, and fixing it at the forming stage clears every lid currently in inventory. Tightening snap depth on a warped rim masks the symptom and usually returns as a complaint the following week.
Quick Troubleshooting Summary
- Leak follows the cup lot → correct rim flatness (warping, cooling, or tool wear).
- Leak follows the lid lot → correct lid snap depth (shrink, stack deformation, tooling).
- Leak follows the pair only → correct the tolerance stack by tightening both specs.
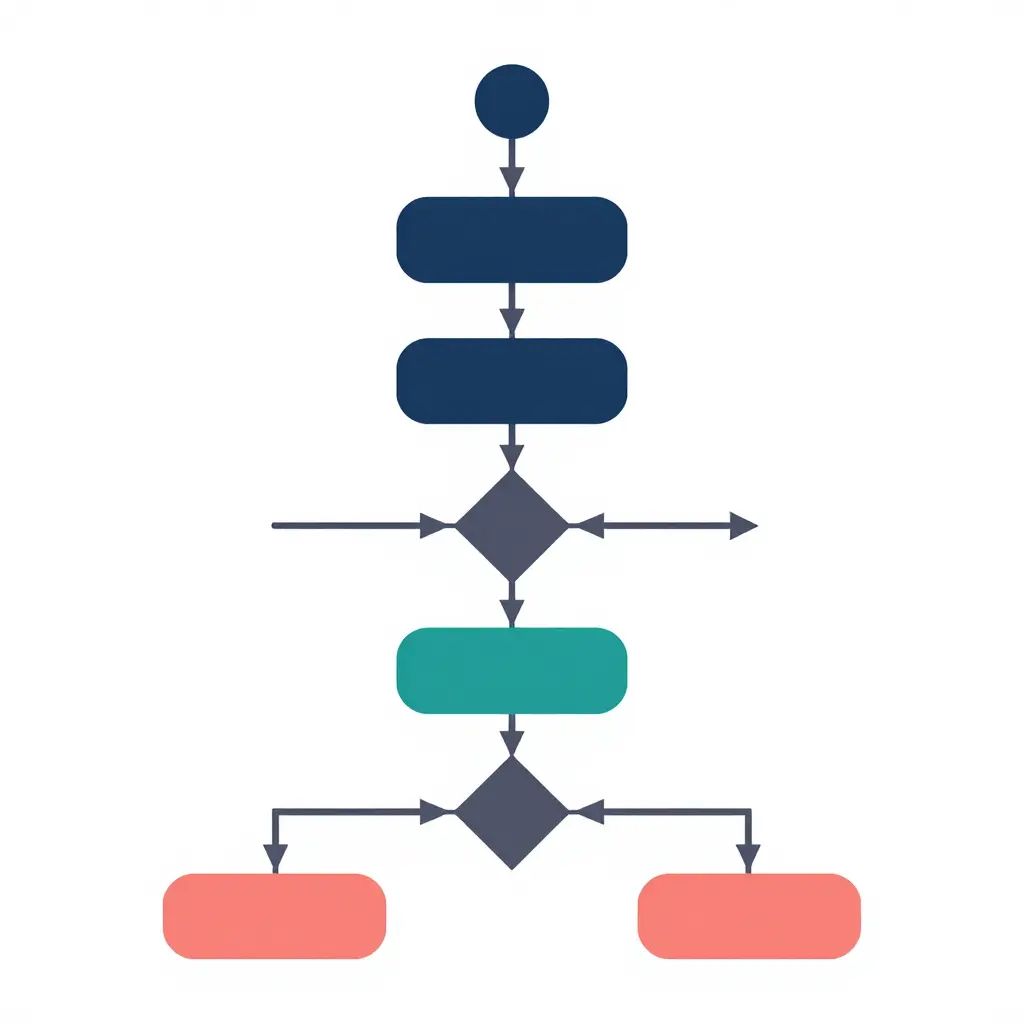
Figure: the root-cause isolation sequence for lid-seam leaks. Isolate the sample, test rim flatness against the decision threshold, then check lid snap depth before assigning the leak to a final category, so each troubleshooting run ends with a traceable conclusion instead of a guess.
Incoming Inspection and Process Control: Closing the Lid-Seam Leak Window
Most lid-seam leaks are not random. They are the predictable result of two dimensions drifting outside the range where the lid skirt can generate enough interference against the cup rim: rim flatness and lid snap depth. The fix is not more operator vigilance at the line but writing those two dimensions into the purchase specification and policing them with fast, repeatable checks at the dock and the filler.
Put Numbers, Not Adjectives, in the Purchase Specification
A drawing that says the “rim must be flat” gives a supplier nothing to control and gives QC nothing to reject against. Every purchase specification for clear plastic condiment cups should state a nominal, a tolerance band, a measurement method, and the instrument class used to verify it. At minimum, capture the following.
| Characteristic | Typical limit (16-20 oz PP cup) | Test method | Sampling |
|---|---|---|---|
| Rim flatness deviation (full 360 degrees) | 0.30 mm max, target 0.12 mm mean | Dial indicator on granite plate, rim supported on reference ring | 13 pcs per lot, AQL 1.0 |
| Lid snap depth (skirt engagement below rim) | 1.8 mm min, 2.4 mm max | Go/no-go depth gauge or digital indicator fixture | 13 pcs per lot, AQL 1.0 |
| Rim OD / lid ID interference | 0.15-0.35 mm | Caliper, 4-point average | 8 pcs per lot, AQL 2.5 |
| Wall thickness at rim | 0.55 mm min | Ultrasonic or sectioned sample | 5 pcs per lot |
| Drop/leak challenge (filled, 1 m drop) | Zero leakage | In-house test, water fill | 5 pcs per shift |
Note the size dependence before copying these limits: a 16-20 oz cup carries a deeper skirt and a larger bead than a 1-2 oz portion cup, so its snap-depth window sits higher on the scale and millimeter figures do not transfer between formats.
State the AQL on the purchase order, name the standard sampling plan (ANSI/ASQ Z1.4 or ISO 2859-1), and specify the normal, tightened, and reduced inspection switching rules. At the AQL-based sample sizes above, both 1.0 and 2.5 carry a zero acceptance number, so one measurement outside the limit rejects the lot. A supplier who cannot quote a numeric rim-flatness limit is a procurement red flag, not a negotiation point.
AQL Lot Sampling for Cups and Lids, Separately
Cups and lids are usually molded on different tools, sometimes at different sites. Sample them as two independent lots, never as a matched set. Draw 13 pieces for critical dimensions at AQL 1.0 and 8 for cosmetic and fit characteristics at AQL 2.5, pulled from at least three cartons and three stack heights in the pallet. Record the actual measurements rather than pass/fail; trend data is what catches tool wear months before a leak complaint. When closures are sourced alongside the cup program, keep the same acceptance criteria across every lid and closure format you buy, so a line change does not quietly reset the baseline.
Gauges and Fixtures That Take Seconds, Not Minutes
Inspection only works if a line lead can do it between pallets. Build or buy three simple fixtures.
- Rim flatness fixture: a machined reference ring that supports the cup at its designed contact plane, plus a single dial indicator on a swing arm. Rotate the cup 360 degrees; max minus min is the deviation. Target cycle time: 15 seconds per part.
- Snap depth gauge: a stepped go/no-go block, or a digital depth indicator with a relieved center, that reads skirt engagement directly after a controlled press-fit. Operators should be able to feel and see the difference rather than interpret a number.
- Interference gauge: a go plug and no-go ring matched to the mating lid ID, for instant OD screening on the dock.
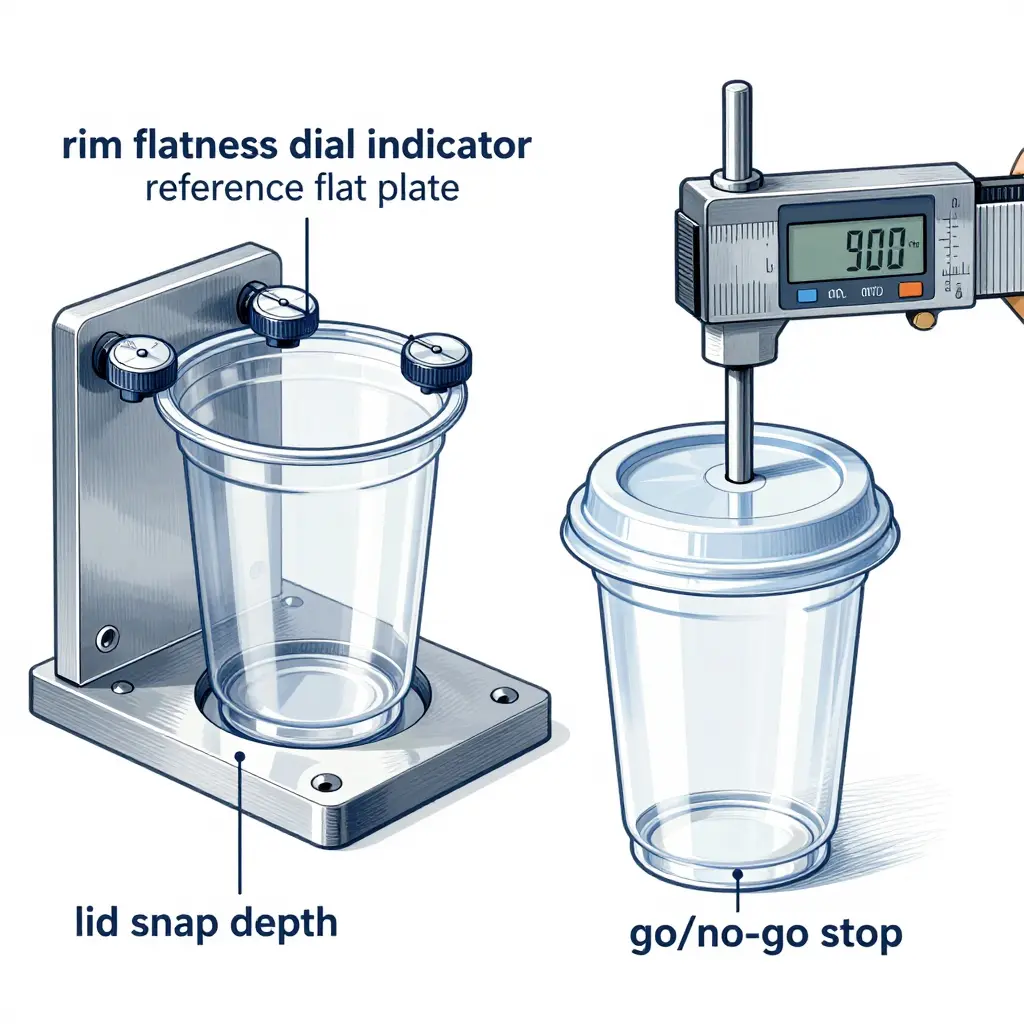
Calibrate each fixture weekly against a master and log the calibration. A gauge that has drifted is worse than no gauge, because it generates false confidence in a leaking lot.
Reference Samples: Your Tolerance Court of Appeals
Retain a signed, dated reference set from the approved first article: one cup, one mated lid, and a filled and sealed assembly. Store them in a sealed bag away from light and heat, and replace them annually or whenever the tool is reworked. When a dispute arises over whether a lot is “close enough,” the reference sample plus a printed measurement sheet settles it in minutes rather than days. Photograph the reference set with a scale bar in frame and attach the photo to the specification so receiving staff can see the intended seam geometry.
SPC Trending: Catch Tool Wear Before the Leak
Rim flatness degrades gradually as core and cavity inserts wear, cooling drifts, or mold plate flatness changes. Plot the mean rim flatness deviation of every incoming lot on an individuals chart with a target mean, a warning limit, and a red line at the leak threshold. A slow upward drift across five or more consecutive lots is actionable: request a tool inspection or tighten incoming frequency before the line starts rejecting product.
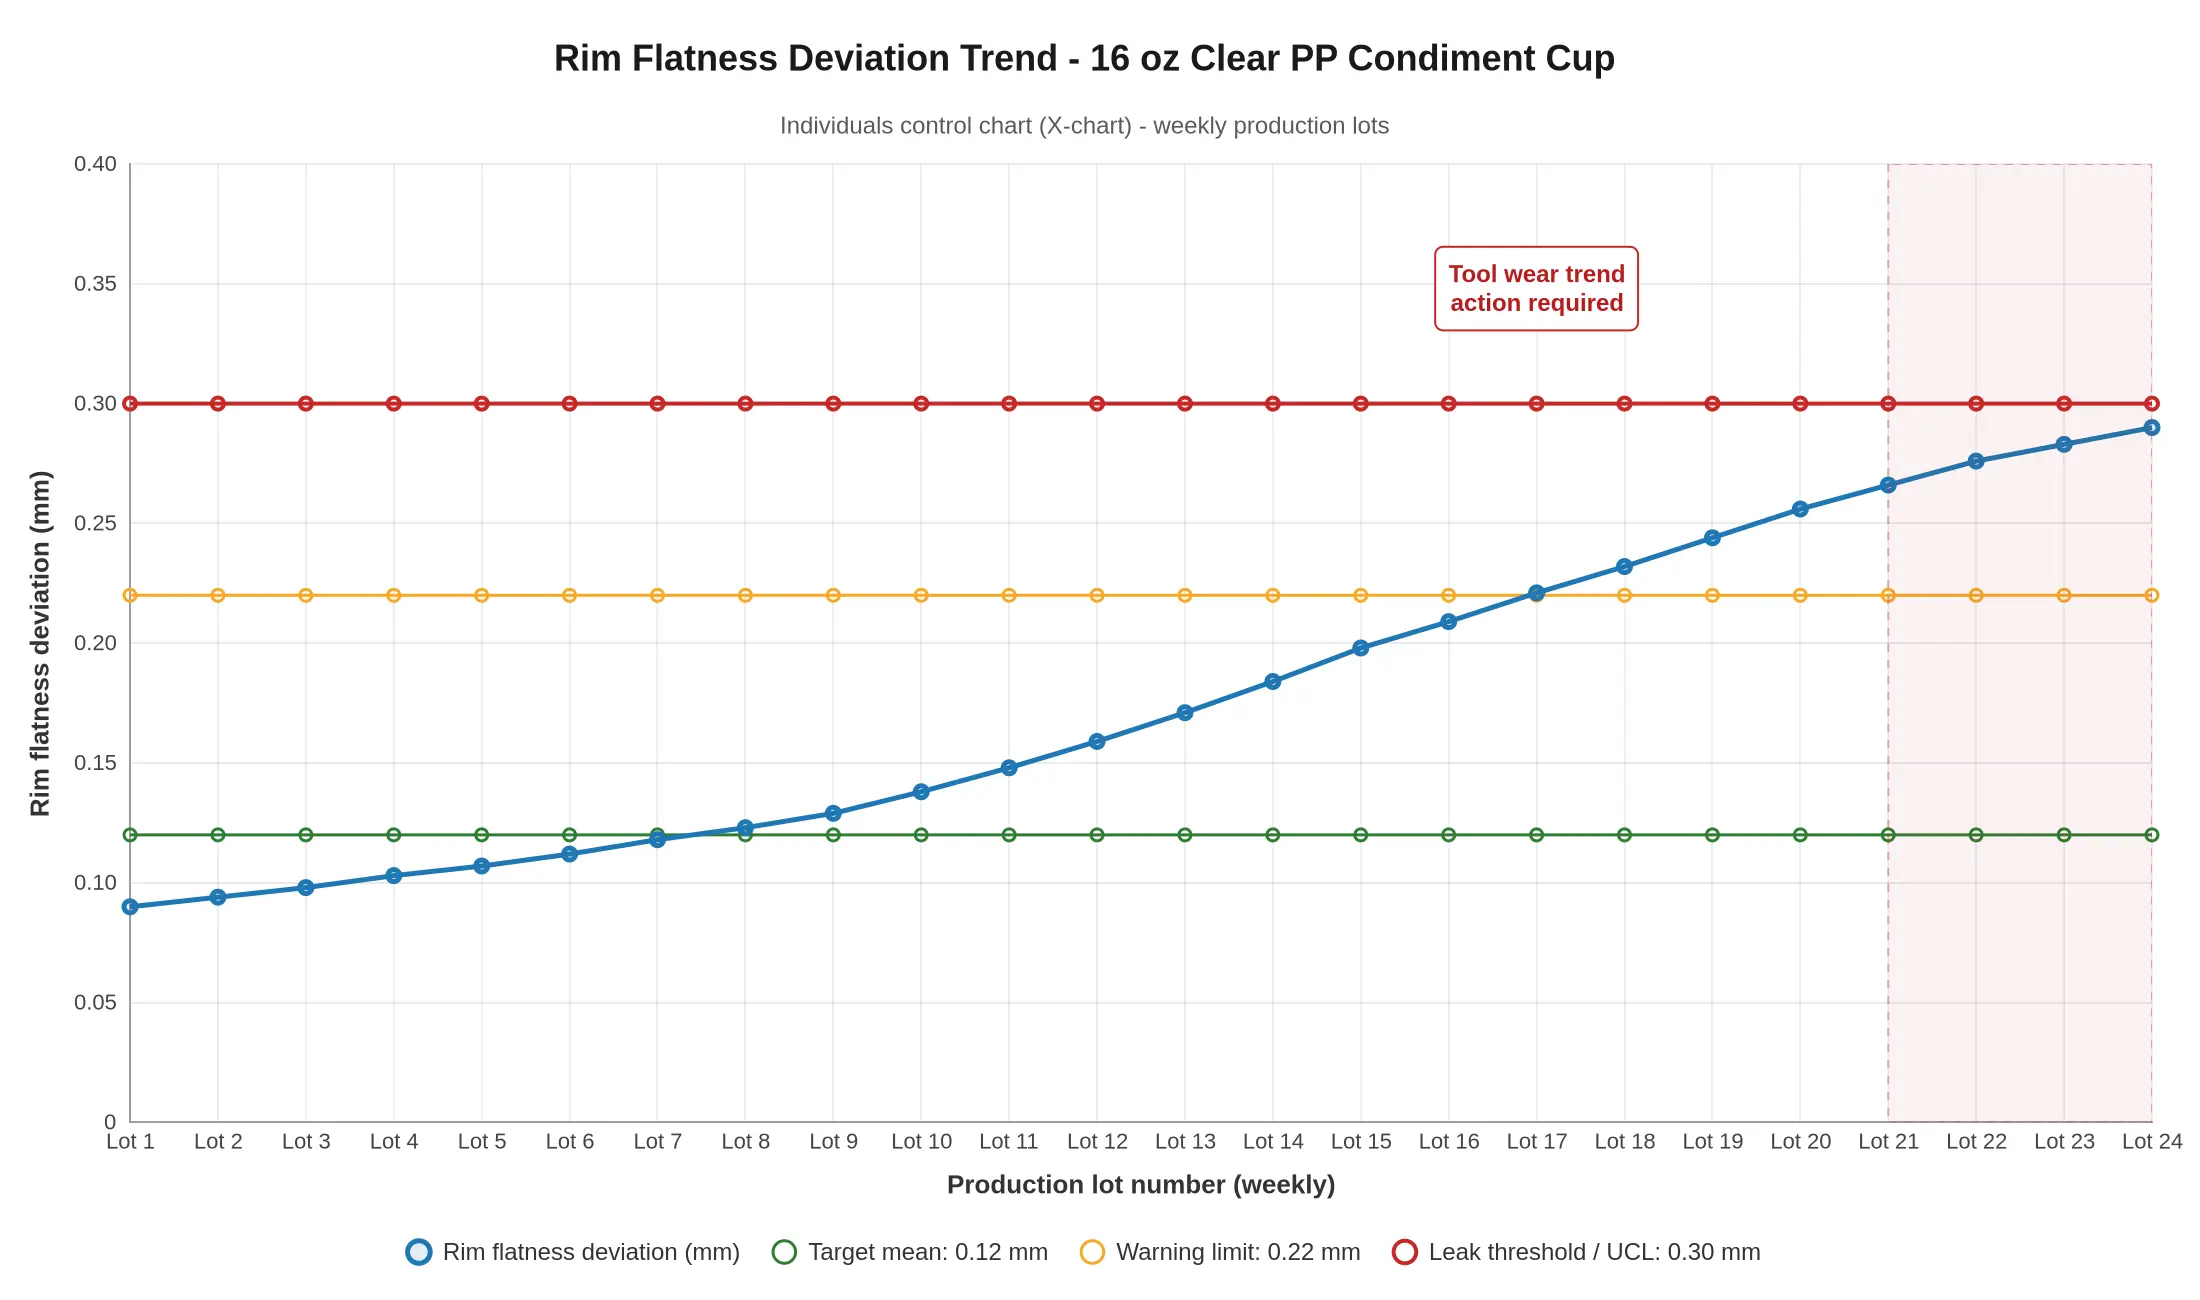
Set the rule now. Two consecutive lots above the warning limit trigger 100% inspection and a supplier corrective action request. Any single lot above the threshold is rejected and quarantined. Keep rejected material physically segregated and labeled, so containment is verifiable rather than assumed.
Storage and Stack-Height Rules
Nesting deformation is an underrated leak cause. Cups stacked too high, or lids stored under heavy loads, take a permanent set that flattens or waves the rim before product reaches the filling line. Publish a stack-height limit per SKU, typically 60-80% of the manufacturer’s rated stack. Require slip sheets between layers and keep pallets on rigid decking rather than the floor or uneven racking. Store below 35 °C and out of direct sunlight, because PP and PET both creep under sustained load at elevated temperature. Rotate stock first-in, first-out and re-inspect any carton with crushed corners.
Match Fill Temperature and Viscosity to the Seam You Specified
Seam performance is a property of the system, not of the cup. A seam that holds cold ketchup will weep hot queso at 75 °C, because heat softens the rim and relaxes the interference fit while internal vapor pressure works the lid upward. Before approving a cup-and-lid combination, run a challenge matrix at the actual fill temperature and at the highest viscosity you plan to pack; thick dressings trap air and load the seam differently from thin vinegars. Document the approved fill temperature window on the work instruction, and require a re-qualification drop test whenever a recipe, fill temperature, or cooling method changes.
Control Points at a Glance
- Receiving: verify the certificate of analysis against the numeric spec, then pull AQL samples from three cartons.
- Dock screening: rim flatness on the fixture and snap depth on the go/no-go gauge, 15 seconds each.
- Line start-up: seal and drop-test five filled cups before the first production case.
- Every shift: five-piece leak challenge at actual fill temperature and viscosity.
- Every lot: log the rim flatness mean to the SPC chart and apply the warning-limit rule.
- Storage audit: weekly stack-height and pallet-condition check; quarantine any deformed carton.
Run these controls consistently and the leak conversation shifts from blame to data, which is where it belongs.
Closing Guidance: Two Variables, Two Inspections
The same fact keeps surfacing: rim flatness and snap depth are independent variables, not two views of one defect. Flatness describes the geometry of the cup’s sealing lip. Snap depth describes how far the skirt travels over that lip and where it locks. A cup can hold excellent flatness and still leak through a shallow snap, and a lid with generous depth cannot rescue a warped rim, because the closure bridges the high points and leaves localized gaps. Correct one and the residual leak rate returns later as intermittent, batch-specific complaints. Both belong on the drawings, and both get inspected separately.
Prioritized Actions for Operators
- Confirm full seating before dispatch. Press the lid down around the entire circumference until the snap is felt or heard at every point. A partial snap reads in service exactly like a shallow snap depth.
- Respect the fill line. Keep product below the rim flat. Sauce sitting on the sealing surface defeats both halves of the seal.
- Quarantine and separate suspect lots. Record cup lot and lid lot independently, since the leak may come from either component.
- Stop force-fitting mismatched combinations, including lids pulled from another supplier’s stock.
Prioritized Actions for Packaging Engineers
- Tolerance both dimensions separately on cup and lid drawings: rim flatness as a profile tolerance, lid snap depth as a dimensional range with a minimum engagement depth.
- Run capability studies per cavity, not per production run, so cavity-specific drift is visible before it reaches the line.
- Use the right inspection method: straightedge and feeler gauge or optical profilometry for flatness, sectioning or a dimension-over-skirt measurement for snap depth.
- Cross cup and lid lots in a designed experiment to isolate which variable drives the observed leak rate.
Related Packaging Categories
The same sealing logic applies across the wider range. Where a paper lid has to mate cleanly with a rolled rim, flatness matters as much as it does on a portion cup. Teams standardizing containment across hot and cold applications often evaluate paper lids, paper cups, and sugarcane cups beside their existing formats, while high-volume sauce and side portions are often moved into paper bowls with matching closures.
Frequently Asked Questions: Lid-Seam Leaks in Clear Plastic Condiment Cups
These are the questions operators and packaging engineers ask most often when they are chasing sauce on the outside of a portion cup. Short answers follow. If you are reviewing closures alongside your cup specs, compare compatible lid specifications before committing to a purchase order.
Can I fix a leaking cup just by pressing the lid on harder?
Usually not. Extra pressing force briefly deforms the lid skirt but cannot correct out-of-tolerance rim flatness or restore lost snap depth. If the seam still leaks under firm, even hand pressure, the mismatch is dimensional. Re-cup the portion or switch to a matched lot.
What rim flatness tolerance is realistic for thin-wall condiment cups?
Thermoformed PP thin-wall cups typically hold rim flatness within roughly 0.25 to 0.40 mm (0.010 to 0.016 in) across the sealing land. Tighter than 0.20 mm gets expensive quickly, and anything looser than 0.5 mm tends to produce seam leaks, especially on 1 to 2 oz sizes. The target that matters is the one your product needs, which depends on viscosity and fill level. The 0.15 mm figure in the tolerance table is reachable on small portion cups, but it narrows the process window and belongs with water-thin products, not as a default.
Does a thicker lid fix shallow lid snap depth?
Only marginally. A heavier lid adds stiffness, but snap depth is set by the cup’s rim profile and the lid channel geometry, not by lid gauge. Over-thick lids often resist seating and pop loose instead. Check channel dimensions against measured rim thickness before buying.
How do I tell whether the cup lot or the lid lot is at fault?
Cross-test them. Mate suspect cups with known-good lids, then known-good cups with suspect lids, and run a 24-hour inverted leak test with the actual sauce. Leaks follow the defective component. Confirm with rim flatness and rim diameter measurements on the cups, and channel depth measurements on the lids.
Do clarity, resin choice, or recycled content affect seam performance?
Yes, indirectly. Random copolymers are softer than homopolymer, so they conform more readily but creep more under stacked load. Clarifying agents raise clarity and usually stiffness as well, so a clarified grade is not automatically the more forgiving choice. Recycled PP varies in melt flow and shrinkage, which shifts rim flatness from lot to lot. Specify resin grade and recycled-content limits for clear plastic condiment cups, then verify both with incoming inspection.